Home Design Work Recognitions For Sale About Me

Friday, September 30, 2011

Gratitude


Hi all! I FINALLY got to my paper & stamps today, it's been over a week since I made anything & I was feeling weird! Also, I wanted to share I was featured at Jingle Belles yesterday for this card! I play so few challenges these days, that it's always a thrill to get picked! Gone are the days I played 5-6 challenges a week, maybe I'll have more time this winter... a girl can dream anyway, right? I showed you in my last post that I just got some SWAP goodies from fellow colourQ designer Kara. I wanted to use some of the things to make her a thank you note & this is what I came up with! I used my old SU set "Autumn Splendor" and stamped the leaves and acorns onto glossy white cardstock with Memento brown ink. Then I used sponge daubers to add color to the images & fussy cut them out. I used one of the tags Kara gave me, some of the ribbon, paper & a button from her too. I stamped "Gratitude" onto the tag with a stamp from this Inkadinkado set "Filigree Fall"

And that's it for me, running out to buy a new microwave, woot woot! :)

xoxo, Noelle


Supply list: paper, ribbon, button: PTI?; stamps: SU & Inkadinkado; inkpads & sponge daubers; tag: Martha Stewart Crafts


Wednesday, September 28, 2011

SWAP goodies :)


Hi all! Sorry for the lack of posts. 'Round here I've been a lean, mean, cleaning/organizing machine! I've cleaned and organized my pantry, my fridge, and one of those really AWFUL kitchen cabinets. You know the kind where you open the cabinet door while simultaneously protecting your head with the other hand, so whatever falls out doesn't hurt you? Yep, one of **those** kind of cabinets. I've been doing a LOT of organizing lately, and (while secretly I'm an organizing freak & I LOVE any excuse to come up with a new system;) it makes our home so much more usable for EVERYONE. Which is really nice :)

I got a "happy package" in the mail the other day & I wanted to share :) The group over at colourQ decided to do a SWAP with each other. Not to buy anything, but just to share things from your stash with someone else. It was a fun idea that Anita had! In all my years and years doing this, I'd never done a SWAP before! So, this was pretty fun for me! I sent a package to LeAnne. And, the other day, I got this VERY COOL collection of goodies from Kara! As that old slogan goes "it's new to you" and I am really excited to get playing with these fun things! 

Well, that's all for me today, I have a really neat home improvement project to show you soon! And, I'll take a break from organizing and projects around the house, and get back into my studio to play with stamps and paper soon! 

Have a great one! :)

hugs, Noelle

Tuesday, September 27, 2011

Vegas Babies scrapbook layout (CQC #104)

Hello, all you papercrafting peeps! I hope you are all doing great! Today is our ColourQ 2nd birthday bash!! Woot woot! That's right, two years since sweet Arielle posted her first colourQ challenge! I have been playing along as a Design Team member since January of this year, and I must say it has been a JOY working alongside this group of incredibly talented, very kind, low-key ladies. I love them ALL & I feel very blessed to have landed in such a cool group. Here is the palette for this week, and because it's a birthday challenge we are asking YOU to CASE (copy & make your own, in case you aren't familiar with that term) a former colourQueen with this palette! Check it! 
I chose to CASE ColourQueen #99, Lynn! Lynn's project was so awesome that she was crowned ColourQueen, the very first time she played! Lynn's was also the first scrapbook page to ever win ColourQueen. I loved the simplicity to her layout, since I struggle with "clean and simple", I thought this would be a good shot for me this week! Here is Lynn's layout that I CASEd
This is Lynn's LO that I CASEd link here.
As I was looking over Lynn's bio, I noticed we have a few things in common. We both have sons named Collin (2 l's), we both married our high school sweethearts, and we both have all boys. And, I didn't even know any of that when I chose to CASE her layout! LOL! ;)

Since the palette included that pinkish Rose Red, I opted to do a more girly page than my traditional boy-friendly layouts. I had this cute pic from the recent girls' weekend I took to Las Vegas in July. I also remembered how I liked the look of masking with the Disneyland Pages I'd done a few months back. I thought it might give the spritzed background a cool look to mask with a few flowers and shaped paper clips peeking out from behind the pic. I also flipped Lynn's layout, to accommodate my horizontal shot. So, I used a brown pen to mark the four corners of where my pic would end up, so I knew where to place the items I was masking. I used some ooooold metal flowers & some shaped paper clips as masks. Then I spritzed with some Log Cabin Smooch Spritz from my stash, moving the flowers around as desired. 
All the paper strips that are punched and layered across the left hand side of the page are scraps from my bin! Yea! I LOVE using some scraps & not having to cut new papers! The final touches were the title stickers, my journaling (I went free-form, like Lynn), and a couple pieces of old SU! hardware I couldn't resist using ;) But, all in all FOR ME **ahem** this is a pretty clean and simple layout, wouldn't you agree? Aren't you proud? And, I love the way the pic takes center stage & I got to use scraps, woot!!

Well, I'm gonna wrap up this marathon post! I hope YOU will come play at our birthday party? Please? Great colors and awesome fun to CASE a former ColourQueen! Hope to see you there! 

xoxo, Noelle

supply list: solid cardstock:SU!; Log Cabin Smooch Spritz; punches: EK Success; sticker letters: October Afternoon; hardware: SU!; patterned paper: MME; textured cardstock: Bazzill; metal flowers: making memories

DUST IT OFF!: Those metal flowers are really old, but this is a fun, FRESH way to use them! Any cool shapes in your old embellishments you might mask with some spray ink?  Hmmm? ;) 


Friday, September 23, 2011

Sure, "owl" decorate! ;)


PUBLIC SERVICE ANNOUNCEMENT: I am not a seamstress! Nor do I claim to be one, so please pardon any rookie mistakes I may have made with this project! ;)

Hey there all, hope you are doing well today. I bought this fabric a couple weeks ago with the intent of making a new Fallish/whimsical table runner for my dining room. I was BOUND and DETERMINED to not let this fabric go by the wayside & forget about it! ;) I really don't care for this table, it was a hand me down from my Mom & (while definitely an improvement from the air hockey table that sat there for 2 years!) it's old & really not my style. So, I always try to make up for that with cute table linens, etc. I altered my boring tab-top curtains about a year ago & made a runner to match. When the runner got thrown in the wash after a recent dinner party, it got ruined. So, I wanted to make a new one & I really wanted a sense of fun in this room! :)

As I announced above, I am really not a seamstress. I do have a machine & I can sew a straight line, but, that's really all. However, through the years I have used my machine to make lots of valances, curtains, pillow covers, etc. So, if you are a professional or experienced seamstress, please try to ignore my screwups. ;)

When I went to school for Interior Design, I got pretty good at figuring yardage for projects. while at the fabric store, I realized that if I just bought an extra half yard of this fabric, that I would probably be able to make some pillow covers, too. So, I did using single strips of fabric & making a sort of "pillow envelope." 


A little sad that I didn't get the pattern to line up on the pillow front, see these are the kinds of things that set a professional apart from me! Also had planned on using some pretty brown buttons that I'd never used on my curtain project, but even though I made the largest buttonholes that my presser foot would allow, they holes were too small for the buttons. So, I found these green ones in my stash, and I think they add to the happy, fun feel I was going for. Also, the original pillow with the original upholstery is still inside, easy to pull out and use just the way it was before, if I don't want these on all the time.

I found these fun tassels on sale at the store where I got this fabric. And, as you can see, I even found a use for those brown buttons after all! I hope you have a great weekend! 

hugs, Noelle


Thursday, September 22, 2011

Operation Christmas Cards

Hi there! I have decided to participate in the Operation Christmas Cards outreach this year! This is the 3rd year for this great event. What you do is send filled out Christmas cards to OCC, and they send them to our troops who are stationed overseas. Many of them don't get holiday mail, so it's a great way to show you care. This will be one card I send, but I am hoping to send at least 10 cards total. The Spotted Canary website (EK Success brands) is helping out with this meaningful project this year! If you register and go here, you can take a free online class that demonstrates how to make 3 different specialty cards. I made this 3D card after taking the class! I've never made a card like this one before, so you never know what you might learn! The snowglobe is heat embossed with silver powder on Kraft paper & then colored in with gold and white markers. The sentiment is accented with a wood snowflake and a fancy brad. This would be cute even as holiday decor, maybe I'll make a JUMBO one for my mantel! :) It will fold flat for mailing, too :) 

I have also realized that this card will work over at this week's Jingle Belles, where they are doing a snowflake theme! I LOVE me a good snowy card whether it be snowmen, snowflakes, or a snowglobe, like here :)

Here's some more pics for ya.....

Well, that's it for me tonight! I've got multiple projects coming together for the next few weeks, as I'll be guest designing at another blog & teaching a class. Stay tuned! :) 

hugs, Noelle

supply list: specialty paper: Martha Stewart Crafts; stamps: Inkadinkado; gold marker: Inkadinkado; white marker: Zig; fancy brad: K&Company; circle punch: EK Success; chocolate brown dye inkpad: silver embossing powder/heat gun/embossing ink

Wednesday, September 21, 2011

Fits to a "Tee" challenge


Hi there! Wanted to share a quick, non-papercrafted project that I made today. :)

I wanted to participate in the "Fits to a Tee" challenge, at one of my fave websites, the Spotted Canary. If you go to this page, you can sign up to take the online class, it's a series of 8 minute videos to watch at your convenience. I couldn't find the cute flower kit where you could make your own flowers for your projects, so I used some premade felt flowers. I cut my gray tee into strips, braided, and stitched the two ends together. Then I stitched on the two flowers. SUPER quick and easy project & with my mane, I can always use a stylish way to keep it out of my face! LOL! I'm also thinkin' that these could be fun, cute, cheap and easy Christmas gifts for some of my buds this year. :) Maybe these or the cute bracelets they show in the video. :) 


That's it for me!! TTFN, will be back soon! :)

xoxox, Noelle

supply list: Jolees felt flowers; gray t-shirt to cut up, needle and thread.


Tuesday, September 20, 2011

Bright Birthday Wishes (CQC #103)


Whew! What a weekend! I had the big event I am a PTO chairperson for on Friday night, then turned around Saturday & had Ev's 4th birthday party! Happy to say that it was all successful, but I was so tired that my Sunday morning run turned into a Sunday morning walk! Really hoping to regain some energy this week, since I don't have so much scheduled, FOR ONCE!

Here is my card for this week's ColourQ challenge!  I love these colors! Poppy Parade, Calypso Coral, Pear Pizzaz, Wisteria Wonder, and White. So pretty & it was fun to make a card with them, since I went a bit more "girly" than I usually can when I scrap. I decided to make a flower card (I know, kind of out of the ordinary for me these days!) Had fun playing with these Mod Flower Inchies Inkadinkado Stamps. I won them in my last prize package from SpottedCanary.com & I hadn't used them yet. Pretty cute, huh? I used an old SU! sentiment stamp from a set called "Wow Flowers." I die-cut and stamped a white piece with a Nestabilities die. I stamped the flower stems a little bit high, as I knew I was going to make some "grass" with my fringe scissors. I cut a Pear Pizzaz piece with the die as well, and trimmed it with my fringe scissors, for the grass, then I adhered it to the white piece. Stamped my sentiment and added a few gems to the flowers. On the center flower, I stamped two different stamps; one with the Poppy ink and one with the Coral, to get a layered look on that one. I found the Coral ink at "full" strength, almost looked the same as the Poppy ink, so I stamped off before I stamped the Coral flowers down, so there was more contrast. I made a mat with the larger Nesties die in the Wisteria color.


For the background of the card, I figured how wide the center section of the die cut piece was. It was 2 1/2" and then that was the same width I made the plaid DP panel. If you want to have your layouts "make sense" that is a good tip for you! I like to create a relationship between each layer of my projects by relating colors, scale, pattern, and the like. Doing something as simple as measuring from point A to B can really give your whole project a more finished look.


Since I knew the center panel was 2 1/2" that meant that the side strips (polka dots) would have to be 3/4" a piece to create the 4" x 5 1/4" background I wanted. I cut those strips from a scrap, and adhered all together on another scrap the same size. I added a little red ribbon to hide the seams. I put my card together, and decided to make a bow for the top. When I started blogging, I used to put a bow on practically every card! LOL, and then I must have gotten sick of them or something, because I stopped! ;) So, I made a layered bow, with ribbons in the challenge colors and topped it off with a Wisteria shade button I found in my "reclaimed" button jar.


Well, that's all folks! I hope you will make some time to come play this fab color combo at the colourQ this week! Go over there and check the beautiful samples my DT buds have for you! Have a great week!

xoxox, Noelle

supply list: stamps: Inakdinkado; dies: Spellbinders; gems; Martha Stewart Crafts & Recollections; ink, solid cardstock &amp sentiment stamp: Stampin' Up!; fringe scissors: Martha Stewart Crafts; patterned papers: My Mind's Eye and October Afternoon; ribbon: The Ribbon Boutique (Hobby Lobby brand) and Offray

DUST IT OFF!: That button is from my reclaimed jar, it was an extra button that came with some capri pants I used to have, LOL!; the dotted paper was a scrap; the coral ribbon is about 8-10 years old

Wednesday, September 14, 2011

Happy Birthday, Ev!!

Happy birthday to my sweet baby Evan today! I am in total disbelief that this little man is FOUR today? I ask you, HOW does that happen? It really does baffle the mind. If you have kids, grandkids, or nieces and nephews, I am sure you know EXACTLY what I mean! Here's my birthday boy! ;)
For his card, I used the same set I used to make his birthday card last year. I actually bought this cute MFT set Little Loveosaurus with him in mind, because his nickname is "Monster Beast" and believe me there are PLENTY of times he's lived up to that nickname too! ;) I saw over at this post on the MFT blog that they are challenging their designers to use NO COLORING for their most recent creations. actually a little bit of a tough challenge considering that most of their stamps are of an illustrative style and just BEG to be colored! Anyway, I thought I would push myself to think a little outside the box and try it as well. I had gotten a fun pack of Jillibean Soup Sprouts journaling circles free with my last Unity order in an olive color. I've actually used several, they are cool! I took the large one with the #4 on it & stamped my Loveosaurus' head. I stamped the "happy birthday" stamp above that & then DID NOT color it in. ;) I layered up some fun MME DPs & die cut a scalloped circle to mat the stamped panel. I punched one of the DP strips with my EK Success Binding Edge Edger Punch, one of my faves for boy projects. I added a Tim Holtz metal 4 tab to my circle & and clear epoxy sticker to a 4 on the DP. Final touch was an olive green bow to pull out the olive green on the journaling circle. 
For the inside, I used a scrap of the train printed paper, because he loves trains & border punched it with a Circles Large Edger Punch. I punched a small 4 from the leftover scrap from the front & popped it up with a 3D dot in the middle "hole" the punch left. I stamped my sentiment & my quick-non colored card was done! I think this post took me longer to write than that card took me to make! LOL, my own fault since I provided all the links! ;) 
Well, that is it for me! The next few days are truly packed, but I hope to get some "craft therapy" time on Sunday! Have a stellar weekend! 

hugs, Noelle


Tuesday, September 13, 2011

Christmas Morning scrapbook layout (CQC#102/CKsketch)


Hi there! Here's my pages for this week's colourQ! Hope you can play along with this super-FAB color combo! Link up over there by Saturday night for your chance to be named this week's colourQueen! :)
I used this great sketch I saw over at Creating Keepsakes Blog. I am not sure if this qualifies as a family page or not, but I think I will send it over there anyway. I started out with the first page, and, since my second photo was not as large as the first, I decided to do a row of snowflakes to the right of the second photo. 
CK Sketch 300x148 Submit
 Picked up these snowflakes recently at Hobby Lobby, as well as some adorable felt deer. They were in the Christmas crafts section of the store, and the snowflakes package had several white and turquoise snowflakes in there! Very budget-friendly, adorable accents!
I added some Celery colored buttons and red bakers twine to the snowflakes on the first page. On the second page I added an old red heart brad to the turquoise snowflake. 
Well, that is all for me today, I hope you will come play with us at colourQ this week! I LOVE this fun combo, may need to make a card for this one, too! :)

Have a stellar day! Hugs, Noelle


supply list: solid cardstock & heart brad: Stampin' Up!; patterned paper: BoBunny; felt snowflakes & green buttons: Hobby Lobby; sticker letters: K&Company; corner rounder: EK Success; journaling paper and circle cutter: Creative Memories; red pen: Zig; crystal snowflake brads: Karen Foster; vellum accent: DCWV; dies: Spellbinders

DUST IT OFF!: The patterned paper is a scrap, the vellum accent is ages old and the heart brad, too. :)

Monday, September 12, 2011

"The Lord is your Sun and your Shield.." (Moxie Fab Square Sketch challenge)


Hey there! Sorry for the blog delay. After breaking his arm AGAIN on Thursday, Ian is feeling better (and went to school today, Yea!) but I am gearing up for ONE HECK of a busy week, so there was a WHOLE LOT of errands and chores to do this weekend.

I haven't done a Moxie Fab challenge in WAY too long! So I was glad I managed to get to this one! This is for the Square Sketch Challenge. I actually submitted some cards for this publication with the sketches, but I hadn't used this one yet. Here's the sketch: 

The rules of Moxie Fab sketches state that a flower can indicate ANY shape on a card. Those strong lines pointing out and up made me think of rays on a sun, so that was my jumping off point for this card. I wanted that feeling in the background, too, so I made this background with "rays" to mimic light coming off the sun into the sky. The way I made the background was this:

1: Cut two identical squares of cardstock to 5".
2: Lay one square on top of the other, fully overlapping each other on a self-healing mat.
3: Using a metal ruler and an xacto knife to cut diagonal lines through BOTH pieces of paper.
4: Arrange and tape together on a scrap piece of paper (also 5" square). Pieces should fit together well if they were cut together.
5: Trim edges as needed.


For the sun, I cut an orange patterned paper into a circle, and matted it with a piece of textured Tangerine Tango cardstock. Then I used my heart punch to make the suns rays, by taping the hearts to the back of the circle. I did the same thing to make sun rays back on this card and on this page. The last thing was my stamping, which I did right onto the card in two places. I LOOOOOVE these stamps from Verve. :) They make me happy. :)

Well, that is all for me today, hope to see you here tomorrow when I unveil a fabulous NEW color challenge for colourQ! I am LOVING these colors for tomorrow! Hope you'll take a peek ;)

hugs, Noelle


supply list: solid cardstock in: Marina Mist, Island Indigo, Pacific Point, Tangerine Tango, and Summer Sun: Stampin' Up!; inkpads in Island Indigo and Tangerine Tango: Stampin' Up!; stamps: Verve; patterned paper: K&Company; large heart punch: SU!/EK Success

DUST IT OFF!: Use your heart punch to make sun rays, trees, or any number of triangular shaped things. Hearts aren't just for Valentines Day anymore! :)

Thursday, September 8, 2011

Halloween card and centerpiece set


Hey all, I'm going to keep this short today as today my oldest son broke his arm for the second time in 4 months. And yesterday, my Grandma broke her pelvis for the second time in 4 months. And my garage door broke, and there is even more, quite the laundry list, actually. But I am too tired to go into it all right now. But lets just say I need to invest in some INDUSTRIAL STRENGTH bubble wrap for my entire family's heads, hearts and bodies right now. Say, about 50 layers of said bubble wrap per person! 
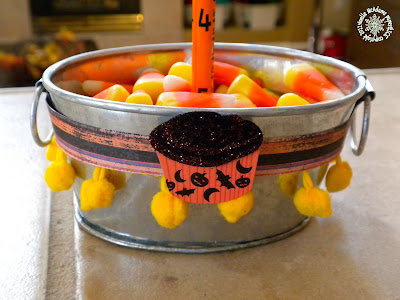
Here is a project I got done yesterday (in an attempt at some craft therapy, before the latest fracture...), something fun for Halloween. I actually made the medallion for a card, and then realized it was too big, LOL! So then I decided to make this cute little centerpiece with some hot glue and an orange pencil. I had this little galvanized bin in my stash. I glued the medallion to the pencil and the pencil to the inside of the bin with a big glob of hot glue. Once it dried it was pretty stable, though floral foam would work well to stabilize it too. I just don't keep that around. Here is an old post on making a medallion. The only thing I do differently now is I use a strong glue (like Crystal Effects) and I weight the medallion down with one of my punches while it dries. Then I add the front part after the rest is SOLIDLY cemented together. More pics....
You can see I added some glass glitter around the edge of this one. 

Decorated the little bin with a sticker, some paper strips, and pom pom trim.

Simple card, the owl is fussy cut, and I punched the moon out. Added some pom pom trim along the side as well. 


that's all folks! Will be back in a couple days when things calm down a little. Take care & WATCH OUT for these kids on skateboards! Actually, take my advice, just keep them off the skateboards all together! 

hugs, Noelle

supply list: stamps: Inkadinkado; paper: K&Company; stickers: K&Company; punches: EK Success; cupcake sticker: Jolees; glass glitter, solid cardstock, pens and inkpads: SU!

Wednesday, September 7, 2011

Trick or Treat


Hey all! here's a card I whipped up the other night during another insomnia bout! I swear, I should change the name of this blog from "paper & ICE" to "Stamping Instead of Sleeping!" LOL ;) This card was inspired by this great card I saw on the gallery at ColourQ 100 last week! Here is a link to Anne's cool card, she was a Courtier last week! I loved the black embossed image on the text background, so that was my jumping off point for this card. I used my new Inkadinkado stamps Trick or Treat and Halloween Night. I used some Halloween text paper and heat embossed the bat and the sentiment in black EP. I stamped the stars in orange dye ink. For the top I made a regular vertical card and cut all but about 1 1/4" off of the front of the card. I border punched what was left of the orange front and then I attached my "card front" to the BACK of that punched orange strip. I layered some stick tape on that orange piece and added some glass glitter to it. The final touch was a cool layered owl sticker, and that's all folks! :) 

hugs, Noelle

supply list: punches, owl sticker, patterned paper: Martha Stewart Crafts; stamps: Inkadinkado; solid cardstock in Pumpkin Pie, Old Olive, and Basic Black:SU!; glass glitter: SU!; heat tool, black EP; orange dye ink

DUST IT OFF!: Pull out that fancy glitter you bought for last years Christmas projects to give your Halloween cards a little extra "oomph!" 

Happy Autumn :)

Happy Autumn! Ok, I know it's not officially autumn until the autumnal equinox, BUT the CO weather has seen an abrupt change in the last few days! We went from a constant stream of 90s to 60s and 70s over the weekend. And, the Pumpkin Spice Lattes have arrived at Starbucks. And, I spent some time this weekend putting up my Fall decorations, which, as a former Interior Design student and merchandiser, makes me VERY happy :) I am kind of a freak when it comes to holiday/seasonal decorating. Holy cow, it's kind of a hobby, though I'm sure some of my family and friends would say "obsession" LOL ;) Anyway, I hold out until the beginning of September & then I go to town. I layer in the Halloween decorations come late September/early October. 
So these pictures here are of my new autumn display I did this year. My hubby built me that pretty white mantel last Fall (the original mantel is still there, it was just that drywall "bump" you see below the crown moulding) and it made my mantel about twice as deep, so I can put things up there, without them falling down. I saw a GORGEOUS display at this fabulous home store that is about an hour from my house. It's called Cozy Cottage (that is a link to their facebook page where you can see pics). It's a little on the high end side, and my taste tends to be a slight bit more "clean" than the uber-rustic feel the store has, but it does have darling accessories and a wealth of awesome ideas. I saw a very similar display to the one I did there, and I saw these adorable grubby lights, which have silicone dipped bulbs, so they look like little candle flames, very pretty and fall-like. If you want some, I will tell you they are far cheaper online, and there's even tutorials to learn how to make your own. I decided it was just easier to order them this time, as I have about 4 other home projects laying in wait, a birthday party and another event coming up, I am too busy! 
So, the display consists of a grapevine garland, a "silk" autumn garland (which has acorns and almost some pine looking boughs on it, very pretty), some sprigs of "berries," and the grubby lights. Then I layered in some pumpkin candles and an little sign I had that says "autumn." See, I told you when I started this blog that there would be some home decorating stuff on here. It only took me 2 years to make good on my promise, but I do have some other upcoming fun projects to show you, too :) I have a Halloween card to show you as well, but this has gotten SO long, I think I'll put it in a separate post. Happy Fall! 
hugs, Noelle

Tuesday, September 6, 2011

More Than the Moon and the Stars...... (CQC101/SFYTT)

UPDATE 9/9: After floating around blogland a little.... here I thought I was being so original and all with my moon card & I just realized that Jen delMuro had posted a moon card just a couple days before this, LOL, I guess great minds think alike! If you want to see a VERY cute card with a moon and an astronaut, go check out her card.


Hi there! Are you ready to get back to the "real world" after the long weekend? Yeah, me neither! ;) I made this card for my hubby who told me I should "make him a card" to convince him to vacuum! Stinker! Yeah, he did vacuum, and before he even knew I was making him a card, too. heh heh... This is for this week's colourQ 101 challenge. I also used a sketch challenge that I haven't played in a while, and have missed, the Sketch for You to Try for September! I loved these colors when I first saw this palette... Blues, greens, purples.... I ask you, WHAT could be better than that? When I first saw this inspiration pic, all I could think about was this old DSP from Stampin' Up! called "Cottage Wall." I used the piece I was thinking of on that small panel, the floral piece. Here's the palette:


Doesn't that fabric in the photo remind you of that DSP, too? I wonder how many creations we will see with that paper this week! ;) I also pulled another (REALLY old!) SU! DSP from the package "Fall Flowers" that had the colors Soft Sky and Old Olive in it, which I felt were pretty good subs for Pool Party and Lucky Limeade. The cardstock/inks I used were the "real" colors however, so you can see it blends pretty well! Here is the sketch: 

For the main panel and the moon I dry embossed with a embossing folder that had been inked with a brayer. The moon is also sprayed with white Smooch Spritz. The stamp was a freebie with my last Unity order. I inked it up with multiple markers. The moon was made by cutting a circle out of the Pool Party that was the same size as the stamped panel, and then punching it partly with a large circle punch. I laid some Razzleberry dotted ribbon along the bottom & my very last acetate star, **sniff sniff* ;) and topped it with a button and some wire. I had thought of using some punched stars on the moon, but in the end, I really liked it the way it was without that. 


Well, that is all for me today! I hope you will come play with these fabulous colors this week at colourQ!! 

hugs, Noelle

supply list: stamp: Unity; cardstock/inkpads: Stampin' Up!; DSP: SU!; pens: SU! and Inkadinkado; circle punch: EK Success; circle cutter: Creative Memories; ribbon: SU!; acetate star: Heidi Swapp; button: The Paper Studio; embossing folders: Cuttlebug; white Smooch Spritz; brayer

DUST IT OFF!: Well, this card is ALL a dust off, except for the stamp which had been previously uninked! Even that old technique of wrapping wire around a round nosed plier? I think that's still cute! And I still have wire, so I'll be using it ;)