Home Design Work Recognitions For Sale About Me

Wednesday, June 29, 2011

Have a "whaley" good 4th! (CQC #91 & TCPTUES)


Hey there! A quick post, and I'm off to go run... Also, a little news, I am sadly not going to participate in Gallery Idol after all..... **sniff sniff** I realized one of the competition weeks coincides with me being on vacation/away from my supplies and therefore unable to participate. TOTAL bummer :( I made 4 cards for that competition and spent a couple hours on uploading older cards yesterday, so I was VERY sad to realize that. I guess that's what I get for not checking my calendar first! Next time I'll be more careful. 

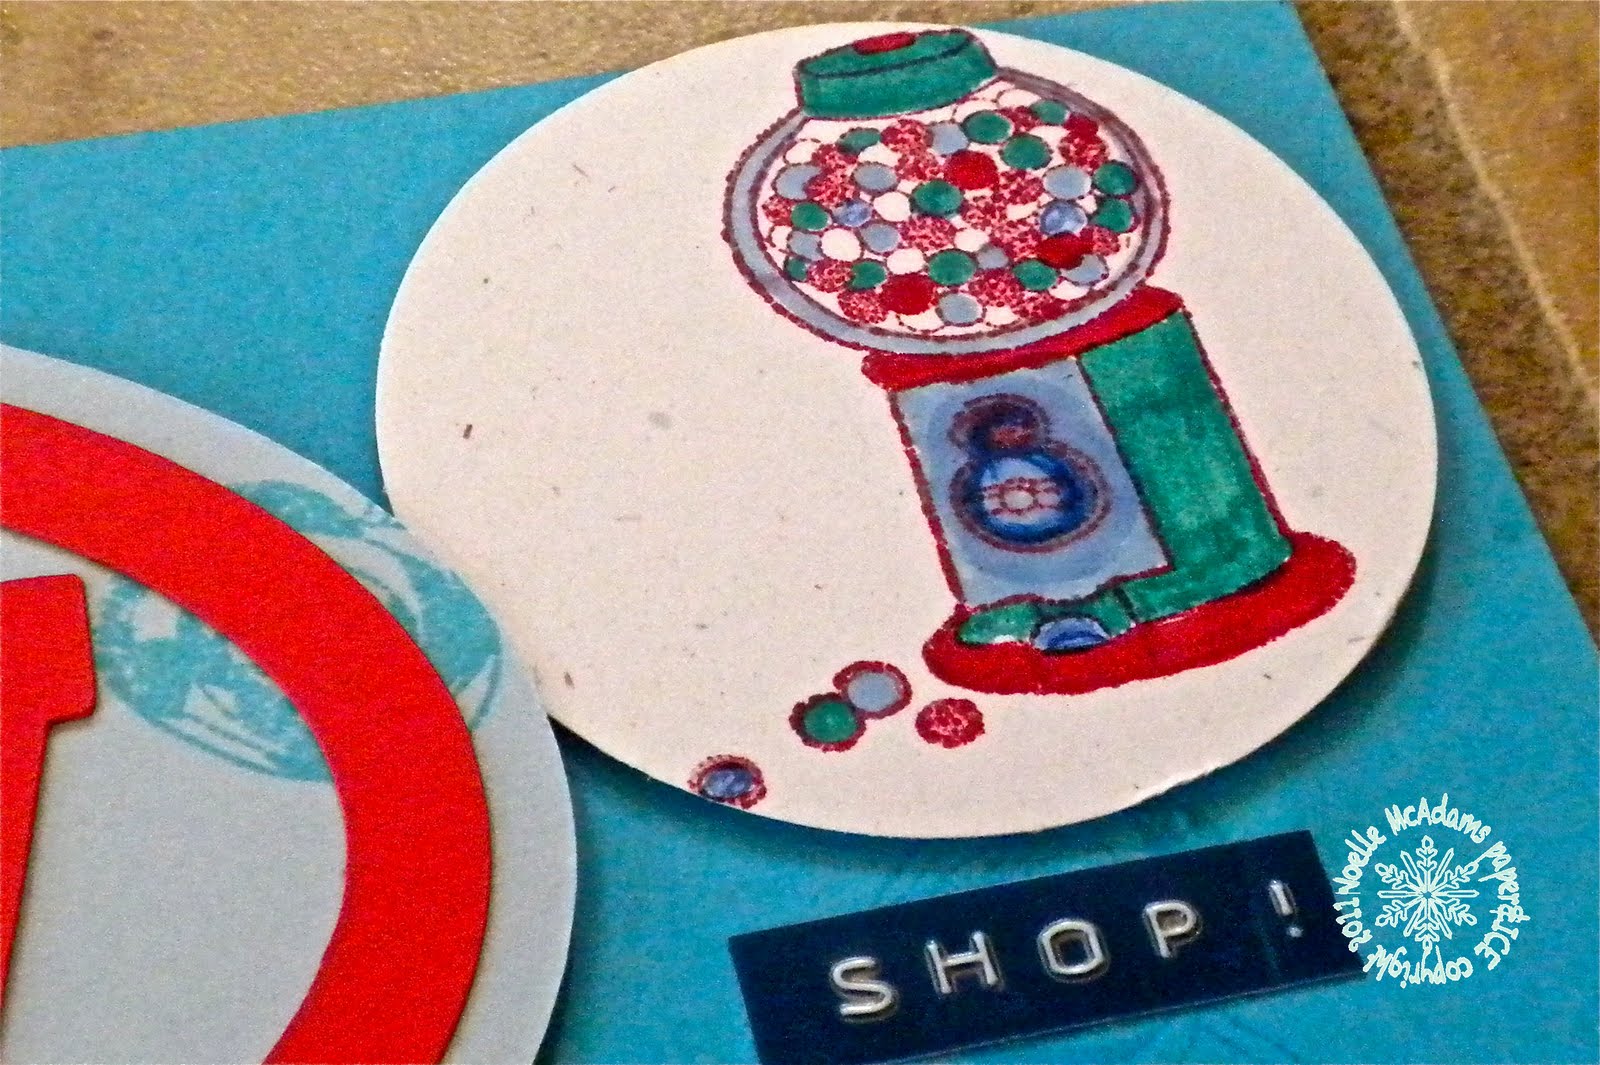
Here is my card for this week's colourQ #91 and this week's challenge over at TCP TUESDAY! I had a lot of fun with both challenges this week. I haven't had the opportunity to play at The Cat's Pajamas for awhile. Fun to pull out this cute Whale of a Time stamp set. I pulled the colors from this week's colourQ palette:


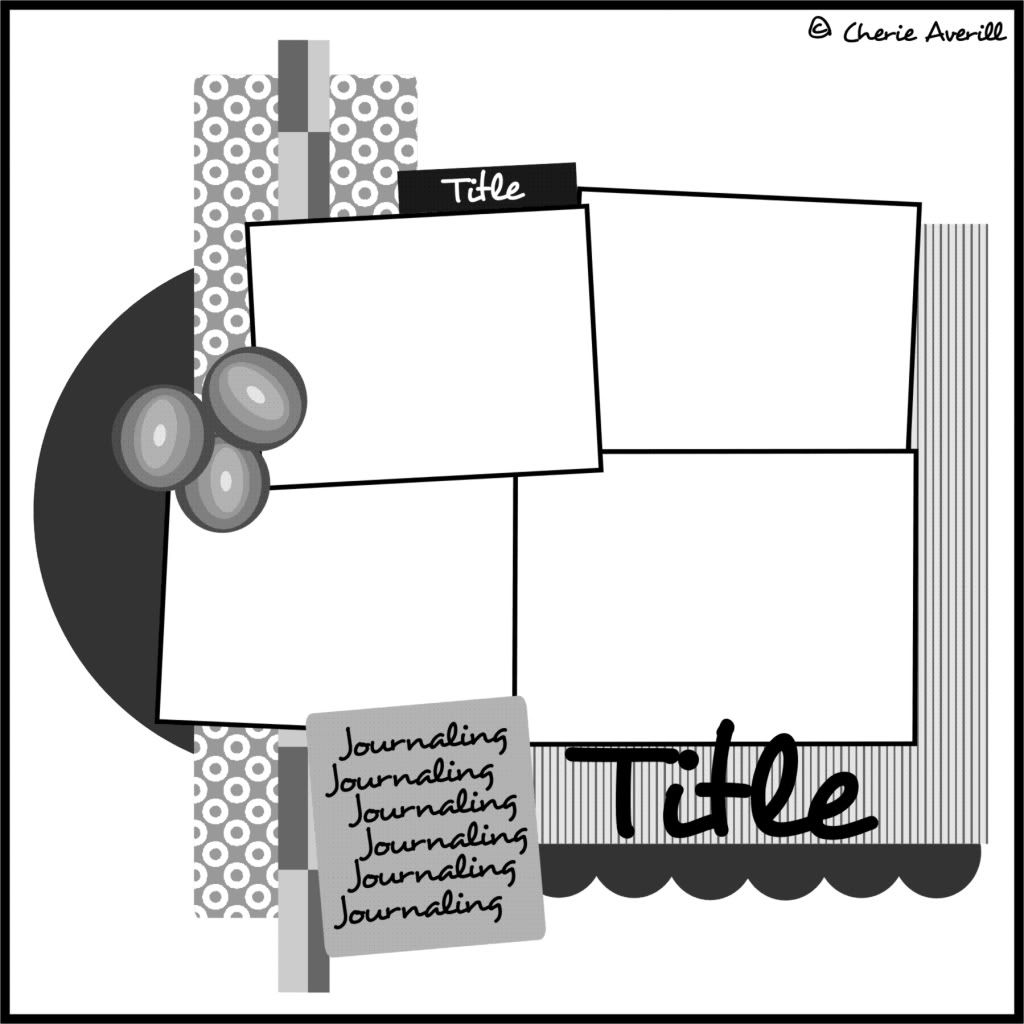
and I used the sketch from TCP. I turned it on it's side and made a large card 5" x 7." 


I made the whale with my oval cutter and a paper pieced whale. I stamped the waves, fussy-cut them and dry embossed that piece before attaching. The fabric piece with button actually fell off my favorite hat, and then the other button got destroyed by the dog, so I thought it would make a cute card accent instead and maybe I'll fix my hat up with a cute piece of ribbon or something, It actually looks ok plain anyway, but some buttons or ribbon might be fun...... ;) I made the bow at the top with some red baker's twine and some blueberry Divine Twine. Pretty fun, I just made a regular bow and then just tied another bow right on top of the other with the long ends of my twine. 


I hope you like my card! I had alot of fun with it. Have a stellar day! :) 

xoxox, Noelle

supply list: stamps and blue twine: Cat's Pajamas; patterned paper: My Mind's Eye, Stampin' Up!, K&Company, BoBunny; medallion punch: Martha Stewart Crafts; tag punch: EK Success; brass rivets: 7 Gypsies; solid cardstock: Stampin' Up!; black inkpad: Memento; red bakers twine: Crate and Barrel; embossing folder: Cuttlebug; oval cutter: Creative Memories; fabric piece: fell of my hat

DUST IT OFF!: That navy and white swirly paper is SOOOOO old SU!, like some of the first SU! stuff I ever bought, it's not even double sided. Also that tag punch is really really old, and I still use it all the time! Plus, who SAYS that cute embellie that fell off your hat can't be used in papercrafting? Not me! :) 


Tuesday, June 28, 2011

Here birdie, birdie......

Hi there! Got some goodies made last night to show you! I used the new Patterned Birds stamp set and the Abrianna Mat Pad I won in my prize package on both cards. Oh, and someone asked me to post a pic of my prize, I am so sorry I already put everything away and opened several packages, so I think I'm not going to get around to that, sorry :(

This first card is for the Gallery Idol competition! This is only my 4th card, sadly. I was hoping to get 10 in, and with less than a week to go, we'll see how far that goes. I guess I can also look back into the archives and upload other cards from the past, too. The blue background paper is the Abrianna, and then there's some red BoBunny and some black/cream Sassafrass accent papers. The pennants are stickers and the yellow letters are too. I backstitched the bakers twine along the bottom in two places and also along the top of the banner. I used a cloud die and I fussy cut my stamped bird. I love the mix of colors and patterns on this card. I hope it's not TOO trendy, but I love it :)

Here's the inside, I used some scraps and an old stamp for the sentiment...


Ok, next card.... I took a more feminine approach with this one. Soft pretty colors and the Jolee's fabric flower was the perfect finishing touch (and also from my prize!) I stamped the large bird in black on one of the green papers and fussy cut it out. I popped him up with dimensionals and stamped two of the other, smaller birds behind him in pastel inks. I used some die cut borders at the bottom before adding the fabric flower. The sentiment went at the bottom, another Inka stamp from a different set I already had. 

I accented the inside with the leftover border strips and another stamped bird....


That's it! I hope you are having a great week so far :)
-Noelle

congrats card: stamps: Inkadinkado & Hero Arts; DP: K&Company, Sassafrass, BoBunny; die: Lil' Inker Designs; pennant stickers: lilybee designs; letter stickers: Authentique; baker's twine: Crate and Barrel; punch: EK Success

Birthday card: stamps: Inkadinkado; papers; K&Company; fabric flower: Jolees Parcel; die cut strips: K&Company; inks/solid cardstock: Stampin' Up! 

DUST IT OFF!: Don't throw those scraps out or into the scrap bin. Use them to fancy up the INSIDE of your card! :)


colourQ #91


Hay all! Check out this fabulously patriotic color scheme this week at colourQ! Are you ready for the 4th? If not, maybe you should make a card or a project and upload it over there. AWESOME DT samples this week and all so different! I'll be back soon with MY challenge card! :) 

-Noelle

Monday, June 27, 2011

Patriotic Birthday Card


Hi all! Again, I am SO VERY sorry I have been MIA, very busy weekend..... We had a wonderful dinner party here last night though.... We are so blessed to have lots of very special friends, and I got my house clean to boot! So that's a very good feeling :)

I won another prize package from SpottedCanary.com! SUPER excited, it's always so fun to win a prize :) In the box were lots of goodies, many I'll be showcasing in the upcoming weeks! But the thing I couldn't WAIT to use (in fact, I opened the prize package at 10pm on Friday night, and this card was made before midnight, LOL) was this SUPER COOL brayer stamp set from Inkadinkado. I love brayers, you've seen me use one LOTS of times, but this one is so cool, not only is there the plain brayer, but also two stamp brayers, too! You've seen me use this "Joseph's Coat technique" before (more than once!) most recently, here. So go to that link if you want the lowdown on how to do this technique, it's such a great one to try!

So, my stepsister's birthday is on July 4th, so I thought I'd make her a patriotic colored birthday card. Speaking of which, she has had a rough week this week! My poor little nephew crashed his bike this weekend and knocked his teeth right out! Poor little guy, so I am hoping things look up for my nephew and my stepsister before July 4th! Anyway, side story....

So, I thought I'd go red/white/blue for the colors. So I used the Joseph's Coat technique on the main panel and rounded the corners. Stamped the sentiment on white cardstock in Night of Navy ink, and filled in the "ticket" with her nickname and signed it. Adhered everything to the card with tape and stapled the ticket to the side. Then I made a multilayered bow with some fun ribbons and a button. So, quick and cute card, I hope she likes it! I hope you like it too. :) Have a stellar day, I am not QUITE as busy this week, so I'll see you soon with some more fun projects!

xoxo, Noelle

supply list: stamps: Inkadinkado; corner rounder: EK Success; solid cardstock in Whisper White, Night of Navy, and Poppy Parade: SU!; inkpads in Poppy Parade and Night of Navy: SU!; red pen: Zig; ribbon: Hobby Lobby; red flower button: SU! 

Thursday, June 23, 2011

Kids Chore Charts


Hi all! I am really, REALLY not meaning to neglect this blog, I SWEAR! But with the boys home, there is just a fight, a mess, an injury, or a need for food about every 3 seconds around here! Ok, it's probably not ACTUALLY every 3 seconds, it could be that I'm exaggerating a wee bit. ;) But I am sorry I have not been around very much, because I miss my blog! So here's a project that got done, but only from sheer necessity! LOL, The boys have been using the same (one month long) chore charts for the last THREE months! Oy.... 


So anyway, I had seen this tutorial on the Spotted Canary TV show for a kids chore chart. I had been using these big poster sized blank charts you buy at the teacher supply store for the last two years. I'd replace them every month or 2, and have to write dates along one side and the chores along the top. Ian and Collin get paid different amounts of allowance for different chores, some are free, some are 10 cents, some a quarter and some really big chores can be worth 1 or 5 dollars, though the 5 dollar ones are really rare and usually take more than a couple hours. I had noticed that lately the boys would ask how much something was worth, and we had just started adding stickers into sections of chores that were worth different amounts instead of being so focused on which sticker went in which column. So that combined with the pockets used on the SC chart gave me the idea for PERMANENT chore charts. I just made each card for the older boys worth a certain amount. So, for example, if they get 20 stickers on the 10 cent card, then the card will be worth 2.00. The great thing about this method is that the only thing that will have to be replaced periodically is the cards, which are super easy to make!


So, I wanted the charts to coordinate with each other, but still each reflect the boys' unique personalities. I also had a goal to use up some old product on these, which I think I succeeded pretty well in doing! I found this old K&Company half used up pad of papers. These are SO cute! I thought that when I bought them and I STILL think that! I had purchased these denim print library pockets at the teacher store, they were on sale, so a package of 30 pockets for 1.99! So, if any of the pockets do get ripped or ruined, I can always replace it with a new one easily. I used a different DP on each chart, bordering the DP with a denim print paper and backing the chart with some lightweight cardboard to make it sturdy. Some letter stickers outlined in dark pen for their names, Large silver eyelets reinforce the holes and flank a green ribbon for hanging. I accented with some coordinating stickers, using ones that worked well and highlighted each kid's interests. Finally I used the labelmaker with different colors of tape to spell out the boys' names and "chores."


Now, for the cards, I decided to only allow myself to use scraps! I am drowning in them and have PLENTY to make work for something like this! Each card measures 3 1/4" x 4 1/4." I used a corner rounder on each one and then found coordinating patterned papers to punch the tabs out of. As you can see, I gave each child a different color cards. This is to prevent a brother deciding he prefers the amount of stickers on his brothers' cards and sneaking a switch. I've been a mom for 10 years, NOTHING gets past me anymore, LOL! On the  older boys' charts I wrote in the amount on the tabs that each card is worth. On Ev's, i just left them blank, because he is still blissfully at the age where he is happy to work for stickers, and the occasional toy when he gets his chart filled. 
Well, that is it for me today, the troops are restless, and I've promised banana pancakes for dinner, so I'd better get crackin'! Have a wonderful day! :) -Noelle


supply list: patterned papers, 3D stickers, letter stickers: K&Company; tab punch: EK Success for SU!; dark blue pen: Zig; denim paper: The Paper Studio; monster sticker: Sassafrass; buttons: Dress It Up; green ribbon: Ribbon Boutique/Hobby Lobby; large silver eyelets, tag board or light cardboard for reinforcements; denim library pockets purchased at Mardel; variety of scraps for making cards; labelmaker: Dymo

DUST IT OFF!: This project was made with a SLEW of old products, in fact more of them are old than new! The only purchase for this project was the pockets. I did use some new letter stickers and ribbon for these, but everything else was several years old.


Tuesday, June 21, 2011

Kids in a Candy Store! (CQC #90)

Hi all! Sorry for the delay in getting this up! I had it all written, but I was gone all day and I forgot to publish before I left the house this morning. Whoops! Anyway, time for another fab color combo at the colourQ! Check it....


Aren't these gorgeous colors? You know me, anything bright makes me happy! I pulled out these pics from last summer, a candy shop we'd visited on our trip to CA. I had these great stamps from Inkadinkado, Sweet Tooth. Now, I won these in a prize package from the Spotted Canary website. I am a big fan of that site as you've seen before. My point being though (yes, I am getting to my point, promise...) is that I probably never would have bought these stamps, though they are VERY cute. I think I would have felt that they were too specific and how often could I actually use them? Well, as it turns out, ALOT! Remember my birthday cake card, and my cookies scrapbook page? Yep, this is the third time out for these stamps and I've only had them a few months.... and thinking ahead, these could be great for Halloween and Christmas projects, too!

So, my page, I started with the "candy" in the title, I cut that out on the Cricut in the Poppy color. The cartridge I used is another thing that has gotten a surprising amount of use! It's been used again and again, one called "From My Kitchen." I cut the oval mat for it in the Bashful Blue. I stamped the mat with the lollipop stamp in turquoise ink. I also stamped the same stamp and ink all over my turquoise 12" base piece. I finished off the title with some OA letter stickers and some labelmaker words. I matted my pics in the dark blue, the poppy red and the light blue and laid them out.

Then I used a variety of patterned paper strips on the bottom, layering them in a random way. I finished that section of the page off by doing my journaling with the labelmaker and adhering it to one of the strips.

The final touch was to make some accents with some of the other stamps and punches. I did color in the gumball machine image for the top of the page. And it's done! One more set of photos down! I have 2 HUGE boxes of pics I'm trying to blow my way through. Let's see if I can get caught up! Hey, a girl can dream, right? :) Well, that's all for me today! Please come play with us at CQC! I'd love to see what YOU come up with! :) xoxox, Noelle

supply list: stamps: Inkadinkado; punches: EK Success; solid cardstock, turquoise & red ink: Stampin' Up!; labelmaker: Dymo; letter stickers: October Afternoon; From My Kitchen Cricut cartridge; patterned papers: Sassafrass, OA, and Crate Paper

DUST IT OFF!: Use those strips of DP from your scraps bin to make a fun eclectic border on a scrapbook page!

Saturday, June 18, 2011

Happy Father's Day!

Happy Father's Day! I wanted to show you the card I made for my awesome hubby, who I really DO believe is the best daddy in the world! So I thought I'd make him a winner's ribbon :) Pretty simple card, there is a BG paper from Crate Paper, the trike stamp is Unity and then some more of those teeny Cosmo Cricket sticker letters. I hope you like it & to all you Dads out there, I hope your day is fabulous! :)

xoxox, Noelle

supply list: solid cardstock in Real red, River Rock and Soft Suede, Real Red inkpad: Stampin' Up!; punches: EK Success; stamp: Unity; sticker letters: Cosmo Cricket; patterned paper: Crate Paper; ribbon: Hobby Lobby; turquoise herringbone ribbon: MFT

DUST IT OFF!: Use those ribbon scraps to make some "award" type ribbons, you can put them on cards, scrapbook pages or even add a safety pin to the back and make them wearable art. 

Friday, June 17, 2011

Science Fair Scrapbook pages

Hi all! I haven't had much time to sit down and work lately, I am missing it! But, our pool trip got rained out today, so I thought I'd take some time to show you these cute scrapbook pages I made. I had a craft day last weekend with some girlfriends, and I really got going on some scrapbooking, which I am WAAAAY behind on!  I used the new October Afternoon line: Rocket Age! To be honest, when I saw this line I went crazy! My husband works in the aerospace industry and my boys (all 3) are absolutely crazy about anything to do with outer space. :) We even visited Houston's Space Center on our vacation to TX 2 years ago. My 2 older sons even have their bedrooms decorated in a outer space theme. So, yeah, I already LOVE OA products, I love the 50's vintage feel they give to their lines. I actually PRE-ORDERED several things from this line, that is how excited I was about it, and truly, I rarely, if ever, pre-order anything! So then it comes, and I start to think "Uh-oh. Maybe I went a little overboard..." Yes, I can use this for cards, and sure there are bound to be SOME photos in my stash of the boys at the museum, and also of Collin's recent stint as John Glenn at school, but I bought A LOT (read: WAY too much!) LOL, but then I started to think, who says that they have to be SPECIFICALLY space themed? Couldn't other pics relate to these cool products? So then I decided, YES, I need to expand my horizons! The very next set of pics in my box were of the boys' Science Fair projects in early 2010. PERFECT! 

So, I started with Collin's pics (blue pages) and a sketch that my friend Jenny had printed out, sorry I have NO clue where it's from or I would hook you up ;) But a great layout, and I was needing to mix things up a bit in the layout arena, my layouts tend to get kind of stale, particularly when I am trying to get some scrapbooking DONE (read as many pages as possible in a short amount of time, LOL, more about this in an upcoming post!) Just used all the OA stuff and 2 sheets of SU! Bashful Blue cardstock.

Next were Ian's pages (yellow). I had more photos of his project, so I needed to get more in the layout. I used this old sketch from Sassy Lil' Sketches for the first page, and then just a variety of patterned paper strips to accent the second page.... I used a Bazzill textured cardstock on the yellow pages, I liked the embossed dots on the textured cardstock, I thought it lent itself well to the OA papers and accents...


Well, that it is for me today! Taking the boys out for frozen yogurt, since we were all a little bummed about our pool fun being cancelled! Have a great one! -Noelle :)


Thursday, June 16, 2011

Sky's The Limit!


Hi all! I hope you all are doing well. We are 2 weeks through our 8 weeks of summer vacation, but.... who's counting? Exasperated moms? Me? I love my boys, but finding new ways to keep them entertained every day is wiping me out! LOL, they have been pretty good though, and not too much fighting with each other yet which is nice. Also, I can't complain TOO much, because I have some fun vacation plans coming up in a few weeks! Hubby and I are going to celebrate our 15 year anniversary with a trip to Mexico, and then I've got some fun with girlfriends planned on another weekend! So, I'm not really whining, just tired! I'm sure someday when they are grown up, I will be missing the summer days where they played on the Slip n' Slide for 5 minutes, then tracked grass all over my clean kitchen floor, then got out a snack, leaving the box on the counter, then complained they were bored, then watched a TV show, then complained again, then did chores since they were "bored" (and being bored around here gets you put to work), and then I looked at my watch and realized it was only 1030 in the morning, and we still have SEVERAL hours to fill! Yeah, I am sure someday I will miss these days, just not today! ;)


This card is for this week's Tuesday Trigger and also I'm going to put it into the Gallery at Gallery Idol since it is a congratulations card. I got this STELLAR set of dies and stamps from Lil' Inker Designs. I really really LOVED that the set had both a small full rainbow and a larger half rainbow, as well as the awesome photopolymer stamp set. The Trigger really gave me a jumping off point, in that I loved the bright colors and the "sewing" feel of the spools of thread. Here is the Trigger for ya:

The title of the Trigger is Rainbow Bright, so I figured it was cool to do a rainbow card. Haven't checked the Gallery yet. but my guess is rainbows are so big right now that mine is probably one of very many! I had some sewing themed papers from Stampin' Up! and I swear I think I've only used them twice, so this was a great opportunity! I cut two out of each color with the large HALF rainbow die. I adhered them to my pattern-print DSP and used my sewing machine to stitch them together in the middle. I cut several clouds out of the stitched DSP and layered them on either end of the rainbow. Then I added some stamping and some buttons tied with linen thread, that pulled the color and the rustic feel of the spools. I hope you like my card! I think it turned out pretty cute :) All these rainbows remind me of my childhood, I had a Care Bear with the rainbow on the tummy (Cheer Bear, I think....) Ok, now just dating myself! LOl, have a bright and sunny day! :)

xoxoxox, Noelle


supply list: dies and stamps: Lil' Inker Designs; DSP, solid cardstock, inkpad, linen thread and buttons: Stampin' Up!; orange button: Dress It Up; sewing machine

DUST IT OFF!: Dig out that cute paper you haven't found the right spot for yet! :) 

Wednesday, June 15, 2011

Father's Day


Hey all! I decided to get a couple Father's Day Cards done with this week's colourQ! Love these colors and they are a PERFECT Father's Day combo! These are pretty simple cards, no new techniques to show you today, but I think my stepdad and FIL will like them. I already sent my Dad this card that I made back in January. Making "guy" cards can always be a bit of a challenge. I don't have much trouble with cards for boys, because I have 3 boys and they can still be a bit cutesy, but man cards cannot be cutesy, so that's always a bit of thought to go into that.


For these cards I stamped the camera (for my FIL, Mike) and the Jeep (for my stepdad, Tom, but we call him "Motty") on white cardstock and added the sentiment. I used the Basic Gray ink and the Bravo Burgundy ink for the stamping. I matted the images in the Bordering Blue cardstock. I made a background by dry-embossing some Cajun Craze cardstock with some coordinating ink brayered on for dimension. I used the houndstooth embossing folder for the camera card and the woodgrain embossing folder for the Jeep card. I pulled out some old metal tags and used my (even older!) impression set to put their names on the tags. Added a few buttons stitched with blue baker's twine and some library clips and called it good.


 I hope you like my cards! Please pop over to colourQ and play with us! I'm sure you'll be glad you did! :)

xoxoxox, Noelle

supply list: stamps: Inkadinkado and Unity; embossing folders: Cuttlebug and Sizzix; library clips, inkpads and cardstock: SU!; buttons: generic; metal tags and impression set: unknown

DUST IT OFF!: those metal tags are at least 6 years old and the impression set (you use a hammer to impress the letters into the metal) is even older. This look reminds me of dog tags and is perfect for men's cards.

Tuesday, June 14, 2011

ColourQ #89


Hey all! Time for another fab color combo at the colourQ! This is a great masculine color scheme for Fathers Day! I will be back SOON with a fab project to show you! To play, just click on that link and add your project to the linky at the bottom of the post. Have a great Tuesday! :)

xoxox, Noelle

Monday, June 13, 2011

Winner, winner!!!!

This prize is, quite literally "outta here!"
Hello there! Happy Monday to all! I (once again) could not sleep and it was past the midnight deadline, so I decided to do the drawing for this blog candy prize (a SMASH book!) that I have been going on and on about for the last 2 weeks! I wrote the name of each commenter on a post-it, and folded them up & stuck them closed, so no writing was visible (those sticky strips on post-its are so handy that way...). I put them in a basket and shook them all up, and then, to make it as fair as possible, I closed my eyes, reached in and grabbed one.

And..... the winner is...... new blogger Annette! She said: "I am a follower and I love your work. Awesome blog candy..I will cross my fingers and toes...I love this new smashing journal."  So, apparently crossing fingers AND toes is what did the trick! Anette, please email me your snail mail address at mcadams01@msn.com and I will mail your SMASHING prize on Tuesday morning!

Thank you to all who played along, this was a fun prize to give. And, if you are not the winner, I suggest you go buy yourself a consolation prize.... perhaps a fabby new SMASH book? I hear they are in stores now ;) I really hope you all have a wonderful Monday, blog friends. I'll be back soon with some more fun projects! xoxox, Noelle


Saturday, June 11, 2011

Your New Home (Gallery Idol Submission)

Hey there! I hope you are all having a super weekend! Don't forget about the fab BLOG CANDY I've got going on right now, go to this post to comment to win a SMASH book! The time limit ends tomorrow at midnight, so get those comments in if you haven't already:)

I wanted to show you my second card I'm submitting to the Paper Crafts Gallery Idol Contest. I am super excited about the contest! Even though it's a longshot, it would be a real dream come true to be in that top 20! :) So, my goal is to get 10-20 WOW cards submitted between now and July 4, soooo you may be seeing a lot of these! Funnily enough, with this contest the theme is "congratulations" cards and projects. Even with ALLLLLLL the ridiculous amount of stamps I have, I've only got 2 or 3 congrats stamps, and the one you saw on my last post is the only one I have that's from a CURRENT product line. So, I'm having to find creative ways to make that theme work for me! On this card, I used a "best wishes" stamp for the new home card. I think it worked out ok :)


Ok, so I saw this awesome super-cool rainbow die over at MFT. Then tonight, I learned that lil' Inker Designs also has a set of rainbow dies with a stamp set. Love 'em, LOVE 'em all! Of course, I don't have the rainbow die, so I set out to make a rainbow without one. I used my circle cutter cutting arches in various blade widths so they would nest evenly. I had this darling Unity stamp I got for free with a recent order from there. I stamped it on white cardstock and colored the image with Copics. I masked the image and used a punched scallop circle, and a sponge with some Baja Breeze ink to make the clouds. This was the first time I'd tried this technique, it turned out cute, but I'd definitely like some more practice on that. Then I cut the top of my image out in the same large arch as the top stripe in the rainbow and layered the rainbow on top. I die cut some clouds with my MFT cloud die and sponged the edges with more Baja Breeze ink. I layered the whole scene up on some cute MME patterned cardstock and a Baja Breeze and Tangerine Tango card base. For the sentiment, I stamped the "best wishes" on a patterned paper scrap and punched it out. I also punched a larger circle and a pink scalloped circle. Before I adhered the scalloped circle to the rest, I added some Tiny Type stickers to read "Your New Home." I also decorated the inside of the card with some more scraps, punches, and a SUPER old stamp that reads "Happy Is The Home That Shelters a Friend." I thought that large curved border punch (one of my faves!) reminded me of the rainbow, and all the arches on the front of the card. I should also mention that this is a LARGE card, 5" x 7". 


Well, that's it for me today! We had an amazing morning at the zoo with the boys. :) Just one of those days that makes you count your blessings, life is good. Church tomorrow and I'm hoping to get a workout or 2 in before Monday as well. 

Have a great weekend! :)

xoxox, Noelle

supply list: stamps: Unity, Inkadinkado, and Stampin' Up!; circle cutter: Creative Memories; punches: EK Success; markers: Copic; cloud die: MFT; patterned papers: My Mind's Eye and Cosmo Cricket; mini letter stickers: Cosmo Cricket; solid cardstock in Baja Breeze, White, and Tangerine Tango, ink in Baja Breeze: SU!; 

DUST IT OFF!: Use your old-school circle cutter to create a very right-now rainbow! Rainbows are ultra-trendy right now! If you don't have a cloud die like me, a scalloped circle punch or hand cut clouds would work equally well :)


Thursday, June 9, 2011

Non-traditional baby boy congrats (MOJO194 & Gallery Idol submission)

Hey all! Happy Thursday! Soooooo looking forward to tomorrow because my Mom and I are spending the day together! Pedis and lunch, cannot wait! This week has been nutso, because Collin has tennis camp in one town every day and on two of the days Ian had tri team in another town and did I happen to mention neither town is the town we actually LIVE in? Oy, I swear I felt like my car was a pinball! Ping, ping, ping, ping! LOL, anyway I told the boys we needed to chill this afternoon!

DO NOT FORGET about the awesome blog candy giveaway I've got going on right now! Only three more days to comment to win! :) Go to THIS POST to hear more about the fab SMASH book I'm giving away and comment to win! :)

I have to apologize upfront for the photo quality around the blog lately. Something is going on with Blogger. I edit my pics in iPhoto on my computer and they look amazing! THEN, I upload them here and every time they look fuzzy :( If anyone has any tips or tricks on how to fix this, any advice is appreciated!

Ok, so my card. This is the first of (hopefully!) many submissions for the Paper Crafts Gallery Idol contest. I guess there's over 1000 submissions every year, and the first "cut" narrows it to only TWENTY, so the more cards I can get up the better, but only if they are FAB cards! I thought this one turned out pretty good. Opinions? I (have not YET) had a card published, so I never know what those editors love, but I did try to keep it to new products. The theme at the competition is congratulations, so this first card is a non-tradional baby boy congrats card. I thought it might be fun to depart from pale blue and use some bright happy "kid" colors for this one.


I also used this week's Mojo Monday sketch. Great sketch this week and pretty simple to execute. I used my new mini pad of MME Lime Twist papers, Just too cute! I bought a few of the large sheets for scrapbooking the boys' pics as well. The stamp is a super-cute Unity. I used some teeny letter stickers to add the "boy is a joy" sentiment to the punched piece. I hope you like it! Several of my friends just had their babies, so this one will have to go in the box to be saved for future use!

Well, off for more cleaning, laundry and caring for boys, I'll be back soon for another "mommy break!" LOL, have a stellar day & THANKS a million to all my new followers! I'm so excited to have you join me in my paper adventures:)

xoxox-Noelle

supply list: stamps: Unity and Verve; paper: MME; solid cardstock in Poppy Parade and Not Quite Navy: SU!; punches: EK Success; ribbon: Hobby Lobby; mini black letter stickers: Cosmo Cricket; buttons: generic

DUST IT OFF!: The buttons are from my random jar, yellow and teal neither color was actually IN the papers! But I thought it blended ok and lent itself to the fun feel of the card. And there's those trusty punches again, could NOT live without my punches! :)

Tuesday, June 7, 2011

Pretty Patriotic Home Decor

Hi there!

Just wanted to share some goodies I've been working on for my 4th of July decorations! I saw this FABULOUS new K&Company line Americana. I'll tell ya, I bought three items from this line at Michaels, the mat pad, the chipbox letters, and the Grand Adhesion Medallions. Guess how much is left? Practically nothing! Not one scrap of paper or any of the medallions, all I've got left are some letters! LOL! It's just a great line, I love the mix of patterns in the mat pad so much, i'm trying to talk myself out of going back and buying the 12" pad! But really, wouldn't these papers be superb for scrapbooking the boys' activities? Yeah, I can talk myself into just about anything ;).

So, my first project (and the one I had in my head when buying the Americana stuff...) was this banner for the mantel in my family room. This was a REALLY simple project, and it did not require a lot of fancy tools, or even a banner die (though, if you read this blog often, you know I covet a banner die, I'd love to have one, but don't). Anyhoo.... Each "card" of this banner is simply one page of the mat pad matted in navy blue cardstock and then layered up with some punched pieces I punched out of leftover pieces. I layered the chipbox letters on top of that. For the bottom, "scalloped" border, each card has 3 punched circles taped to the back of the card at the bottom. I stuck the medallions on to accent and then tied the cards together with red ribbon, and voila! Truly CUTE banner (if I do say so myself) with minimal effort and very few tools (no dies, just 2 punches). Here's detail shots on a couple of the cards...


Ok, so project two was a last minute deal and born from scraps and leftovers from project one.... I saw this photo here on Pinterest, so cute! She made hers with confetti inside, there's a tutorial here. But I thought it would make a cute and simple decor project for above the sliding glass door in my kitchen. I hang other seasonal decor there at different times of year, so the cup hooks are a permanent fixture, but I have nothing "summery" to hang there. So, my "firecrackers" are really small, but these would be simple to make in any scale. This would be a great kid project, super simple, great use for leftover scraps and fun, too!


Ok, so, to make these. Cut out one 6" square and one 4 1/2" circle. Cut a slit in the circle all the way from the edge to the center of circle. Cut a tiny hole in the center of the circle. Put tape on one of the edges where you made your cut and wrap around on top of the other half to make a cone, adhere. Tie a knot in ribbon or twine making a hanging loop. Slip the loop through the hole you cut in the top. The knot should hold it in place.  Tape ribbon scraps along the bottom of the square piece, then make a cylinder with that piece. Tape top and bottom together on the underside of cone with scotch tape. Accent with punched pieces, or adhesive medallions. Very fun! :) 
Well, that is it for me today, I hope you're having a great week! The boys have tennis camp and triathlon training this week, so I feel like a chauffer! LOL, gotta love the summertime! 

xoxoxox, Noelle

supply list: all papers from K&Company, even the two "non-Americana" ones!; punches: EK Success; letters and medallions: K&Company; ribbon: Ribbon Boutique by Hobby Lobby, adhesive; bakers twine: Crate and Barrel