Home Design Work Recognitions For Sale About Me

Sunday, September 29, 2013

Super Mario Bros. birthday party! ..... aaaaand big NEWS! :)


Hi all! It has been such a crazy month, the play I'm directing is in less that a week and I am ready for it! I know blog posts have been short, sweet, and few-thanks for your patience. :)

I also got the HUGE and EXCITING news last week that one of my cards will be PUBLISHED in CardMaker magazine in Summer 2014!! I am so excited, I have been working towards this goal for a long time, what a huge thrill! :)

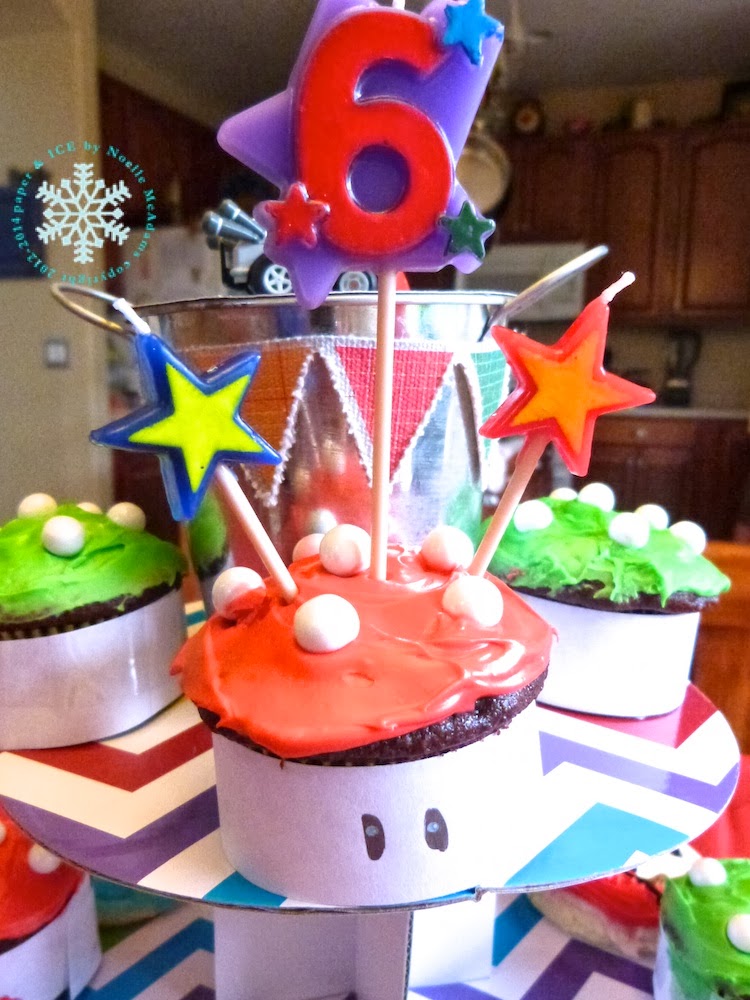
I have been dying to share these pics from Ev's 6th birthday a few weeks back! He wanted a super Mario Bros party and it turned out so cute! :) I am a weird mom who really loves doing the whole birthday party thing, it's a fun chance to be creative. I have done other parties in an Elmo theme, a Lego theme, a football theme, a Wii theme, and a Cars/Lightning McQueen theme! Plus countless others that were before I began blogging, haha. ;) Here's my now SIX year old birthday boy! :)
To start, here are the invitations, I found similar ones on Pinterest, and kind of messed around with my punches until I was happy with the mushroom design. The question block is a pocket that the invitation slides out of.
I mounted the mushrooms on a large black circle and printed these out from my computer. I added a plastic gold coin to the invitation for fun, since you try to get coins in the game.


 Onto the party bags! Went with the question block theme again, since it was so easy to cut the question marks out on my Cricut! ;) The handle is made from Mario themed duct tape we picked up at Michaels. We found Mario candies at Party City, also a few other goodies that Ev picked out.

I made a banner that went in his room after the party. The game uses many simple shapes like stars, mushrooms and bricks, all of which are easy to make from paper.


We made another GIANT question block, this time in the form of a punch piƱata. In the video game, the characters punch the question blocks and sometimes they get coins from them. So we had the kids jump up and try and punch the pinata until the candy fell out. Pinatas at the store can be pricey, around 20$ or so, so I was glad to make this one out of a yellow tablecloth (plastic), and more question marks cut from the Cricut, plus an old box! The punching side is several layers of construction paper taped down so the first kid didn't punch all the way through on the first try.

The hats were 20 cents a piece at Michaels from the clearance bin. So we came up with as many different Mario Bros characters as we could think of, and then the kids were able to wear them and pretend to be different characters.
The cupcake idea was totally stolen from a friend. She had made her son these mushroom cupcakes (along with an adorable cake!) for his Mario party a few years back. I do not do cakes well AT ALL. I always tell people, you want something cute made from paper, I am your girl-from cake? NOT so much, haha! But the cupcakes were easy enough, and as per Steph's instructions I was able to use printer paper with the eyes drawn on. The cookies were accidentally happened upon at the awesome Eileen's Cookies in a neighboring town. Aren't they so cute? Delicious, too.


I found lots of wonderful Mario party printables FREE through the magic of Pinterest :) 

I also discovered on Pinterest a FREE "Pin the Mustache on Mario" printable that I had blown up poster-size at CopyMax. I cut the mustaches out with my Mustaches CutUps


Another game we did was "Goomba Stomping" the kids had 5 minutes to stomp as many of their colored Goombas (aka balloons) as possible. :) 
I made little signs for the food with a variety of fonts and colors and some Mario stickers.


Party decorations in the mario theme are not easy to find and are expensive, so I bought a basic party pack from Target, and one pack of those vinyl decals for walls in a Mario theme. Ev moved all the decals to his room after the party.

The final thing to share are the thank you notes. The party pack came with invitations that I didn't need since I made the others, but I used some Nestabilities to cut out the Marios from the invitations to make thank you notes.


And that's all for me today, thanks for popping by! 

hugs, Noelle


Friday, September 27, 2013

New Product Review at CSI!


Hi guys! Just wanted to pop in today and let you know I have a new product review up at Craft Storage Ideas today! It's for the Cropper Hopper Expo, so if you're interested in learning more, please pop by and check it out! :)

hugs, Noelle

Tuesday, September 24, 2013

Ride (TCPTUESSEP13)


Hi friends! Popping in today with my second card for this month's TCP Tuesday Challenge, which is to use paper piecing on your project! You can link up on Alma's blog here, if you want to play (sidebar). I just got around to returning comments last night, I am SO SORRY I have been hardly around. The theater class I teach has its play in a few weeks, plus we just had the littlest man's birthday party, we had out of town family visit, and there's that whole 3 kids in 3 schools thing we have going on! But we are grateful to be happy, healthy, and were not impacted by the recent flooding. I still cannot comprehend the devastation that has happened to my beautiful home state these last months with all the fires and floods. If you are interested in helping the flood victims, I thought this was an interesting relief fund to check out.
Well, onto my card for this week. I decided to use this cute set Wheel Love. What I "wheely love" is this cute Mr. Bike Bun taking a little ride!
The chalkboard panel is just a piece of DP from one of the more recent My Mind's Eye 6" pads.
Of course Mr. Bike bun is paper pieced and the bike is colored with markers. I did a tutorial on my last TCP Tuesday post this month about paper piecing, if you have never tried it, you should look at my post!

My crazy month will be this nutty for just another week and a half or so! Hanging in there in the meantime. ;)

hugs! Noelle

Friday, September 20, 2013

My "new" chalk painted dining room set!


Hello! I just wanted to pop by today to show you that my dining room set is finally FINISHED! You may remember that I used chalk paint to transform an old hutch waaaaay back in February. I loved it so much that I decided to paint my dining room table, my grandparents vintage bench, and 6 unfinished chairs (another friend gave me these) so they would all match, and I would finally have a dining room I could be proud of :). Outside of the chairs being the same, none of the pieces were matching to start.
I got the bench and half the chairs done sometime in the summer. I finally found the motivation to finish this project that's been half done for SO LONG, a couple weeks ago. Hubby pitched in too, by finishing the tabletop, and the chair seats for me. I did all the blue which is chalk painted with Annie Sloan Chalk Paint in Duck Egg Blue, and then "distressed" with the same method used on the hutch post.

We used a product on the tabletop, hutch serving surface, and chair seats that was a combo stain/polyurethane.

That's it for me today! See you back here soon! 
hugs, Noelle

Tuesday, September 17, 2013

Hello Pumpkin! (TCPTUESSEP13)


Well, hello hello! How are you doing crafty peeps? Hope you are doing well. Here is a RARE September post for you guys today, I know, I know.... Someday it will be October and things will "calm down" (I hope!) ;) We were VERY fortunate to not have been affected by the recent flooding in CO.

Also, the Cat Pack has some exciting NEWS to share! Kelli Hull and Jessica Rone have joined our Pack! I am so excited to get to know Jessica better and to have even more fun with Kelli! :) If you know, Kelli, you know she is AWESOME! Love ya, girl! :)
Last week, I was checking things off my to-do list, and this challenge was one of them. The weather had cooled off to a lovely, damp, autumn day, after being in the 90s for the whole week+ prior, ugh! I started thinking about how I love the Fall,  and that Halloween is right around the corner. :) So, I decided to make my first Halloween card for this year.

The challenge at The Cat's Pajamas in September is to use PAPER PIECING in your project. Here are a few words about it from Alma:


Last month was the Long, Tall Challenge. This month is all about Paper Piecing.

Paper Piecing is a technique that I use all the time. And you see it everywhere. It's a relatively "new" technique, though. And, when I started stamping over 12 years ago, paper piecing didn't really exist. Now, with all the pretty papers, it's fun to actually use them.

Paper piecing looks complicated, but is really easy, especially if you like to fussy cut. You simply stamp your image on pieces of paper. Use one as the "base" and cut along the inked lines on the other papers. (The Cat's Pajamas stamps are great for that, because of our think lines) Then, you attach the pieces to the main image.


Here is my card:
And, just in case you've never tried paper piecing before, here's a little tutorial for you:

1. Stamp your image down both on your main piece of cardstock and the patterned paper you'd like to piece from. In this case, for the "main" piece I used the largest die from the Framed Up CutUps. I love the shape of this one!
2. Color your main piece if you are not paper piecing the entire image. In my case, I pieced the pumpkins and the penguin's scarf, so I colored the penguin feet, beaks, cheeks, and pumpkin stems.
3. Rough cut out the part you are piecing.
4. Then fussy cut out the things you are piecing. Fussy cutting used to REALLY freak me out, but them I got some great advice from Sylvia, who, in my opinion is the QUEEN of fussy cutting, if there is such a thing! She said to go very slowly, and use a very good pair of scissors. These are the ones I use. Take as many tiny cuts as you need. Sometimes I will just cut closer and closer to the image for more control while cutting. You can see I opted NOT to cut out the tiny penguin feet, and just colored over them instead.
5. Then adhere the pieced parts to the main image, and I have a patterned jack-o-lantern on my card, now! Doesn't that up the cuteness factor a ton? :)

I used sequins for the first time since this trend has come to be. My friend Annette gave me a bag full of them when I saw her a few weeks ago. Thank you, Annette! :) I added teeny gems to the centers of the sequins. 

I used some glitter paper (American Crafts), with the following CutUps:


And the set is "Hello Pumpkin." I just got this one a few weeks ago when Alma had her big sale! :) 
And, my card again: 

If you want to play this fun challenge, head over to Dancing In Pajamas and you can link up on the sidebar! Hope to see your fun, paper pieced creations! :) 

Halloween hugs, Noelle