Home Design Work Recognitions For Sale About Me

Wednesday, September 14, 2011

Happy Birthday, Ev!!

Happy birthday to my sweet baby Evan today! I am in total disbelief that this little man is FOUR today? I ask you, HOW does that happen? It really does baffle the mind. If you have kids, grandkids, or nieces and nephews, I am sure you know EXACTLY what I mean! Here's my birthday boy! ;)
For his card, I used the same set I used to make his birthday card last year. I actually bought this cute MFT set Little Loveosaurus with him in mind, because his nickname is "Monster Beast" and believe me there are PLENTY of times he's lived up to that nickname too! ;) I saw over at this post on the MFT blog that they are challenging their designers to use NO COLORING for their most recent creations. actually a little bit of a tough challenge considering that most of their stamps are of an illustrative style and just BEG to be colored! Anyway, I thought I would push myself to think a little outside the box and try it as well. I had gotten a fun pack of Jillibean Soup Sprouts journaling circles free with my last Unity order in an olive color. I've actually used several, they are cool! I took the large one with the #4 on it & stamped my Loveosaurus' head. I stamped the "happy birthday" stamp above that & then DID NOT color it in. ;) I layered up some fun MME DPs & die cut a scalloped circle to mat the stamped panel. I punched one of the DP strips with my EK Success Binding Edge Edger Punch, one of my faves for boy projects. I added a Tim Holtz metal 4 tab to my circle & and clear epoxy sticker to a 4 on the DP. Final touch was an olive green bow to pull out the olive green on the journaling circle. 
For the inside, I used a scrap of the train printed paper, because he loves trains & border punched it with a Circles Large Edger Punch. I punched a small 4 from the leftover scrap from the front & popped it up with a 3D dot in the middle "hole" the punch left. I stamped my sentiment & my quick-non colored card was done! I think this post took me longer to write than that card took me to make! LOL, my own fault since I provided all the links! ;) 
Well, that is it for me! The next few days are truly packed, but I hope to get some "craft therapy" time on Sunday! Have a stellar weekend! 

hugs, Noelle


Tuesday, September 13, 2011

Christmas Morning scrapbook layout (CQC#102/CKsketch)


Hi there! Here's my pages for this week's colourQ! Hope you can play along with this super-FAB color combo! Link up over there by Saturday night for your chance to be named this week's colourQueen! :)
I used this great sketch I saw over at Creating Keepsakes Blog. I am not sure if this qualifies as a family page or not, but I think I will send it over there anyway. I started out with the first page, and, since my second photo was not as large as the first, I decided to do a row of snowflakes to the right of the second photo. 
CK Sketch 300x148 Submit
 Picked up these snowflakes recently at Hobby Lobby, as well as some adorable felt deer. They were in the Christmas crafts section of the store, and the snowflakes package had several white and turquoise snowflakes in there! Very budget-friendly, adorable accents!
I added some Celery colored buttons and red bakers twine to the snowflakes on the first page. On the second page I added an old red heart brad to the turquoise snowflake. 
Well, that is all for me today, I hope you will come play with us at colourQ this week! I LOVE this fun combo, may need to make a card for this one, too! :)

Have a stellar day! Hugs, Noelle


supply list: solid cardstock & heart brad: Stampin' Up!; patterned paper: BoBunny; felt snowflakes & green buttons: Hobby Lobby; sticker letters: K&Company; corner rounder: EK Success; journaling paper and circle cutter: Creative Memories; red pen: Zig; crystal snowflake brads: Karen Foster; vellum accent: DCWV; dies: Spellbinders

DUST IT OFF!: The patterned paper is a scrap, the vellum accent is ages old and the heart brad, too. :)

Monday, September 12, 2011

"The Lord is your Sun and your Shield.." (Moxie Fab Square Sketch challenge)


Hey there! Sorry for the blog delay. After breaking his arm AGAIN on Thursday, Ian is feeling better (and went to school today, Yea!) but I am gearing up for ONE HECK of a busy week, so there was a WHOLE LOT of errands and chores to do this weekend.

I haven't done a Moxie Fab challenge in WAY too long! So I was glad I managed to get to this one! This is for the Square Sketch Challenge. I actually submitted some cards for this publication with the sketches, but I hadn't used this one yet. Here's the sketch: 

The rules of Moxie Fab sketches state that a flower can indicate ANY shape on a card. Those strong lines pointing out and up made me think of rays on a sun, so that was my jumping off point for this card. I wanted that feeling in the background, too, so I made this background with "rays" to mimic light coming off the sun into the sky. The way I made the background was this:

1: Cut two identical squares of cardstock to 5".
2: Lay one square on top of the other, fully overlapping each other on a self-healing mat.
3: Using a metal ruler and an xacto knife to cut diagonal lines through BOTH pieces of paper.
4: Arrange and tape together on a scrap piece of paper (also 5" square). Pieces should fit together well if they were cut together.
5: Trim edges as needed.


For the sun, I cut an orange patterned paper into a circle, and matted it with a piece of textured Tangerine Tango cardstock. Then I used my heart punch to make the suns rays, by taping the hearts to the back of the circle. I did the same thing to make sun rays back on this card and on this page. The last thing was my stamping, which I did right onto the card in two places. I LOOOOOVE these stamps from Verve. :) They make me happy. :)

Well, that is all for me today, hope to see you here tomorrow when I unveil a fabulous NEW color challenge for colourQ! I am LOVING these colors for tomorrow! Hope you'll take a peek ;)

hugs, Noelle


supply list: solid cardstock in: Marina Mist, Island Indigo, Pacific Point, Tangerine Tango, and Summer Sun: Stampin' Up!; inkpads in Island Indigo and Tangerine Tango: Stampin' Up!; stamps: Verve; patterned paper: K&Company; large heart punch: SU!/EK Success

DUST IT OFF!: Use your heart punch to make sun rays, trees, or any number of triangular shaped things. Hearts aren't just for Valentines Day anymore! :)

Thursday, September 8, 2011

Halloween card and centerpiece set


Hey all, I'm going to keep this short today as today my oldest son broke his arm for the second time in 4 months. And yesterday, my Grandma broke her pelvis for the second time in 4 months. And my garage door broke, and there is even more, quite the laundry list, actually. But I am too tired to go into it all right now. But lets just say I need to invest in some INDUSTRIAL STRENGTH bubble wrap for my entire family's heads, hearts and bodies right now. Say, about 50 layers of said bubble wrap per person! 
Here is a project I got done yesterday (in an attempt at some craft therapy, before the latest fracture...), something fun for Halloween. I actually made the medallion for a card, and then realized it was too big, LOL! So then I decided to make this cute little centerpiece with some hot glue and an orange pencil. I had this little galvanized bin in my stash. I glued the medallion to the pencil and the pencil to the inside of the bin with a big glob of hot glue. Once it dried it was pretty stable, though floral foam would work well to stabilize it too. I just don't keep that around. Here is an old post on making a medallion. The only thing I do differently now is I use a strong glue (like Crystal Effects) and I weight the medallion down with one of my punches while it dries. Then I add the front part after the rest is SOLIDLY cemented together. More pics....
You can see I added some glass glitter around the edge of this one. 

Decorated the little bin with a sticker, some paper strips, and pom pom trim.

Simple card, the owl is fussy cut, and I punched the moon out. Added some pom pom trim along the side as well. 


that's all folks! Will be back in a couple days when things calm down a little. Take care & WATCH OUT for these kids on skateboards! Actually, take my advice, just keep them off the skateboards all together! 

hugs, Noelle

supply list: stamps: Inkadinkado; paper: K&Company; stickers: K&Company; punches: EK Success; cupcake sticker: Jolees; glass glitter, solid cardstock, pens and inkpads: SU!

Wednesday, September 7, 2011

Trick or Treat


Hey all! here's a card I whipped up the other night during another insomnia bout! I swear, I should change the name of this blog from "paper & ICE" to "Stamping Instead of Sleeping!" LOL ;) This card was inspired by this great card I saw on the gallery at ColourQ 100 last week! Here is a link to Anne's cool card, she was a Courtier last week! I loved the black embossed image on the text background, so that was my jumping off point for this card. I used my new Inkadinkado stamps Trick or Treat and Halloween Night. I used some Halloween text paper and heat embossed the bat and the sentiment in black EP. I stamped the stars in orange dye ink. For the top I made a regular vertical card and cut all but about 1 1/4" off of the front of the card. I border punched what was left of the orange front and then I attached my "card front" to the BACK of that punched orange strip. I layered some stick tape on that orange piece and added some glass glitter to it. The final touch was a cool layered owl sticker, and that's all folks! :) 

hugs, Noelle

supply list: punches, owl sticker, patterned paper: Martha Stewart Crafts; stamps: Inkadinkado; solid cardstock in Pumpkin Pie, Old Olive, and Basic Black:SU!; glass glitter: SU!; heat tool, black EP; orange dye ink

DUST IT OFF!: Pull out that fancy glitter you bought for last years Christmas projects to give your Halloween cards a little extra "oomph!" 

Happy Autumn :)

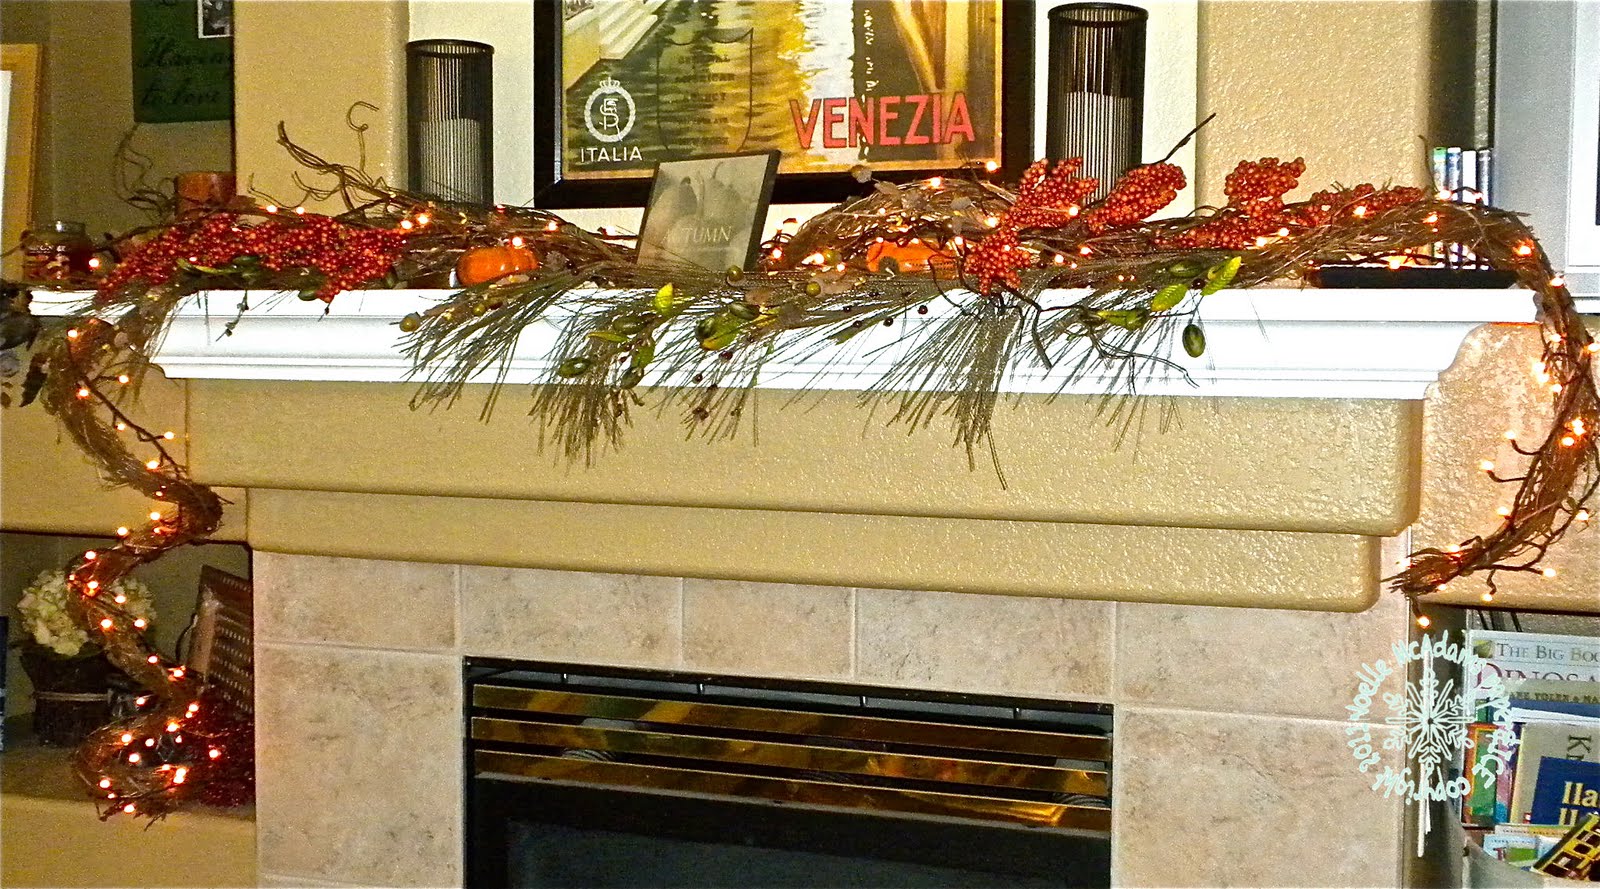
Happy Autumn! Ok, I know it's not officially autumn until the autumnal equinox, BUT the CO weather has seen an abrupt change in the last few days! We went from a constant stream of 90s to 60s and 70s over the weekend. And, the Pumpkin Spice Lattes have arrived at Starbucks. And, I spent some time this weekend putting up my Fall decorations, which, as a former Interior Design student and merchandiser, makes me VERY happy :) I am kind of a freak when it comes to holiday/seasonal decorating. Holy cow, it's kind of a hobby, though I'm sure some of my family and friends would say "obsession" LOL ;) Anyway, I hold out until the beginning of September & then I go to town. I layer in the Halloween decorations come late September/early October. 
So these pictures here are of my new autumn display I did this year. My hubby built me that pretty white mantel last Fall (the original mantel is still there, it was just that drywall "bump" you see below the crown moulding) and it made my mantel about twice as deep, so I can put things up there, without them falling down. I saw a GORGEOUS display at this fabulous home store that is about an hour from my house. It's called Cozy Cottage (that is a link to their facebook page where you can see pics). It's a little on the high end side, and my taste tends to be a slight bit more "clean" than the uber-rustic feel the store has, but it does have darling accessories and a wealth of awesome ideas. I saw a very similar display to the one I did there, and I saw these adorable grubby lights, which have silicone dipped bulbs, so they look like little candle flames, very pretty and fall-like. If you want some, I will tell you they are far cheaper online, and there's even tutorials to learn how to make your own. I decided it was just easier to order them this time, as I have about 4 other home projects laying in wait, a birthday party and another event coming up, I am too busy! 
So, the display consists of a grapevine garland, a "silk" autumn garland (which has acorns and almost some pine looking boughs on it, very pretty), some sprigs of "berries," and the grubby lights. Then I layered in some pumpkin candles and an little sign I had that says "autumn." See, I told you when I started this blog that there would be some home decorating stuff on here. It only took me 2 years to make good on my promise, but I do have some other upcoming fun projects to show you, too :) I have a Halloween card to show you as well, but this has gotten SO long, I think I'll put it in a separate post. Happy Fall! 
hugs, Noelle

Tuesday, September 6, 2011

More Than the Moon and the Stars...... (CQC101/SFYTT)

UPDATE 9/9: After floating around blogland a little.... here I thought I was being so original and all with my moon card & I just realized that Jen delMuro had posted a moon card just a couple days before this, LOL, I guess great minds think alike! If you want to see a VERY cute card with a moon and an astronaut, go check out her card.


Hi there! Are you ready to get back to the "real world" after the long weekend? Yeah, me neither! ;) I made this card for my hubby who told me I should "make him a card" to convince him to vacuum! Stinker! Yeah, he did vacuum, and before he even knew I was making him a card, too. heh heh... This is for this week's colourQ 101 challenge. I also used a sketch challenge that I haven't played in a while, and have missed, the Sketch for You to Try for September! I loved these colors when I first saw this palette... Blues, greens, purples.... I ask you, WHAT could be better than that? When I first saw this inspiration pic, all I could think about was this old DSP from Stampin' Up! called "Cottage Wall." I used the piece I was thinking of on that small panel, the floral piece. Here's the palette:


Doesn't that fabric in the photo remind you of that DSP, too? I wonder how many creations we will see with that paper this week! ;) I also pulled another (REALLY old!) SU! DSP from the package "Fall Flowers" that had the colors Soft Sky and Old Olive in it, which I felt were pretty good subs for Pool Party and Lucky Limeade. The cardstock/inks I used were the "real" colors however, so you can see it blends pretty well! Here is the sketch: 

For the main panel and the moon I dry embossed with a embossing folder that had been inked with a brayer. The moon is also sprayed with white Smooch Spritz. The stamp was a freebie with my last Unity order. I inked it up with multiple markers. The moon was made by cutting a circle out of the Pool Party that was the same size as the stamped panel, and then punching it partly with a large circle punch. I laid some Razzleberry dotted ribbon along the bottom & my very last acetate star, **sniff sniff* ;) and topped it with a button and some wire. I had thought of using some punched stars on the moon, but in the end, I really liked it the way it was without that. 


Well, that is all for me today! I hope you will come play with these fabulous colors this week at colourQ!! 

hugs, Noelle

supply list: stamp: Unity; cardstock/inkpads: Stampin' Up!; DSP: SU!; pens: SU! and Inkadinkado; circle punch: EK Success; circle cutter: Creative Memories; ribbon: SU!; acetate star: Heidi Swapp; button: The Paper Studio; embossing folders: Cuttlebug; white Smooch Spritz; brayer

DUST IT OFF!: Well, this card is ALL a dust off, except for the stamp which had been previously uninked! Even that old technique of wrapping wire around a round nosed plier? I think that's still cute! And I still have wire, so I'll be using it ;)