Home Design Work Recognitions For Sale About Me

Sunday, April 10, 2011

Disney scrapbook layout (Spotted Canary sketch challenge)

Hello again! Just one more QUICK post this morning and then I'm off on a Quest. Well, I'm off to make a dent in my family's laundry, but that feels like a Quest! LOL! Seriously, the laundry situation in this house is COMPLETELY out of control! I have this idea that if I get it all done, I am going to eliminate the kids' hampers and just have a single family hamper, with which I will be SO on top of it, I will wash, dry and put one load away DAILY. It's a dream, I know, but it COULD happen, right?

So, this first page is for this month's sketch challenge at SpottedCanary.com! That link will take you to the thread where the sketch is posted. Then I wanted a 2 page spread to get all my pics in from this ferry ride, so I made the second companion page to coordinate. I used my labelmaker to do the journaling. That's a trick I like to use a lot. :) Well, I hope you like my layout. Have a wonderful day! -Noelle

Supply list: patterned paper and Disney chipboard, buttons & stickers: EK Success; border stickers: Reminisce; 3D circle stickers, letter stickers: Sticko; all punches but Mickey Mouse: EK Success; Mickey Mouse punch: Creative Memories; labelmaker: Dymo


DUST IT OFF!: That labelmaker is an oldie but goodie:)

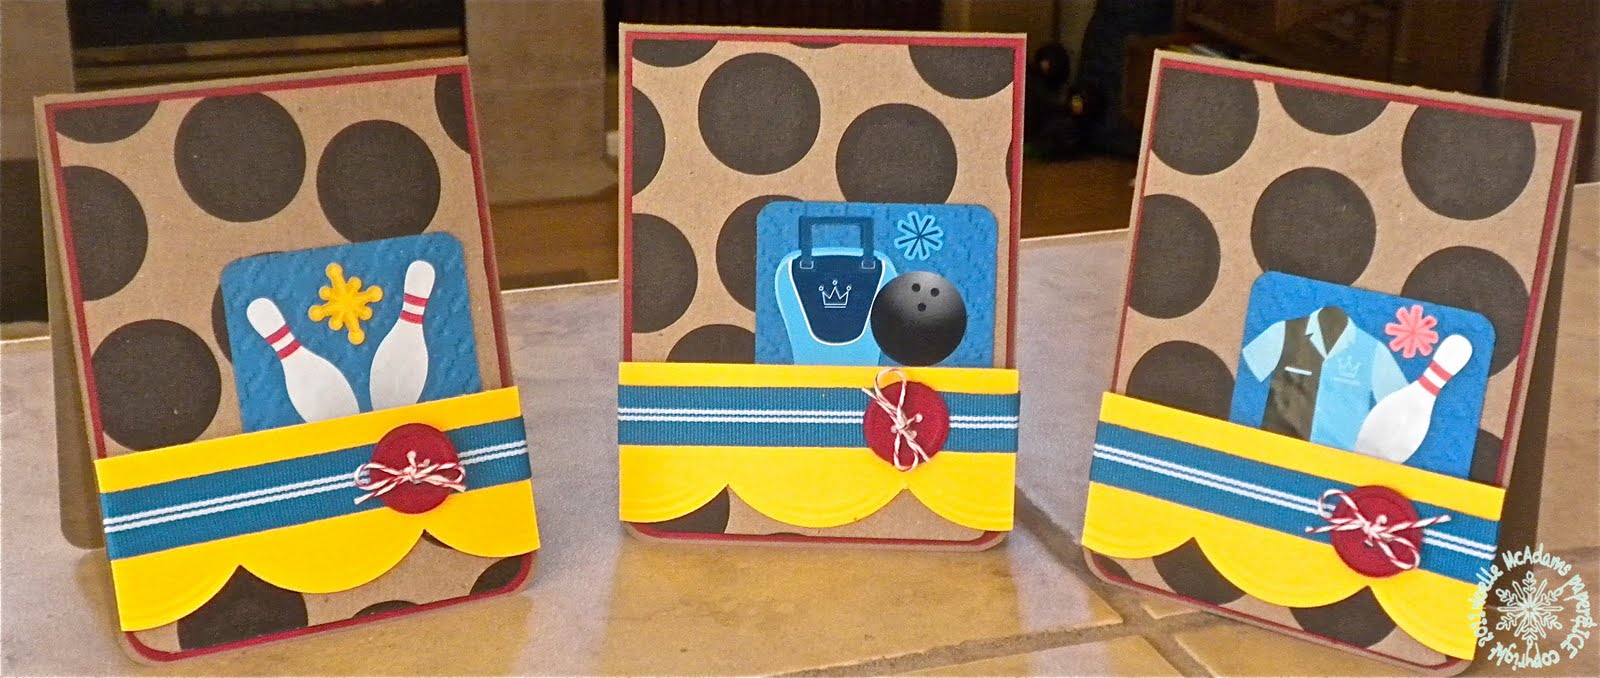
Bowling for Birthday Party Invitations

Hey all! Just wanted to share these fun birthday party invitation I made for my nephew, Thomas. My stepsister contacted me last week to see if I could make his invitations for his bowling party. I LOVE to do these things for my family! It makes me happy that they WANT me to make custom invitations for the kids' parties:) I had never made anything with a bowling theme before. I mean, I know I did a few scrapbook pages sometime in the past, but I think they were pretty generic. My hope was to find some fun bowling paper, and I really didn't think it would be very hard to find, but just when you think you'll have NO problem finding something, that's when you run into trouble, right? So, I called Archivers and she said they had stickers but no paper. So, the hunt began.... First stop, Michaels, which is where I picked up this fun kraft cardstock with the black circles that I ended up using. Kinda reminds me of bowling balls;) But there was not a single bowling themed item in that store, believe me, I LOOKED! LOL! So then, onto Joann's. Nothing there either, except they had some stickers, but they were all different, more like for a scrapbook page. Nothing that I could duplicate a card 30 times from. So then, onto Hobby Lobby. FINALLY found some Sticko stickers that were affordable, and though I ended up with 6 different versions of the invite (5 packs of stickers, but since they were Sticko, they were only $1.50 a pack:)  I think these turned out REALLY cute, wouldn't you agree? I was trying to make them "mailman friendly" so I used this embossing button punch, so the buttons actually lay flat when mailing, which I think will be nice. Also, with the flat stickers, that keeps it flat, too. Additionally, still trying to make a dent in my MASSIVE spool of baker's twine, so this was a good fit for that, too:)
Well, I hope you like my cards! Additionally, and more importantly, I hope Thomas likes them! Have a "strike" of a day! :)

-Noelle
Supply list: black/kraft cardstock: Recollections; bowling stickers: Sticko; solid cardstock, ribbon:SU!; large curved embossing punch: EK Success; button embossing punch: Martha Stewart Crafts; bakers twine: Crate and Barrel; corner rounder: the Paper Studio; embossing folder: Cuttlebug

DUST IT OFF!: A corner rounder is one of the first tools I ever bought and I still love them! What a simple way to add pizzaz to your projects:) lso, remember that stickers are a perfectly fine alternative to stamps for the images on your cards! Particularly when making several cards, there's nothing faster and easier! :)


Thursday, April 7, 2011

Shrink Plastic long card

Hi there! I was so excited to use some of these shrink plastic embellishments I made last night, that, I couldn't wait! :) Check out my last post for more details, but this is shrink plastic, like the Shrinky Dinks you used to make when you were a kid? I bought a package of the plastic sheets several years ago and I think it came with clear, white and black sheets. I used the black and white making my embellishments last night. I punched out a variety of shapes and then stamped them with pigment inks and then used my heat gun to shrink them down. So, I used very large punches, pretty fun! I decided I wanted a pleated medallion to frame one of the accents, so I border punched a 12" strip of paper and then used my scoring board to score the lines before I pleated the paper. Then I used a large punched circle and some dimensional glaze on the back to begin to make the medallion "behave" and lay down. I laid a punch on top of it to weigh it down while the adhesive took hold. Then I added my punched images and shrink plastic embellishment to the top with some more glaze. That's the one think about those darn medallions. They are not hard to make, but you MUST use a strong glue and sort of sandwich them between two other shapes to hold them in place. I remember the first time I made one here, I kept coming into my studio to find that the medallion had come undone and instead of a lovely circle, it was a long pleated strip of paper, lol! So, take it from someone who's learned the hard way, you NEED to use a strong glue, like Crystal Effects or other dimensional adhesive. I think this medallion turned out so pretty with that punch around the edge, LOVE it! :) Well, that's it for me tonight, I hope you like my card! have a great one! -Noelle


Supply list: variety of punches: EK Success; stamps: Inkadinkado; pigment ink, vintage brads, ribbon,  and solid navy cardstock:SU!; shrink plastic; heat tool

DUST IT OFF!: That shrink plastic is really old, but super fun! :)

Wednesday, April 6, 2011

Balloon Bear (cqc #79)

Hey there! I got my card done for CQC! YAY!

I paper pieced and used Crystal Effects on the balloons, to make them shiny looking.... When I saw this stamp set I thought that you really have NO CHOICE but to do that, plain balloons would just be BORING compared to paper-pieced-dimensionally-glazed balloons, right? I colored my little bear green with Copics. Some more fussy cutting ensued, aren't you proud? I guess I really got the vote of confidence that I can do it after cutting all those waves on that whale card a couple weeks ago, because I think I've used it on every card since! I still had the sewing machine out, threaded with aqua thread from my last card, so I accentuated the way I laid the die cuts on an angle, by stitching around the sides. The sentiment is on black shrink plastic, I can always use more birthday cards to have around. The final accent are some super-cute K and Company cupcake brads, LOVE these!

Go over to colourQ and check out the awesome creations from my DT buds, have a great day! -Noelle

Supply List: stamps:TCP; patterned paper: SU! and Cosmo Cricket; cupcake brads: K and Company; black shrink plastic; white pigment ink: Inkadinkado; giant tag punch: Marvy; sewing machine; heat tool, large hole punch; markers:Copic


DUST IT OFF!: If you're like me, you bought some shrink plastic a looooong time ago when it was all the rage. Using a pigment ink on it, punching it out and using a heat tool to shrink it, is a quick and easy way to use it up! You could make just one accent, or make several and keep them on hand for future projects. I had fun playing last night, and got several of these done for future use very quickly! I guess we'll see what comes out of them, I'll keep you posted! 

Rainy Day (TCPTUES 153)


Hey all! Hope you are well, sorry I've been MIA so much lately. I got some freelance work (yeah!) SOOOOOOO excited, but it means all the work I've done lately is PRIVATE. So I've been a busy bee, but nothing I can share. SO, I got those projects finished, and decided today I need some PLAY time, just for me, just for fun. I've been dying to play with these new stamps from The Cat's Pajamas! It's a fun challenge over there this week, use Teal, Orange and Yellow in your project, so that was my jumping off point, though I used a BUNCH of colors, not just those 3, I hope that's ok! 

I'm hoping to get another post done by tomorrow lunchtime using another new TCP set for the colourQ challenge this week! I'm dying to sink my teeth into it, great colors! 

So, my card, I had these two papers with raindrops on them, and I couldn't decide between the 2, I liked them both so much! So, I decided to go big or go home and use them both even though it was a bit risky, but the kraft one was pretty subtle and since it did have the same shade of pale teal as the bright colored one, I figured I could make it work. 
I created my A2 card base from Tangerine Tango and matted a piece of the kraft raindrop paper with Baja Breeze and decided to lug out the sewing machine. I used a zigzag stitch to go all the way around the card, and then went back and forth several times on the top, I was going for a "smocked" look like you'd see on an old-fashioned little girl's dress, I think it's pretty cute! Then I die cut the bright raindrop paper and another piece of Baja Breeze, for the background of the scene. I added a die cut cloud, and some raindrop stickers below so it looked like she was walking out of the rain. I paper pieced my little girl, and both her coat and boots are covered in Crystal Effects (dimensional glaze) for a slick look. I actually added her yellow rhinestone buttons to the coat while the glaze was still wet, so they are sort of embedded into the glaze. I colored her hair first with a SU! marker (the fine end) for the strands in her hair and then Copics over that to shade. 
You may be thinking the layout of this card looks familiar, and you would be right, it's the same layout I used a couple weeks ago for TCPTUES right here. I used one of the same OLD tab stickers for this card that I used there. I was actually going to make a yellow tab with my tab punch, but it was too narrow for the sentiment stamp, so out came those old stickers again, I like them! When I got done, the inside of my card was a MESS! There was the back of all the sewing and then the spot where I accidentally punched the hole for the brad all the way through the card instead of just through the card front, oy. So, I decided to decorate the inside too, I still had some die cut clouds left and it was pretty quick to do the inside too, since everything was already out. 

Well, that's it for me tonight! I hope you like my card, I think these stamps are TOO cute! Have a stellar evening! -Noelle

Supply List: stamps: TCP; ink: Memento Brown; solid cardstock in Whisper White, Baja Breeze and Tangerine Tango:SU!; kraft raidrop paper & yellow paper: American Crafts; bright raindrop paper/teal plaid: Echo Park; dies: Spellbinders and MFT; buttons, brad, and pen: SU!; bakers twine in yellow and orange: Jillibean Soup; tab sticker: K&Company; raindrop stickers: EK Success; paisley teal paper (on coat): MME; yellow gems: The Paper Studio

DUST IT OFF!: Another tab sticker makes an appearance! 

Monday, April 4, 2011

Stylish Blogger Award


Hi everyone! I hope you are doing very well today! My sweet friend Sylvia left me this blogger award! My first ever:) Thanks, Sylvia! So, I guess the deal is, you pass the award on and tell eight things about yourself. 

I would like to pass this award on to: Berenice, Arielle, Jenny, Rochelle, and Kim.

Berenice is one of the first people I didn't know who started following my blog, which gave me a huge vote of confidence! Berenice comments a lot, which is so sweet! She is kind and very creative, and I love the work she does for Karber. 

 Arielle is an amazing artist and also draws her own line of beautiful digi stamps, The Wax Fruit Company. She started and mediates the colourQ blog where I am a DT member, so, she was the first one to give me a shot at being a designer, and I truly LOVE working for CQC,the challenges ROCK & the whole team is very friendly and fun.

Jenny started blogging right around the same time as I did, and, also like me is a proud mom to 3 boys (we moms of 3 boys are a small club, I say). She has been named "Swanky Stamper of the Month" at The Cat's Pajamas a swaggering 3 times, and she earned it every time, her work is truly a cut above, amazing! 

Rochelle is another DT member of mine at CQC! Once we got chatting, we realized that we both live in CO! Rochelle is a digi scrapper, and her pages have the depth and detail that I love to use on traditional pages! She is very talented:)

Kim is a new blogger, a super experienced designer, and a very good friend of mine. When I used to be an SU! Demonstrator, Kim was my "upline" and we are still fast friends. She's only blogged a few posts so far, but I predict that once she gets going, she'll be VERY popular, she has such a pretty, feminine style.

So, eight things about me..... 
Well, the 1st is that I have a Christmas birthday, yes, actually on the 25th, and that's why my name is Noelle. 
The second is that, when I was little girl, we were an Air Force family, and I lived all over the US and also in Germany, in fact I moved six or seven times before my 9th birthday. 
#3 is that I live in CO and I wouldn't want to live anywhere else, travel is fun, but no matter where I go, I'm always glad I live here. 
The fourth is that I married the guy I started dating when I was 15, and we've been together ever since. The best decision of my life was sticking with this sweet, loving, and supportive man!
Number 5: I have a HUGE family, a brother, a sister, 2 stepbrothers, 3 stepsisters and a SLEW of nieces and nephews. Holidays are always a BALL & usually hosted at my house! 
6: I love home decorating! I'm a DIY Diva and even once cut a sofa in half, reupholstered it, reattached the arm, and turned it into a large armchair! I actually worked in the Interior Design industry for 4 years and have several credit hours towards a degree in the field. I'm about as passionate about fabric as I am about paper! Since I love it so much, I'm a major "seasonal decorator" and have loads of holiday decor items that are seasonally switched out. A project I'm currently working on is a 12$ salvaged door that I'm turning into a headboard for our bed. When I started this blog, I intended to focus on Interior Design as well as papercrafting, so maybe one of these days I'll get around to that too. 
Lucky seven: I am super speedy crafter, and I can usually finish a card in 20 minutes and a 12" page in less than 45. 
Finally, number 8! My **not so secret** dream is to do this professionally, and work from home as a professional artist in the crafting industry. It could happen, right? 

Well, that's it for me today, thanks a million, Sylvia! I hope the rest of these gals will stop by and get their awards! 

Have a stellar day! -Noelle


Sunday, April 3, 2011

Moxie Fab Tuesday Trigger: "Farm Fresh"

Hey guys! What a weekend! I've been working all weekend, I think I've made 11 projects! Holy smokes, I almost decided to bail on this challenge from Moxie Fab World, but you see I was really, REALLY in love with this GORGEOUS Trigger, this hand made dish towel, just lovely. Then to top it off, I kept seeing everyone else's GORGEOUS creations from the Trigger, and then finally, my friend Sylvia (who also happens to be this week's Moxie Fabber of the week! Yay! GO Sylvia!) suggested that I should in fact try and make the time, so, here we are! Yikes!

This card is about as CAS as I get, and I'm still sitting here thinking it needs more layers or something! But I do think (just as in the Trigger....) all the white keeps it looking fresh and clean. I stamped the flowers in Pumpkin Pie ink. LeAnne (from the DT at CQC) had shown this cute paper lace on her scrapbook page (there at the link) and I kept thinking how fresh eyelet lace is and how it seemed the feel would work well with the theme "Farm Fresh." LeAnne told us she used a cheap piece of cardstock (you could probably even use computer paper I would think...) punched it with that lacy punch, and then crimped it. I smoothed it out with my bone folder after crimping, and then stuck it down to my card. Some Pacific Point ribbon on top and a punched bird, and there you go CAS and sort of farmish, wouldn't you say? I pulled the colors and the fresh look from the Trigger. Well, that is it for me! Another busy day tomorrow, I've got Pilates in the morning and a group meeting here tomorrow afternoon, and my kids FINALLY go back to school tomorrow! Yay! 2 weeks is kind of a long Spring Break, particularly since we just laid low and stayed home this year. Anyway, I am WIPED! I hope YOU all have a stellar day and I'll "see" you soon! -Noelle

Supply list: All supplies from Stampin' Up!  except for blue and green patterned papers: TPC Studio and MME

DUST IT OFF! That eyelet punch I've had awhile, though SU! may still sell it, I'm not sure.... :) Fun technique with the paper lace, I'll have to try it again! :)

-Noelle