Home Design Work Recognitions For Sale About Me

Wednesday, February 29, 2012

Elephant Birthday card (SFYTT)


Hi there! Well, it's sure a good thing that Leap Year falls in 2012, as it's giving me the time I need to play along with this month's Sketch For You To Try. I really would like to play every month this year, so far, I am 2 for 2! Sadly, the sponsor this month is Your Next Stamp, and I don't have any of those, which is a bummer, because I do think that this commissioned elephant birthday card would have been stellar with this cute elephant stamp from there. But, ces't la vie, right? Here is the sketch:
feb2012sketch

As I mentioned above, this card was commissioned by a friend for her son's 8th birthday. She also commissioned the penguin card from this post for her other son. 

**Thanks a million, Stephanie! :) Encouraging friends keep me going, and you have given me a lot of that lately. I am still hoping you will move here, so we can actually hang out in person, instead of just on facebook. xo**


Stephanie's son likes elephants like my son does! So, I pulled out this old (retired) SU! set "Wild About You." I actually used this set for my little Ev's birth announcements **sniff sniff** and now he's 4 and a half! :( But, I digress.... this is an adorable set, and such a cute stamp. I have a few other elephant stamps, but this, by far, is my fave. He's got so much character! :) The elephant is stamped in Pool Party ink with a popped up ear stamped in Bermuda Bay (retired). I started out with a Early Espresso card base, and all the DP is from a single Imaginisce printed sheet, love the balloons! I even fussy-cut out the 8 and the balloon that the elephant is holding from that sheet. For the balloon string, I decided that I wanted the string to look as if it was tied around his trunk, so I pierced some holes and backstitched some bakers twine down to the card. 
along the LH side, the layered embellishments are just made from a variety of punched pieces. The elephant brads were a last minute addition, but I'm glad I came across them in my stash, as they are just too cute for this card. the final touch was to heat-emboss the sentiment in white pigment ink with white EP. Well, that is all for me today! I have some other things in the works, and still need to snap pics of the scrapbook pages from this weekend, so I'll be back soon with some more fun projects!! :)

hugs, Noelle

supply list: solid cardstock, ink, stamps: Stampin' Up!; patterned paper: Imaginisce; punches: Martha Stewart Crafts, EK Success, and SU!; elephant brads; making memories; bakers twine: Crate and Barrel; white pigment ink; white embossing powder; heat gun

DUST IT OFF!: Those animal brads have been around a LONG time! I have used a few here and there, but I guess I need to find a big project to use them on! :) Plus that stamp is old and retired... but look at that face, who could resist him? Just say YES to using those old supplies! ;) 


Tuesday, February 28, 2012

Field Trip 2 Blackbird Pond scrapbook pages (CQC126)

Well, hello, hello! I hope you had a lovely weekend. :) I did, on Saturday I scrapped these pages for this week's ColourQ challenge. Then, I got a call from a dear friend inviting me to meet her at Archivers to scrapbook. I got 12 more pages done! Whooohooo! 

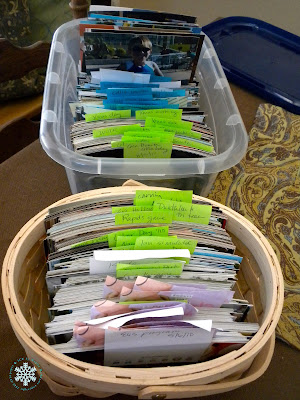
I was thrilled to get some pages done. Especially, since I spent much of Friday sorting, dating, and organizing the 600 photos for the crop I'm going to in May. It took hours, in part because I was so behind in printing. I normally print around 200 at a time, but hadn't printed anything but a few 5x7s from 2011. So, these were ALL my 2011 pics. While sorting, I realized that loads of my photos had doubles, and I didn't order doubles? At the end of sorting, I **had** to make sure I hadn't actually paid for this huge stack of extra photos, so I counted the stack of the sorted singles I was sure I had ordered. Nope, I only paid for my 627 pictures, however, I guess Walgreens made an error, and ended up giving me an additional 420 photos for free? It was crazy! So, grandmas and grandpas will be getting packages in the mail, soon! ;) Anyway, to me, this is the prettiest photo of the whole post, the photos I already had printed and organized, plus the 600 I sorted, arranged by date and labeled, the life of a traditional scrapper, I tell you! ;)
Well, I'm betting you stopped by because you were actually interested in seeing something for this week's ColourQ challenge? Here's the pretty palette:
cqc126
My first inclination was to pull out pumpkin patch photos.... but it's springtime (well, sort of... with over 20" of snow in Denver this February, it doesn't FEEL much like Spring, but I think we are getting there!) and then I pulled out the first batch of pics from the old box... This was one of those events I really didn't know what to do with. These were the oldest photos that I need to scrap, and the reason for that was that I just wasn't sure... should I do a school page, it was a Field trip... A nature page? These colors ended up being the perfect jumping off point for these. This was a Field Trip I took with Collin's class when he was in the 1st grade, it was a trip to a nearby pond to look for crawdads, and observe the animals in this phase of their development. The photos weren't that great, so you can see I did a whole lot of journaling. 
I thought the bird punch would be a great way to "set the scene" (yeah, I still use Theater lingo every now and again, what of it?) ;) for this page... I cut the branch from woodgrain paper on my Cricut (Home Decor cartridge), and made birdie a little "nest" from some green baker's twine and a scrap of ribbon.

As I was trying to combine two themes outdoor/school, I pulled stickers, bits and pieces from a variety of places in my stash. I used the notebook looking border punch, and a few school chipboard pieces I found in the proper colors. I tried to combine the school theme and nature theme in the colors where possible. Here's an embellishment I made from a nature sticker, a vellum sticker with an education quote, and a book sticker:
As with many of my pages, much of the style came in on the title blocks:
In the end, I was really tickled with the way things turned out. Particularly since these photos were such a question mark to me for so long. I'm going to write up as complete a supply list as possible; but there are so many bits and pieces on this page, I know that I'm not sure of the manufacturer of everything, but I'll do my best! Will try to snap a few pics of some of the pages I finished at Archivers this weekend. Hope you can came play with us at ColourQ this week! :) 

xoxox, Noelle

supply list: banner stickers: MME; letter stickers: scrapworks; bird punch/solid cardstock/striped DSP/orange ribbon/polka dot circle sticker: SU!; plaid paper: K&Company; school chipboard: Crate Paper; border punch: EK Success; nature stickers/woodgrain paper: American Crafts; 2 sticker/scalloped circle sticker: October Afternoon; book and notepaper stickers: Sticko; bakers twine: Jillibean Soup; orange/white "bobby pin:" making memories

DUST IT OFF!: SOOOO many old stickers and goodies on this page! The papers are all old, too. Just kept digging through my stash to find "just the perfect" thing, so glad so many of them were old! :)

Saturday, February 25, 2012

TCPTUES times two

Well, since I just can't seem to keep up with myself, I'm back again, catching up on the last 2 TCPTUES challenges! I'm so glad Alma gives us the whole month to git 'er done! (Sorry, every now and again a Larry the Cable Guy quote just flies right out!) ;) The first project is my 3D/ABC (anything but a card) project for  TCPTUES 197. I made a diorama to add to my Easter decorations, this is the same instructions as for the diorama card on SCS, but much, much bigger! The finished size is 8" wide, by 5" tall. This project took awhile, but it was mostly due to all the Copic coloring. I took a lot of time with that & went very sloooooowly. I also used the large scalloped pennant die for the "hole" in the front, green panel, and then a Nestabilities die in the brown panel.
I created a little scene with stamps from Bunny Side Up and an older set that I am VERY attached to! You may remember ALL the cards I did with this set last year, it's called "Beans, Bunnies, and Peeps, oh my!" That set isn't available any longer, but it's sure a cutie! :) 

I made the "flower" embellishment by cutting a Lacy Floral Doily from a pink polka dot scrap & sort of crunching it to give it movement. be careful if you do this because I tore the first one I made and had to cut a second! Then I added some punched pieces with the sentiment to the center of the free-form "flower." The final touch were some cute new vintage look buttons from the "Dear Lizzy" line at American Crafts. I just bought those buttons and have used so many already! 

Ok, finally onto the next project! Thanks for keeping up through this long post! :) 

This is for TCPTUES 198, you can see a soft color challenge! :)

Here's my card:

I was a little shocked about how much pink I ended up using on this card, what was even more surprising to me was how much I LIKED all that pink. I guess I can like anything if there's enough blue and green, LOL ;) I used my Build A Bingo set with the Easter egg mini stamp as the "marker." I used some punched scraps to make a sort of scalloped border across the bottom of the card. I really liked how stamping this on the patterned DP turned out, that was a first for me with this set. Another one of those fabulous buttons in the center.... I didn't have a die that was quite the right size to make a mat for the bingo card, so I cut two of the size that was slightly too small and I cut each die cut in half, one was cut long ways and one was cut cross ways, if that makes sense. Then I attached each one to the back, peeking out, so it made a mat that was the right size.


Whew!! Well, that is all for me today! Remember, even if you are as harried as me right now (I said harried **not HAIRY!;) - you can play at Dancing In Pajamas until the end of the month! Have a great one. :)

xoxox, Noelle

supply list: stamps: TCP; dies: TCP & Spellbinders; punches: EK Success; papers: American Crafts, MME, Authentique; markers: copic; solid cardstock and inkpads: Stampin' Up!; buttons: American crafts "Dear Lizzy" and Pebbles

DUST IT OFF!: Soooo many old papers on these, lots of them were scraps! And that one stamp set is retired, but still SUPER cute!! :)

Thursday, February 23, 2012

Masculine camera card (PP83)


Hi there! I am sooooo happy to be writing a post that won't take an hour! After thoroughly enjoying a FULL crafty day yesterday, when I made 4 cards, a scrap layout, and a 3D project, today I've spent the whole day typing about them! LOL! Sometimes, I wish I wasn't quite so "wordy." I get a little carried away telling you guys "all about it!" Especially when I know a lot of folks just look at the photos and move on... but I like to read what other people write, so I guess that's why I feel the need to share so much. Besides, I am just kind of a "heart on the sleeve" gal, anyway. :)

Anyhoo... this is for this week's Paper Players challenge #83! My friend, Anne Marie came up with an inspiration challenge, a fun one, thats near and dear to my heart, actually.... since I have 3 boys and all. 


I got some new 6" paper pads last week! Yeah! Mostly they were new from the recent CHA releases. One that I got was from the Echo Park "This and That: Charming" line. There's a more feminine counterpart to this masculine one, but I was THRILLED to see papers that will work well for men AND boys, and I really love the change of pace the soft colors provided, instead of being dark or bright; which masculine papers often are. I also picked up one of the 12" sticker sheets, and used a few on this card. 

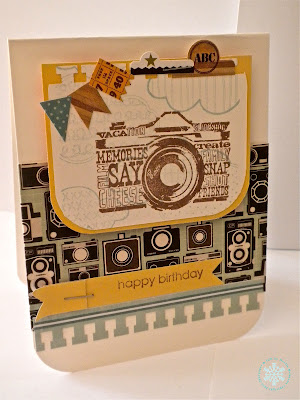
This paper just screamed to me to be used with this stamp from Inkadinkado. I know, sometimes I am WAY too predictable, camera on cameras, how original, LOL ;) I overstamped the camera image with an old KOM cloud stamp from Unity. I used my punch that looks like a notebook, it mimics the border sticker used along the bottom. I hope this card isn't **too** busy to be "CAS" but I do like it & think it would make a good birthday card for man. I used a few staples on the card, too. Hope you like it! :) 

xoxo, Noelle

supply list: DP & stickers: Echo park; stamps: Unity, Inkadinkado, and Stampin' Up!; punch: EK Success; die: Papertrey Ink; solid cardstock and inkpads: SU!; stapler

DUST IT OFF!: Some old stamps get new life with some cool new paper. :)


Paper Players DT call


Hi there!! I have a MONSTER post for you today with 2 cards and a scrap layout, so just keep scrollin'! ;) This is for the Design Team Call over at The Paper Players. I decided to create new projects for the call. The 2 cards are using past PP challenges and I decided to include a scrapbook LO since the call mentions that scrapbook pages may be submitted if you were to become a DT member.

So, for those who don't know me already; my name is Noelle McAdams. I have 3 sons & a very sweet hubby, 2 Pomeranians & a cat; so.... my life is blessedly full! :) When not taking care of the above (and ok, every once in awhile when I've planted them in front of a TV...;) I make things & write about them. I'm really passionate about helping people plunge into creative endeavors; having a background in theater, interior design, and all kinds of crafting makes you want to spread the love, I guess. Have been blogging for almost 2 years. I would love to join the PP team since I thoroughly enjoy the blog, I love designing, and I look up to their DT. I love to learn new things & expand as an artist, so that is important to me. One thing I have learned being on the DT at colourQ, is that I really enjoy working for a blog where the focus is not on prizes or a specific brand of product, but on the art. Since PP is set up similarly, I think it would be a good fit for me. Now, onto the projects! :)

This first card is made using an old PP sketch, here it is:
I did flip the sketch, and used one large flower element instead of two smaller elements, but the "meat" of the design is still there. I have to confess this is the most favorite card I've made in awhile! I always need birthday cards, but might have a hard time parting with this one! ;) I used DP for the 3 slim panels & PTI dies for the oval element.

For the next card, I used the PP challenge from a few weeks ago, which was to use a TAG.

I decided to turn the tag into a removable bookmark, as a little thank you gift. Here's my card:
This card used such a variety of products; both old and new! The tag used for the bookmark was purchased recently in this pack. These tags were really affordable, and I liked how they are printed on one side, and solid on the other. I used the solid side, removed the twine that was on it, and added some ancient rub-ons, an owl cabochon, some seam binding and bakers twine.

I used a mini paper bag on the front of the card, to slip the bookmark in. I accented it with a large owl stamp which was colored with Copics, and fussy cut out. the sentiment is an old SU! stamp. The card was accented with a loopy bow, and a fun wood button.

The final project was a 2 page scrapbook layout. I used a favorite technique I've been loving on my pages lately: masking with spray ink! I punched some stars, laid them down and sprayed sopme dark brown ink on top, then removed the stars; I really like the grungy "western" feel this adds to the page about the BBQ for my littlest cowboy. ;)


Both old and new product on this, too. The die cut paper is new, but all the rest of the DP is scraps. Including that piece with the horse on it that I used for the title block, it was discovered in the bottom of my scraps bin. :) More pics, you can see the handmade accents made with punches:

Well, that is all for me! Please pop back soon, though, I made SO many fun things yesterday, including more cards and a 3D diorama! there will be a couple more FUN posts, coming your way in the next 48! Have a SUPER day!!

hugs, Noelle

supply lists:

flower card: stamps: Stampin' Up! and Papertrey ink; dies: Papertrey ink; brown bakers twine: Jillibean soup; decorative papers: My Mind's eye; paper flowers: Prima; silk flowers: The Paper Studio; corduroy brad: Stampin' Up!; adhesive buttons: Pebbles; wood button: American Crafts; ink and solid cardstock: Stampin' Up!

owl card: stamps: The Greeting Farm & Stampin' Up! Decorative paper: Authentique; owl cabochon: Jolee's Parcel; seam binding, ribbon, solid cardstock, rub ons & ink: Stampin' Up!; wood button: American Crafts; tag: Hampton Art; blue bakers twine: Jillibean soup; mini punch: EK Success for SU!; markers: Copic

scrapbook pages: die cut cardstock: Little Yellow Bicycle; plaid DP: Oriental trading; cowboy paper: DCWV; punches: EK Success for Stampin' Up!; sticker: Echo Park; spray ink: smooch Spritz; letter stickers: October Afternoon


DUST IT OFF!: Sooooooo many old things on these projects; scraps; old rub ons; old brads and other accents too :)


Liebster Blog award


Hi there! Just wanted to share that I was recently given this blog award by my fellow blogger: Anita! Thank you so much, Anita! Here's the deets:


"Liebster" is a German word that means "favorite" or "dearest", and the award is meant for up-and-coming bloggers with less then 200 followers.  Such an awesome way for us to show our support for new bloggers!  And to get our friends to check out the blogs we love!

In order to accept the award and keep the love going you must:
*Thank your award presenter on your blog {thanks Anita!!}
*Link back to the blogger who presented you with the award
*Copy and paste the award to your blog
*Present the Liebster Award to 5 blogs that have fewer then 200 followers that you think deserve to be recognized
*Let them know by leaving a comment on their blog.

The 5 bloggers I would like to pass this on to are:

Kasia:  a fellow DT memeber at ColourQ, this girl is kind, loads of fun, and crazy talented, you should MOST DEFINITELY check out that link! I love that Kasia loves things like roller derby; it gives you an insight into just how cool of a chick she really is. :)

Rochelle: Another CQC friend! Rochelle and I are "neighbors" well, sorta, we live a couple hours apart. She just had a new baby, that's so exciting. I really DIG her digi pages, and I am a traditional scrapper ALL the way, so when I love digi pages, it's because the designer is really good & has the ability to make the pages look dimensional instead of flat. Rochelle is just that kind of designer, check out her work! :)

Jenny is the 3rd crafty gal I'd like to honor. In fact, I was kind of shocked that I could even give her this award, because she is just THAT talented. She is funny, too! We both have 3 sons, and have bonded over that, & our love of stamps. ;) Jenny is fabulous; I love her work, I'm always BLOWN AWAY when I pop by her "little stampin' spot." You will be too. Check it out! 

Linda is a new blogger, a friend I've made on the TCP boards on Splitcoast. Her work is really pretty, I always enjoy the spin she puts on her projects, there is a real freshness to her designer's eye. She and I are also "neighbors" as she lives in CO, too. Her blog is new, so check it out! :)

My final pick is Jen of JENerally Speaking! She plays often at colourQ, and I love the clean feel her work has. She is always so sweet, too. And I love the animal stories she tells on her blog! 

So, I hope that you will check out these blogs. It is a lot of fun. Thanks again, Anita!! :) 

Big hugs, Noelle

Tuesday, February 21, 2012

Coffee Cards for ColourQ


Hi there! I am so excited about the palette at this week's ColourQ Challenge! This is a GREAT combo, it's right up my alley. 
cqc125
I'm crazy about this quilt! I'd love to have it in my home. :) I recently bought these PTI stamps and dies used from a friend on SCS. I thought they would be fun to make a couple of quick, CAS cards with this palette. 

Here's the inside sentiment for the grey one. One of my fave stamps EVER from Gel-A-tins...

and here's the other card, which ended up being a bit longer than an A2 size, I had a piece of cardstock already cut and scored, and I didn't measure it before I put it together to see if it was actually cut and scored correctly! So, it will be a new back/inside and a custom envelope for this guy, but I still think it's pretty cute. :)

well, I hope you will make some time to come play with us at the ColourQ this week! I'd love to see what YOU come up with! :)

xoxox, Noelle

supplies: dies and stamps: Papertrey ink; stamps: Gel-A-Tins; punches: EK Success; all papers/cardstock: Stampin' Up! 


Friday, February 17, 2012

Handmade paper flowers in a recycled vase (Spotted Canary challenge)


Hi there! Wanted to show you this fun little project I made. I ended up adding the punched pieces and the sentiment on the front of the vase, because a friend's daughter broke her finger yesterday, and Ev wanted to give these to her. I thought she might get a kick out of flowers that would never die. ;) This is for the  Spotted Canary Paper Blossoms Bouquet Challenge. There are still a couple weeks left to play, and the winner gets a 250$ prize package from EK Success. You really should check it out! There's 3 video segments that show you how to make the paper flowers at that link. I actually ended up making one of each style because I wanted the vase to have an eclectic look. I used this punch to make the pink flower, this punch to make the blue flower, and 2 sizes of scalloped circle punches to make the yellow flower. Other than that I basically followed the instructions on the videos.

I want to tell you a little bit about the vase, because I had fun making it. I started out with an empty, cleaned out sweet and sour sauce bottle. I squeezed some aqua craft paint into the bottom, and kept swirling the bottle around until the paint had completely coated the inside. It helps if you have the lid on the bottle when you do this. I have used this technique before, and it's fun, because it gives it a vintage "milk glass" kind of look for just a few cents. I let the bottle dry on my kitchen windowsill for 24 hours before putting the flowers in. When it was dry, I decided I wanted to create a few "stripes" with bakers twine. I love all the projects I see that are wrapped in bakers twine or bakers twine is formed into a swirly pattern on one of those large glue dots. So, using some springlike colors I created three stripes, putting some of that super sticky tape on the back of the bottle in the areas I was making the stripes on, so I could keep it even while I wrapped the twine. At the top, I added the ribbon to cover the threading where the lid screwed on. And then I added the layered punched pieces and a stamp from this stamp set.

The floral wire I was using was really long, and so I added to the flowers whimsy by doubling up the wire and creating some curly cues up near the head of the bloom. 

and that's all for this post! Hope you have a fabulous weekend! 

xoxox, Noelle

supply list: punches: EK Success and EK Success for Stampin' Up!; papers: K&Comapny and Martha Stewart Crafts; bakers twine: Jillibean Soup; ribbon: MFT; stamp: Inkadinkado; velvet covered embellishments (flower centers): Jolees Parcel; adhesive green buttons: Pebbles; aqua craft paint; recycled bottle; sticky tape; glue dots; hot glue gun; floral wire stems

DUST IT OFF!: A bottle rescued from the recycling bin makes a fun, faux milk glass vase! 


2 cards, 2 TCPTUES challenges


Hi there! One thing I love about TCP Tuesday Challenges is that there's a new one every week, but you have the whole month to play! :) And since I've been a little flaky as of late, that's a really GOOD thing for me! There are 2 cards for 2 different TCPTUES challenges on this post, so be sure to scroll all the way down to see both cards. :)
This first card is for TCPTUES 195, a sketch challenge from the fabulous Leigh! :) here's the sketch:
I used my new set Bunny Side Up, and my new Lacy Floral doily die behind this silly bunny. He was colored with Copics, and fussy cut out. I used my pennant dies from TCP as well, for the banner.

The second challenge/card is for TCPTUES196, and inspiration challenge, here's the inspiration pic:
very "birthday-ish" wouldn't ya say? I wanted to make a birthday card with (one of) my favorite older TCP sets: You say it's Your Birthday, and two other TCP sets: the balloons from Catch My Drift, and the sentiment from A Beary Good Year. Also I used my Big Scallop and Circus Panels CutUps on this card.

 I was commissioned to make a penguin birthday card for a friend's son, and I think this is it! :) Here it is: 

I masked the penguin with his one balloon, and stamped just the balloons from the Catch My Drift set over the top. then I just "attached" all the balloon strings together with a black pen, and outlined them all, since the lines were finer on the "Catch my drift" set. I also stamped the penguin down on my white circle, so that I wouldn't have to fussy cut out his tiny feet. So, that's why you are kind of seeing double in this pic. I added a blue corduroy button, some Peppermint Divine Twine, and a yellow star stickpin to the right hand side of the card. The circus panel Cutups framed the sentiment nicely, and some orange gems complete the fun, bright birthday look. And, those balloons just needed SOMETHING, so i added some bright buttons to a few.

And that's all for me today! I have a couple more fun posts coming up soon, so stay tuned! :) 

xoxox, Noelle

supply list: stamps: the Cat's Pajamas; dies: TCP and Spellbinders; papers: K& Company, My Mind's Eye, and BasicGrey; solid cardstock: K&Company & stampin' Up!; punches: EK Success; stickpin: Little Yellow Bicycle; markers: Copic, Zig, and Stampin' Up!; corduroy button: SU!; Divine Twine in Aqua and Peppermint; other buttons: stampin' Up! and generic

Thursday, February 16, 2012

Mod Judy Jetson card for FMS


Hello hello! Are you completely SHOCKED to see me actually playing a CURRENT challenge? Well, I have happy news, I am feeling better, and things are looking up. :) So, I actually have this challenge and TWO more new TCP cards coming up in the next few days, PLUS a Spotted Canary 3D project I am working on. So lots of fun goodies coming up for you, my oh-so-patient blog friends :)

This is for this week's Freshly Made Sketches 22. A sketch challenge:


I recently got some cute new Inkadinkado stamps, this one is Atta Girl, and I bought a few other sets, including Atta Boy which was backordered and now is on it's way! :) I LOVED the Mod-Jetsons feel of these, reminded me of ALL this October Afternoon Rocket Age stuff that I bought a YEAR ago, and have used very little of, even though I **LOVE** it! So that was the jumping off point for this card (blasting off point, perhaps?) Great CAS sketch I thought would be a fun foil for this card. 

I stamped the stamp on Bashful Blue cardstock in poppy Parade ink and punched it out. Then I stamped it again on the text-print cardstock in black and cut out only this oh-so-modern Charlie's angel with her ray gun, and pieced that onto the punched piece. Of course the 3 panels are different DPs from the OA line, and I added a few stickers and embellies from that line, too. I think this would be a fun card to give a girlfriend who's ROCKING her world, of which I am blessed to have many. :)  Here's the inside:


a different inkadinkado stamp and some more OA stickers. And, that's all folks! See you back here SOON with some more fun projects and cards! :)

xoxox, Noelle

supply list: patterned papers, embellishements, stickers: October afternoon "Rocket Age;" stamps: Inkadinkado; inkpads and solid cardstock: stampin' Up!

DUST IT OFF!: Some new, inexpensive stamps give new life to a great line that I love, but just didn't have the right use for.