Home Design Work Recognitions For Sale About Me

Tuesday, October 25, 2011

Carving Time layout (CQC108)


Hi all! Time for another "Halloween-y" color combo at colourQ! Sorry, I just HAD to use my made-up word one more time! :) And actually, you don't have to go Halloween with these colors at all, last week, several people did NOT go that route, and there were some GORGEOUS non-Halloween projects up! Woot woot! 

Here's my layout: 
I'll admit, I am not real thrilled with these pics, the colors became off because of the glitter on some of the accents (like the letters). I've got some more better "detail" shots below, also not lovin' the weird light filtering across the pics, I swear, they are not like that in person! I DID go "Halloween-y" ;) because I just CAN'T NOT do holiday stuff if there's the opportunity? Yeah, I'm kind weird that way... blame it on my Christmas birthday! I do! ;) 
You can see here how I arranged the photos...
The pic of each boy above, and their jack-o-lantern right below them.
I added names to the pumpkin pics.
I essentially arranged the page in 3 strips/sections, one per boy.
So my VERY Halloween page, I was desperately TRYING not to do my typical "border strips" pages. My go-to layouts are always, border strips either along the top or the sides, usually title on the strips, and then mat and arrange pictures in a boring fashion & add coordinating stickers. And, if I want to get ALOT of scrapping done in a hurry, it pays to stick with that, because I can do those border strip pages with my eyes closed! BUT, if I am trying to actually create a DYNAMIC layout? Well, then, I either need a sketch or to think outside the little box/rut my brain gets into! 
So, ok, sorry for rambling... I matted the orange (peach) paper with a black piece. I found some yellow in my stash that was almost an exact match for the daffodil color, but it was shimmery! oh yeah! Cut two 5" wide strips and laid them down about 2/3 of the way down the page (rule of thirds, look it up if you don't know what I'm yammering about, good design principle!) This is another thing where the pics are a bit weird, the yellows have far more contrast than shown, but the shimmer reflected the light more, and in some pics it appears to be the same shade of yellow. 
You can see the contrast between the 2 yellows much better in this pic.
I distressed all the outside edges with one of those edge distresser thingys. So, I decided to use the yellow strip as the place where the pictures would all "land." I ended up covering more of the page (and almost ALL of the yellow strips!) with this plan, but I really like this. I got ELEVEN (count 'em!) pics on this two page spread (SWEET!) and still had room for a journaling block? Yep, I'll be doing this technique again! Maybe it will get me out of my border page rut :) 
You can see in this pic better that the letters do match the paper!
The title was made with some glittery letters I had in my stash in the perfect shade! Most of the "decoration" on the page came in around the title with those glittery chipboard pieces. The photos are matted in the Saffron shade. At the end I decided to add the banner with the "lanternmania" sentiment to bring in a bit more of the Daffodil color that I had (almost completely!) covered with my pics. Threw in a few dimensional and pillow stickers to complement the page. I bought some of these Storybox kits from Creative Memories recently, and I've been using a TON of them on my Disney layouts (pics to come soon!) It's a journaling box, it's also a photo mat, LOVE that! And, generally, I really NEED lined paper if I'm doing hand journaling. So, I love these & that's what I used here. Added the boys' names to the first page, since I arranged the pics of their pumpkins right under their respective pictures. And that's it! Hope you like it & I hope you'll join us at colourQ this week! :) 
Have a stellar day! 
xoxo, Noelle
Journaling paper with lines.
supply list: peach, saffron, and black cardstock: SU!; shimmery yellow "daffodil" cardstock: Bazzill; glittery chipboard shapes: Martha Stewart Crafts; letter stickers & pillow stickers: K&Company; dimensional stickers: Jolee's; glittery orange letters: Colorbok; journaling box: Creative Memories; black pen: Zig
"Lanternmania" banner in the daffodil color.


Friday, October 21, 2011

MY Jingle Belles prompt! "Snow SOFTLY Falling"


Hi there! I am SUPER excited to be the "guest star" over at Jingle Belles this week! I gave Lauren and Stef the idea for a prompt & they liked it, so I get to be this week's guest star. :) I hope you might make time to come and play my prompt? Oh pretty please?? 
jingle belles

If you read this blog often, you know that lately, my projects have centered around the design work I do for colourQ and those "have-to" projects: scrapbook pages I NEED to get done, birthday cards for my loved ones, etc. But when I do find time to play another challenge? Well, Jingle Belles is almost ALWAYS my "go-to" challenge! I love to make holiday cards! And I LOVE the fun, positive atmosphere on that blog. Lauren and Stef are both HUGELY talented, experienced designers, as well as being so nice. :) 

So, my prompt is "snow SOFTLY falling." When I think of winter, I think of: softly falling snow, snuggly sweaters and socks, mittens, down parkas, warm, soft cookies & coziness in general. So, that was my jumping off point for this idea of making a SOFT Christmas card/project. I recently learned how to do wool felting & I knew that was something I wanted to incorporate, as well as flocking, ribbon, & stitching. But, some other ideas of SOFT items you could use on your projects this week are: batting, velvet, fibers, denim, thick layers of embossing powder, soft silk flowers and snowflakes, pillow stickers & upholstered brads!  Really, anything your brain can come up with that is SOFT, it doesn’t have to be only papercrafting products that you use, either! :) I encourage you to pull out those quilting, knitting, sewing, & flocking skills!
This project started out with the felt snowflake medallions that you see on the giftcard holder and on the card. I die cut the green scalloped circles from a wool felt sheet. Wool felt is different than craft felt, it is MUCH thicker and if you want to do needle felting, you really need the sturdiness and wooliness of the wool felt. The snowflakes were felted on freeform using wool roving. Felting is very simple & I have really enjoyed adding this technique to my crafting skills. The pouch is also felted, instead of being stitched closed. If you go to this link on Spotted Canary, you will see a tab on the right hand side of the page. that says "related videos." Click on that and it will take you to a short 3 minute video that shows that basics of wool felting.


I used some craft felt as my base mat for the card and stitched the cardstock card front to it in the four corners. I gathered some ribbon with a running stitch & adhered that down, too. Had to add lots of white flocking to sweet Santa!  I made a tassel from fibers to my giftcard. 

Well, I hope you like this project, and I hope you will be able to come play with us at Jingle Belles this week! I'm thinking I need to make another set like this so I have one for both Ian and Collin's teachers this year. :)


Have a GREAT day! :)


-Noelle


Supply list: stamp, solid cardstock, ribbon: Stampin' Up!; markers: Copic; wool felt and wool roving: FeltWorks/EK Success; flocking powder: Inkadinkado; die: spellbinders

Thursday, October 20, 2011

InkadinkaBOO challenge

Hi there! I just wanted to share a quickie Halloween project, likely my last one of this year, I am not sure, but I'm kind of starting to feel a little "over" making Halloween stuff, LOL....

So this is for the InadinkaBOO challenge at Spotted Canary. Go to that link and you will be able to take a short online FREE class with 3 video tutorials (each video is around 7-8 minutes), and then make a Halloween project based on the class. The class covers techniques like rolled paper, sponging and blending inks, fussy cutting and heat embossing. You will be entered to win a 250$ prize package! There is one winner for every challenge and usually not that many people enter, so your chances are good!


And, even though I'm no beginner, I like the classes, I usually learn something new or a new way to do something I already knew how to do. It helps me think outside the box a little, too... You might remember that I made that 3D Christmas card for the last challenge, and I'd never made one of those before! On this project I did some paper rolling on the letter "B," that is new for me, too!:)
Ok, so I really have wanted to try mixed-media painting, I admit that's why I bought these canvas! Buuuut.... well we all have our comfort zones, I guess! the only real "painting" I did on these was to base coat the canvas by dry-brushing on silver acrylic paint! The other color comes from sponging ink on... Next time I'll try to do a wee bit more PAINTING! ;) 
As I mentioned the canvas color comes from a light coat of silver acrylic craft paint, and sponged on dye ink. The letters were sketched on the back of the paper and cut with a craft knife. I used punched squares and circles of scrap paper to help "guide" the sketching. The outside of the "O's" are corner punched with a large corner rounder. The letters were sponged with black ink all around the edges and adhered to the canvas with glue dots. 
I embellished the "B" with a sparkly chipboard rat, the rolled paper corner and two pins. The first "O" got a few dimensional stickers. The second "O" I stamped and cut out my fave Halloween Inkadinkado stamp Trickster Cat. I colored him, added some epoxy glaze on his nose and gave him a few gold teeth ;)  I stamped the sentiment below him a bit off center as not to disturb Mr. Spider who was printed in the lower R hand corner! All 3 mini canvas got ribbon wrapped around and topped with a button. And that it's for me tonight! I hope you'll pop by tomorrow or Saturday, as I'll be the "guest star" at Jingle Belles starting tomorrow! See you soon!

xoxo, Noelle
supply list: mini canvas; patterned papers: K&Company; stamps: Inkadinkado; craft knife; stickers: Jolee's Boutique; chipboard rat: Martha Stewart Crafts; silver acrylic paint; sponge brush; purple and orange dye inkpads; black and orange buttons; ribbon; corner rounder punch: EK Success; square and circle punches to help trace letters: EK Success

Tuesday, October 18, 2011

colourQ 107 Trick or Treat pets


Hi there! Happy Tuesday and we have another great color combo for you at the colourQ!!! Here's the palette for this week:
I got going with my card yesterday, and I pulled out these cute stamps Ghouls and Goblins from Inkadinkado... I actually won these stamps in my last Spotted Canary prize package! Too cute, it's little animals all dressed up for Halloween! I took 2 of my faves from the set, the little doggie dressed up like Frankenstein, and the the kitty "mummified" with toilet paper, LOL! I stamped them on some white cardstock (I like Neenah Solar White, I've almost gone through the whole 250 sheet package I bought 2 years ago!) and I colored the dog with Copics.... I confess I DID think the palette showed Old Olive instead of Lucky Limeade... Not fully paying attention, I guess! It really wouldn't have made a difference in the coloring, though, because I don't have a ton of Copics, and these are the only green ones I have! ;) I stamped the cat stamp in the Pumpkin Pie ink and outlined the toilet paper with brown pen. I also added some stripes to him with a marker, and colored his eyes, too. 

Next step was the card base... I started to go to my "go-to" background, some Halloween patterned papers, but I couldn't find one with just the right colors or style for these cute images, so I got out my Halloween embossing folder instead. The folder really had the same "cute" feel that the stamps had. At this point, I was still under the impression that the palette showed Old Olive, and between **thinking** the color was supposed to be olive, and the coloring I'd done, I pulled out, embossed and sponged this piece...
Suddenly, as I'm layering this up with the bright orange and raspberry tones, I just get the whole WRONG feeling for the card, this piece was way too muted to go well with those colors, and suddenly my muted, sponged card looks NOTHING like the palette! Ever had this stamping experience? LOL, so I actually choose to READ the colors listed on the palette this time, and I see the color is supposed to be Lucky Limeade, NOT Old Olive! Aha! So then I got out a Limeade piece, did the dry embossing and sponged the orange ink on instead.... THEN my card starts to "feel" like the palette! YES!!!
This card was a weird one for me. Usually I start pulling out supplies and know exactly where I want to go. This one was a work in progress until the final detail! I had the card all made, even took my pics, and then decided it needed just a little more! So, I added the tab with the pumpkin treat bucket to the UR hand corner, and only then did I feel like it was really "done" if you know what I mean! 
I hope you like my funny little card that took me on a funny little journey! LOL, have a stellar day & PLEASE come play with us at colourQ this week? I'd love to see what you might do with these colors! 

hugs, Noelle

supply list: stamps: Inkadinkado; markers: Copic and Stampin' Up!; embossing folder: cuttlebug; brads: making memories; corner and tab punches: EK Success; solid cardstock and inkpads: Stampin' Up!

DUST IT OFF!: I save all my ribbon scraps in a ziploc bag for these times when I just need a little ribbon. This piece was a scrap! :)


Monday, October 17, 2011

Jolly Old Saint Nicholas


Hi all! The kids are home and I have already put them in front of the TV long enough, so I'm going to keep this "short" and sweet! I had "pinned" this Vintage Santa on Pinterest last week, with no reason but I just loved him! Then I saw the prompt over at Jingle Belles this week is "A Caroling We Will Go!" I just thought the Santa in the picture (on the phone, "lending his ear"!) he reminded me of the old song "Jolly Old St. Nicholas." 

Jolly Old St. Nicholas
Lend your ear this way
Don't you tell a single soul
What I'm going to say..
Christmas Eve is coming soon,
now you dear old man,
whisper what you'll bring to me,
tell me if you can! 

And then the song goes on to say what all the children would like for Christmas, some of them are pretty "old school!" ;)


I started with the sheet music paper, it had the vintage feel I was going for and went along with the song theme. I backstitched bakers twine all around the edge of my card front after piercing holes through. I printed my Santa out, and had some trouble, he was only going to print this size or an 8" x 10" LOL, sometimes my computer is TOO smart if you know what I mean! This size turned out OK, but I would have liked to have made it slightly bigger. I found an ANCIENT pack of stickers in my Christmas stash, those definition stickers were in there. "wish" and "carol" seemed appropriate! I added a santa mini dimensional sticker, some "jingle bell" brads (for Jingle Belles! ;) also I wanted to add some more "music" to the page. A glitzy photo corner completes the vintage-y card, for a vintage carol. :)

hugs, Noelle

supply list: patterned paper: The Paper Studio; Santa clip art: Pinterest (link above); definition stickers: making memories; 3D Santa sticker: K&Company; bakers twine: Crate and Barrel; glitter photo corner: Martha Stewart Crafts; brown ribbon and jingle bell brads: hobby Lobby; red/green ribbon: Michaels

DUST IT OFF!: I think I bought those definition stickers (it was a little pad of Christmas stickers, a variety) before we bought this house in 2006. The copyright date on the back says 2005! :)

Happy Birthday, Ian!


Hi there! Today is my oldest son, Ian's, 11th birthday! It is SO hard for me to swallow that I have an ELEVEN year old?? Where has the time gone? I know, all us moms feel the same, the days are long but the years are so short. Here's my boy at his birthday party last night:

And here's a couple of his baby pics **sniff sniff** 


He was a BIG baby! 8 lb. 10 oz! And he was 10 days early, so that was really big! he was an awesome baby, very mellow and sweet, slept like a rock. I still can't fathom how it's been 11 years, but I'll spare you my issues! ;) Onto the card! 


I made two, because my dear friend Beth's son was also born on the 17th, albeit two years later. Jay was at Ian's party last night, so I made him a card, too! :)

You might remember the birthday party invitations I made for Ian a few weeks ago. The party was a skateboarding/X Games theme, so I used the same Skater Dude stamps/die for these cards. I pulled out my Verve set Dude, I really felt they coordinated well, and since Ian SAYS "Dude" **ALL** the time, it was perfect! After I had the card all together, I felt it still needed a little somethin'-somethin' so I pulled out my old letter impression set and metal tags to put the boys' names on the cards. And there you have it, 2 super-cool birthday cards for 2 super-cool kids. Have a super day! :)

hugs, Noelle

supply list: patterned paper: MME lime twist 8' stack; die/skateboard stamps: Papertrey Ink; Dude stamp: Verve; HB stamp, solid cardstock, & ink: Stampin' Up!; metal tags & letter impression set; orange glittery brads

DUST IT OFF!: That letter impression set and metal tags are so old, I can't even tell you who made them! But, they still look neat on these cards. :)

Friday, October 14, 2011

Christmas Tag SWAP


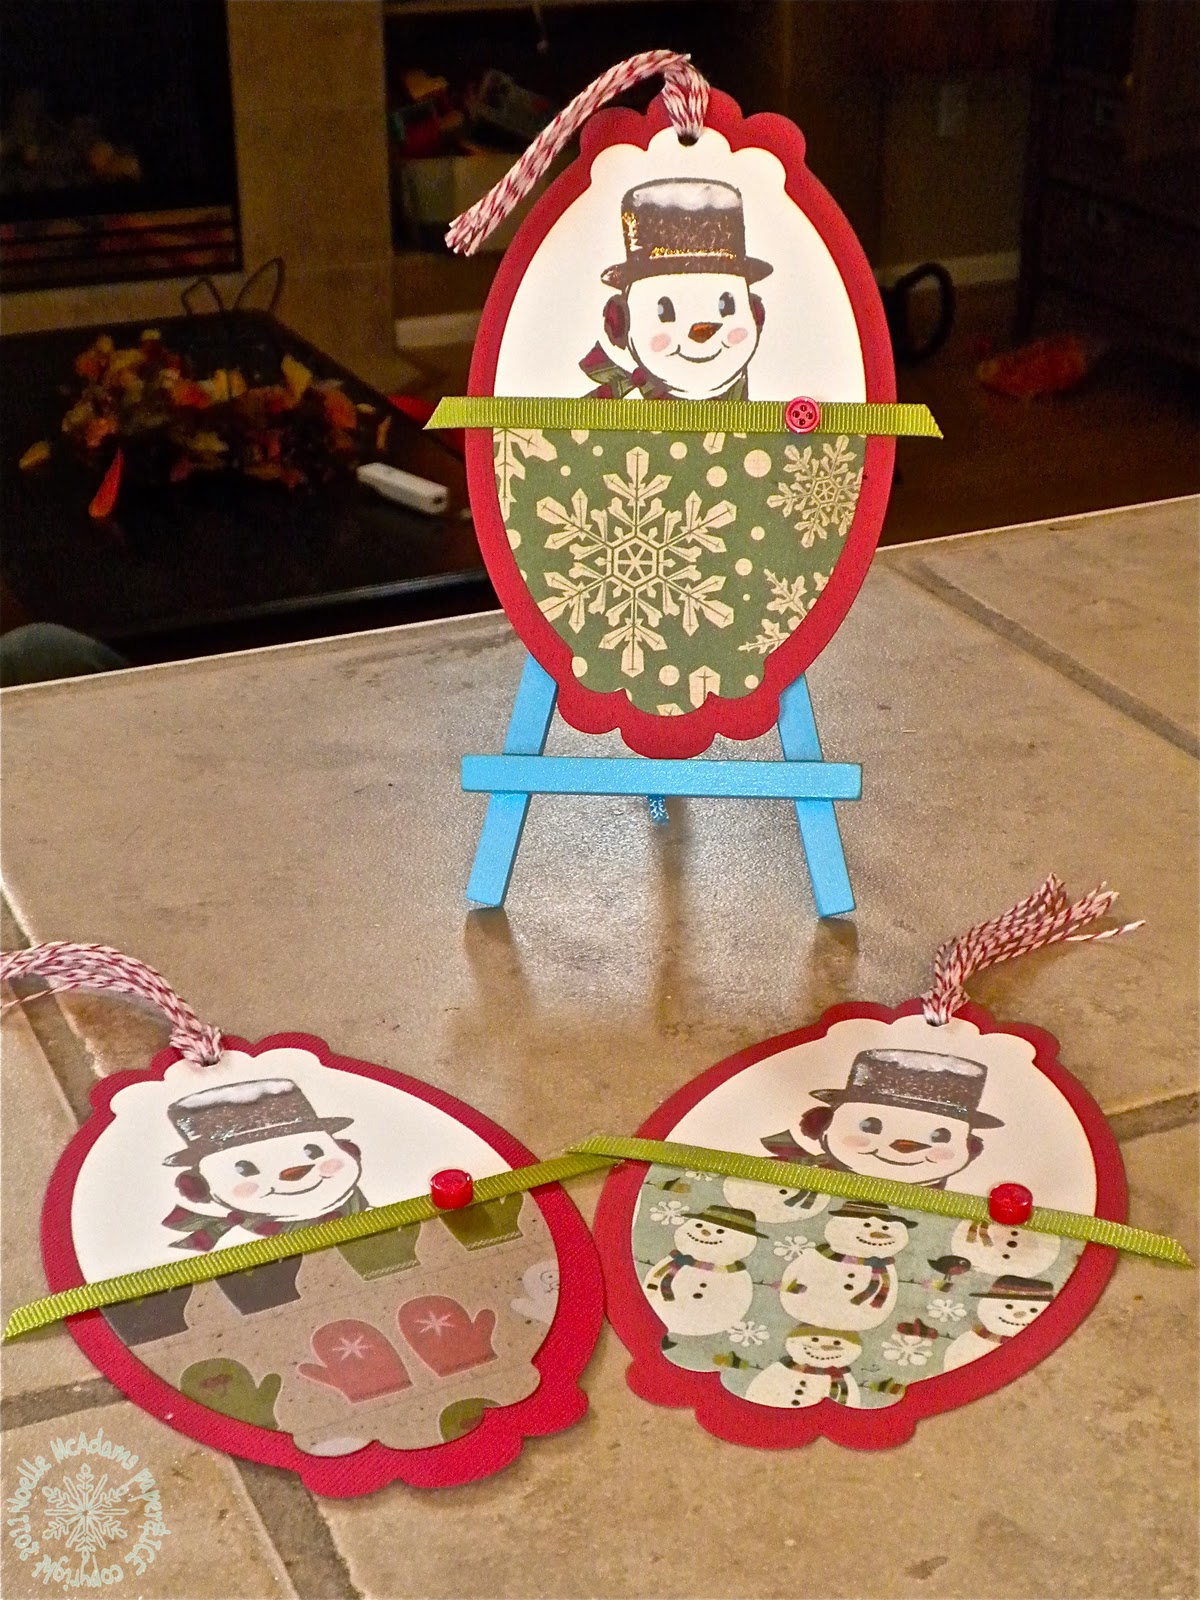
Hi there! Hope you all are well.... my kids are off school and it's been unseasonally warm here.... boo...... :( I like a cool, crisp Fall myself, but I don't think I'm going to see it this year! I thought making a cute Christmas project might make me feel more "seasonal" somehow! :) I am participating in a Christmas tag SWAP with some of the ladies in the scrapbooking group that I recently joined. You make 12 tags and get 12 tags (all different) back in return! I think it will be fun since I always have the best intentions to make my own Christmas tags & never actually do so! So here's my tags, at least a few... I've made 6 so far and have 6 to go. I used different papers on them since I was trying to use up scraps.
I think they are pretty cute! Opinions? I thought maybe I should have pleated the ribbon, but I have to mail them, so I didn't want them to get too thick. I used my new favorite Snowman stamp from Inkadinkado. You may remember him from this card that was featured on Jingle Belles in April. I loved that card & I did the same thing here with the white flocking powder and Stickles on his hat. The tag base is made from the largest die in this set of Nestabilities. Then I cut 6 ivory pieces with the next smaller die and cut them in half. I stamped my snowman in brown Memento ink and colored him with Copics. Then I added the flock and Stickles.
 I cut the patterned papers with the die as well. The ones that were an "all over" pattern, like the snowflakes, I just cut  a full piece and cut that piece in half. The ones that were an "up and down" pattern (like the mittens and the snowmen) I only die- cut the half size at a time, so they wouldn't be upside down if that makes sense. 
I ran a strip of Olive ribbon across the center to hide the seam where the 2 papers meet. I accented the ribbon with these little adhesive buttons I recently picked up at Archiver's. They were sold by the adhesive gems, if you are looking for some. For the top, I threaded some baker's twine through the hole. To do this, I wrapped the twine around my hand 7-8 times. I gathered the loop, and put one end of the loop through the hole I'd punched. I pulled it through the hole enough that I could widen the hole in the loop. Then I put the top part of my twine bundle through that hole, and pulled. The final step was to trim the ends off so I had a tassel instead of a loop. If you have large spools of baker's twine, like me, this is a great way to give a fun accent for just pennies. I bought this 2300 foot spool of red baker's twine at Crate and Barrel last Christmas for only 8$! The final touch was to stamp my "to: from:" stamp on the back of the tags.
Well, I hope the other ladies in my SWAP like these! I like them enough, that I'm making a couple extra, just for me :) Hope you have a fabulous weekend! 

xoxox, Noelle

supply list: solid cardstock in red, ivory, and green ribbon: Stampin' Up!; stamp & flocking powder: Inkadinkado; dies: Spellbinders; markers: Copic; assorted holiday paper scraps; glue pen; baker's twine: Crate and Barrel; brown dye ink: Memento

DUST IT OFF!: Use your scraps to die cut or punch and use on tags! :)