Home Design Work Recognitions For Sale About Me

Tuesday, May 29, 2012

Cutesy Birdie Card (CQC139)


Hi there!! I think you are really going to like the palette at ColourQ this week! There's just so many ways you could go with this one... It gets an A++ for versatility! :) The colors are Crumb Cake, Bashful Blue, Night of Navy, Rich Razzleberry and White. I decided to make another birthday card... you know how I've been trying to build up my birthday card stash and all. :)
cqc139
Now, like I mentioned, very changeable on the style you could go with these colors! You could definitely go very soft and feminine... but I was itching to use some more of my new Paper Smooches stamps, so I had this idea to use the cute little cloud border in strips. So I stamped 3 of them in the navy ink on the Bashful Blue card stock, fussy cut them out and added some Frosted Lace Stickles. Then I adhered them to a white card front. 

When I mat my card fronts like this, the dimensions are as follows... the card is an A2 size, so a vertical card with a fold at the top like this would be 4 1/4" by 11" then folded in half at 5 1/2." The mat is 4 1/8" x 5 3/8." the card front is 4" x 5 1/4." 

So, I adhered the cloud strips down first, and then stamped the flower border stamp in between the cloud strips. 


My little party bird was stamped 3 times, twice on white card stock, and once on the kraft printed scrap. Punched one of the white images out in a circle and colored the hat on that one, then fussy cut the bird body from the printed piece, eliminating the legs and the hat. I pieced the printed piece onto the circle piece, and the final "layer" was the eyes and beak, which were cut from the final white image, and then the beak was colored. I added some more Stickles to his hat and the mini stars that I stamped around him for a bit of glitz. :) The final touch was stamping the sentiment in the kraft color (aka Crumb Cake).

Well, I hope you like my cute party bird card! Thanks for popping by, hope you can join us at ColourQ this week! :)

hugs, Noelle

supply list: solid card stock and ink pads: SU!; stamps: Paper Smooches; Frosted Lace Stickles; punches: EK Success 


Monday, May 28, 2012

S'up Grillfriend?


Happy Memorial Day! Hope you all are having a great long weekend! We sure are, chock-full of BBQs, friends, and fun. :) I thought these might be the perfect cards to share with you guys, since the season of grilling has begun! These are really simple cards made with these adorable Alfresco stamps from Paper Smooches, actually, it was this card that Arielle made a few weeks ago that inspired me to go buy these stamps in the first place! Yep, so we can "blame" Arielle for all my new PS sets, right? ;) LOL, I have really been digging on these stamps, though! Had my little "gno" me card from last week, the fun woodgrain PS stamp was used on these, and when you check in tomorrow for my next colourQ post, you are going to see even more of these cuties! That cartoon style is just too fun! :)


So, these were quick and easy cards, I found a strip of this BBQ print paper in my scraps bin, and used it all up making these. Decided to go with "condiment inspired colors" for the mat and card base, and all the embellishments were food inspired. Doesn't that brown glittery brad remind you of a hamburger patty? How about that red adhesive button as a tomato slice? Little choices like that can really make your projects sing if you take the time to think about them. :) I gave the hamburger one to my friend  Kim, and sweet Annette sent me such a pretty card last week, so I'm sending her the hot dog since I know she likes PS stamps a whole lot!! :) The heart on the hot dog stamp is an oldie from my stash, also it looks more red than it does here, the light was weird when I took these.


Well, that is all for me today! Hope you have a FUN, HAPPY and SAFE Memorial Day! Be back tomorrow with a "tweet" card for ColourQ, come check it out!! :)

xoxo, Noelle


Friday, May 25, 2012

Layouts from Crop post #3


Hey there!! Here's installment #3 from the crop. These are my very fave layouts that I did last weekend. :) Click on the photos to enlarge, and please leave a comment here, if you want to know the manufacturer for a product on these pages.

big hugs!! Noelle


Tuesday, May 22, 2012

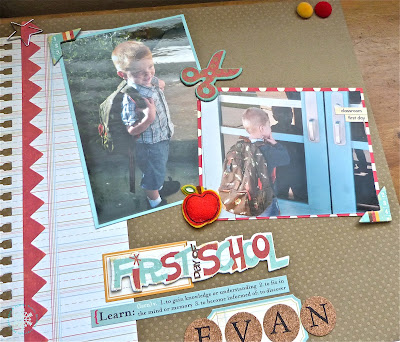
Ev's First Day of Preschool (CQC138)


Hello hello! time for another fab color palette at ColourQ!! :) Love this Pool Party, Crumb Cake, More Mustard, Poppy Parade, and White! I made a 2 page LO for Ev's FIRST day of preschool from LAST school year! Kind of "appropriate" this goes up today, since he "graduates" from this school this week! My baby is growing up so fast! :( Here's the palette.... LOVE these kind of colors for scrapping the boys pics! :)
cqc138

I started out just doing a one page LO, then two days later decided to make it a 2 pager.... I just really prefer the way 2 page LO's look in my books, know what I mean? Anyway, as ALWAYS, page one (LH page) is the "main" page, and the RH page is a companion.


I have really been digging on this Bazzill textured card stock for my pages lately. I bought a big assorted pack of it before I went on the crop a few weeks ago.... and, I don't know, it just adds a real somethin' somethin' to the pages, just a title extra zing compared to a solid piece of card stock without texture. 


I added different school elements, several pieces of older Crate Paper chipboard... these have been so versatile! Also some old October Afternoon bits from "report card," LOVED that line... I really think it was possibly the best school themed line I've ever seen/used. I still pick out teeny pieces of paper to use up from that line! Also some felt "puffies" stickers give a really fun, juvenile look, perfect for the little guy! 

detail shots


He was pretty proud of his page! :) Love you, Ev. xo


Well, I am outta here! Come play these fab colors with us this week! 

xoxo, Noelle

supply list: card stock: Bazzill, and SU!; DP: We R Memory Keepers and October Afternoon; chipboard pieces: Crate Paper; stickers: October Afternoon & Sticko; velvet adhesive buttons: Jolee's Parcel; border sticker: Crate Paper; felt stickers: Puffies

DUST IT OFF! Some things are so old, I am not even sure where they came from, like the star paper clip, the metallic letter stickers, and the cork letter stickers.


Monday, May 21, 2012

To "Gno" me is to love me... 2 year blogoversary, and more teacher gift pics


Hey there!! I wasn’t even planning to do a post today, but then realized that today is my “blogoversary,” 2 years today, since paper & ICE hit the web! I don't know if I ever told you why I named my blog "paper & ICE," so I will now. My sons names are Ian, Collin, and Evan (ICE), plus my birthday is on Christmas, I live in CO, and I love winter... so I figured that the ICE anagram really hit home on lots of levels. That's also why my watermark is a snowflake. And though I’m still just a happy little papercrafting blog, I have a few stats for you….

***423 posts in 2 years, on average a little more than one post every other day.
***Around 40,000 hits.
***The most popular post I’ve ever done was this one on organizing the craft room, and it’s gotten some more recent love on Pinterest. Guess I should show off some of my newer storage solutions, too!! :)
***1538 comments from my lovely readers.
***147 followers, but that includes some who follow on networked blogs and through Blogger.

What a ride! I have to tell you I have really really enjoyed it!!  Thank YOU for making this blog a success! Now onto today’s card!


I had gotten this gnome stamp in my recent order from Paper Smooches. Love him!! I colored him with Copics and fussy cut him out. On his beard I used some Watercolor pencils in addition to the Copics. 


I think I will link up to Paper Players polka dot challenge this week.

I recently joined the Cricut Craft Room, it’s free, go check it out, sort of like free designing software for your Cricut. Though you can’t cut with any cartridge you don’t own, you can design with all the cartridges, and they also have Craft Room cuts you can buy for a few dollars! For this card, I bought the Gnomes and Mushrooms Craft Room Exclusive. These are digital cut files that you download on your computer, and then cut connecting your computer to your Cricut via USB. I thought this little guy needed a mushroom behind him!


So, there’s a DP base (old OA) then the Cricut cut mushroom, and then I used my TCP grass die for the bottom, and my MFT cloud die for the sentiment which was printed from the computer and then cut. Finally added the polka-dot bow… I figure between that and the mushrooms it’s pretty dotty for the challenge at The Paper Players!

I also finished up the teacher gifts from the other day! Go to that link for a tutorial on how to make these little gift card hangers for the Bath and Body Works hand soap. Whenever I have to do multiples of something, I usually try to mix it up a little. In this case I'd bought 3 different kinds of soaps, so I had 3 different color schemes, etc. The strawberry ones are my favorites! One of the great things about this projects was that all these papers were scraps! Love that!! 
Add caption


That's it for me today! Still on my MAJOR cleaning organizing jag around this house! We got SO much cleaned up in the garage this weekend! Even got some cool, inexpensive Bicycle Lifts to get the bikes up and out of the way! Also some heavy shelving to get all the sporting goods stuff off the floor! I am so happy, I have hated walking through our messy garage every day:) 

Hope you are having a lovely Monday! See you back here tomorrow with some very cute pages for the ColourQ!! 

xoxo, Noelle

supply list (card): Cricut Craft Room; dies: MFT & TCP; paper: OA; stamp: Paper Smooches; button: Walmart dollar craft section

DUST IT OFF!: A new stamp and digital cut files make my old paper and dies look brand spankin' new as well! :)


Friday, May 18, 2012

Quick Kid Birthday Cards


Hey all! So, last weekend, Ev needed a couple birthday cards for parties he's been invited to... I swear, this kid has been to more birthday parties in the last year than I've been to in my whole life! LOL, he's just such a social little beast, that I hate to say no, when he enjoys them so much! Anyhow.... I made 2 cards that were similar to these, almost identical, though I did personalize them with the boys names. I forgot to photograph them before I put them in the envelopes, though! Whoops! But, the cards came out so quick and easy, and I started thinking how I always, I mean ALWAYS need kid birthday cards, usually boy ones. And I thought I'd whip up a few more. I ended up getting all these done in about 30 minutes; plus I used loads of scraps and old papers to make them. Even the shaped paper clips are really old! Anyway, it felt so good to use up old stuff, and scraps; plus get a bunch of cards done that I will really use! :) I did use the April 2012 SFYTT, which turned out to be a quick and easy sketch to use for these cards!! :)

apr2012sketch2
and here are photos of all the rest of the cards:


That's all for me! have a stellar day!! :)

xoxo, Noelle

supply list: stamps: Unity & PTI; papers: K&Company, MME, and scraps

DUST IT OFF! Challenge yourself to use old papers and scraps to make several quick, needed cards! Throw on some old paper clips, and you'll feel so good to use up your old things! :)

Thursday, May 17, 2012

Teacher Gifts: (Bath and Body Works hand soap with attached gift card holder/card)


Hi there! Just thought I'd share these quick teacher gifts I'm making this year.... In the past, I've done pencil bouquets like these and these with a matching card, and a little Target gift card tucked inside. This year, I'm getting a cold hard dose of reality as we have a crazy weekend ahead, and Ev has his little end of school program in the middle of next week! Plus, Ev has 4 teachers. So, I knew I'd need 6 gifts this year, and I'm starting to feel really pressed for time! This is my solution, and I'm including a tutorial with dimensions so you can make your own version of these if you'd like. :) I think they turned out really fun!


First I picked up 6 of these pretty foaming hand soaps from Bath and Body Works, (they are on sale 6 for 20$ right now, if you have a lot of teachers to give to as well! ;), then I figured the dimensions of my little hanging pouch, which holds the gift card and a little card to write a personal note on.... If you use a different brand of soap you might need to alter your dimensions a little.... Here's how you make them:

First, cut a strip of card stock 2 1/2" wide by 10 1/2 inches long... if you use a printed one like I did, make sure you like both sides of the paper, because you are going to fold it up to make the pocket.


Then score the card stock at 2 1/2" and at 7."

 Punch a hole (I used a 1 3/4" circle, but this is the foamy soap, and has a really wide pump, so be aware of this if you use a different kind) in the top (smallest) scored section.

Then fold up the front where the other score mark is. You can adhere the pocket together with very skinny Sticky Strip, I used 1/8" wide kind like this, if you use a wider tape, you will need to make your pouch a little wider to accommodate, because the gift card and note card just fit in here EXACTLY right, and otherwise it would be too narrow for them.


For the little note card, I cut a 2" x 3 1/4" piece of white card stock, rounded the corners, and stamped to coordinate with the soap and my pouch. I punched a hole through the gift card (this was just an old one that the boys had kept, but I'm going to get Target ones... who doesn't LOVE Target?;) and through the notecard. If you have a Crop-o-dile, this is easy to do; just make sure you don't punch through the bar code/magnetic strip, and it will still work fine. I looped some ribbon scrap through the gift card and the note card to hold them together, and make it easy to pull them from the pouch.


For the front of the pouch, I cut a solid mat 2 3/8" x 3 3/8." And then the front was another white piece 2 1/4" x 3 1/4" that I stamped to coordinate as well.

and that is all! Hope you like it, I've got 5 more to make, 3 different varieties, so I'll try to post photos when they are all done, but I was trying to get this posted in case you are pressed for teacher gifts, too! ;)


have a wonderful day!!
hugs, Noelle

supply list: printed card stock: Martha Stewart Crafts; circle punch: EK Success; stamps, ink, and solid card stock: Stampin' Up!

DUST IT OFF! Some old stamps and retired ink pads, still make for a pretty project! ;)  

Wednesday, May 16, 2012

Mmmmmm.....Mustache Mania!


Hi there! Hope you are all having a great week, we are wrapping up the end of the school year, and it's been BUSY! But I was super excited when I saw this "Mmmmmmay" TCPTUES challenge @ The Cat's Pajamas :) I cheated a wee bit, because I was also supposed to use the Pennant CutUp, and since I didn't re-read the challenge before I made my card, well, let's just say I get an epic FAIL on direction reading! LOL! So, I won't be eligible for the prize this week, but I still wanted to share my card with you guys. I still think my card is cute, you likey? :) I'd sorta had this old-timey, mustachey, would-be-suitable-for-a-man birthday card floating around in my head for a bit now, so that's the way I went, M is for mustache!  Besides, I am ALWAYS in need of birthday cards, no matter how many I make, so I'm always glad to have another on hand! I die cut two mustaches, and stitched them down with the machine. That way I could fold them up towards the center a little and get some dimension to the card. 

This card is weirdly lacking in color for me, but I really like it! Going all neutral was a great way for me to reclaim my mojo, which has been a bit sporadic lately... Couldn't resist adding some glitz with 2 little gems and some glitter photo corners. :) I used The Mustache Set, from the new release at TCP, the coordinating Mustaches CutUps, and the Circus Panels CutUps, which are just awesome for sentiments! 

Well, that's it for me today! I "mustache!" I have some grocery shopping to get done, and more cleaning/organizing. I have been a lean mean cleaning and organizing machine lately! Hoping that by early June, I've got the house completely cleaned up (and cleaned out!), so the boys and I can start the summer out on a neat foot! ;) 

Have a super-stellar day! I am getting comments back today, too, thank you so much for all your sweet words, they mean the world to me. :)

hugs, Noelle 

supply list: stamps: TCP; dies: TCP and Spellbinders; DP: SU! and BasicGrey; glitter photo corners: Martha Stewart Crafts; circle cutter: Creative Memories 

DUST IT OFF!: Today's "dust it off is more of a challenge... if you're a color lover like me, why not try to do an all-neutrals card and see where it takes you? You might be pleasantly surprised! :)


Tuesday, May 15, 2012

pretty extra MD cards ColourQ 137


Hi all! Time for a GORGEOUS color combo at the ColourQ!! Can I just tell you how much I LOOOOOOOVE these colors?? Cool colors are always right up my alley! Throw in a charcoal gray, and I am tickled pink! Or tickled blue/green/purple/gray! ;) Here's the palette:
cqc137 

I made these last week, since I needed to send a few other Mother's Day cards out, besides the the one  I already made for my OWN mom! The inside says Happy Mother's Day. I used some new goodies and a really old retired SU! set on this card. The woodgrain stamp is one of my first stamps from Paper Smooches. Never had bought any from there before, and recently made an order of 5 sets, so you will see more! This stamp is so big, it didn't even fit on my XL acrylic block! I ended up adhering it to the other side of the wood block on a really big rubber stamp. That worked well, and now I don't have to buy another block:)

The shaped panel & mat were cut on the Cricut (Accent Essentials cartridge). To stamp that panel, I used an old SU! stamp set that I'd pulled from my girlfriend's discard pile called "Best Blossoms." the ribbon is so pretty, from the Ribbon Carousel, and the pin is My Mind's Eye.

For the other card I used a silver adhesive button, tied with some baker's twine.

Well, I hope you had a lovely Mother's day and that you will come play this fabulous palette at ColourQ this week!! :)

xoxo, Noelle

supply list: stamps: Stampin' Up! and Paper Smooches; solid card stock and inks: Stampin' Up!; Accent Essentials Cricut cartridge; ribbon: Ribbon Carousel; silver button: Jolees Parcel; stickpin: MME; white EP and heat gun

DUST IT OFF! Some old floral stamps still make for a pretty card when paired with a modern color palette and a funky woodgrain background. 


Monday, May 14, 2012

Layouts from Crop post #2


Hey there! Here's installment #2 of the pages I did at the crop. :) If you need to know a manufacturer on something, leave a comment here, and I will get you the info! Have a wonderful day:)

hugs, Noelle


Didn't have one of my photos for this page with me at the crop.
Will print and add soon!!