Home Design Work Recognitions For Sale About Me

Monday, October 17, 2011

Happy Birthday, Ian!


Hi there! Today is my oldest son, Ian's, 11th birthday! It is SO hard for me to swallow that I have an ELEVEN year old?? Where has the time gone? I know, all us moms feel the same, the days are long but the years are so short. Here's my boy at his birthday party last night:

And here's a couple of his baby pics **sniff sniff** 


He was a BIG baby! 8 lb. 10 oz! And he was 10 days early, so that was really big! he was an awesome baby, very mellow and sweet, slept like a rock. I still can't fathom how it's been 11 years, but I'll spare you my issues! ;) Onto the card! 


I made two, because my dear friend Beth's son was also born on the 17th, albeit two years later. Jay was at Ian's party last night, so I made him a card, too! :)

You might remember the birthday party invitations I made for Ian a few weeks ago. The party was a skateboarding/X Games theme, so I used the same Skater Dude stamps/die for these cards. I pulled out my Verve set Dude, I really felt they coordinated well, and since Ian SAYS "Dude" **ALL** the time, it was perfect! After I had the card all together, I felt it still needed a little somethin'-somethin' so I pulled out my old letter impression set and metal tags to put the boys' names on the cards. And there you have it, 2 super-cool birthday cards for 2 super-cool kids. Have a super day! :)

hugs, Noelle

supply list: patterned paper: MME lime twist 8' stack; die/skateboard stamps: Papertrey Ink; Dude stamp: Verve; HB stamp, solid cardstock, & ink: Stampin' Up!; metal tags & letter impression set; orange glittery brads

DUST IT OFF!: That letter impression set and metal tags are so old, I can't even tell you who made them! But, they still look neat on these cards. :)

Friday, October 14, 2011

Christmas Tag SWAP


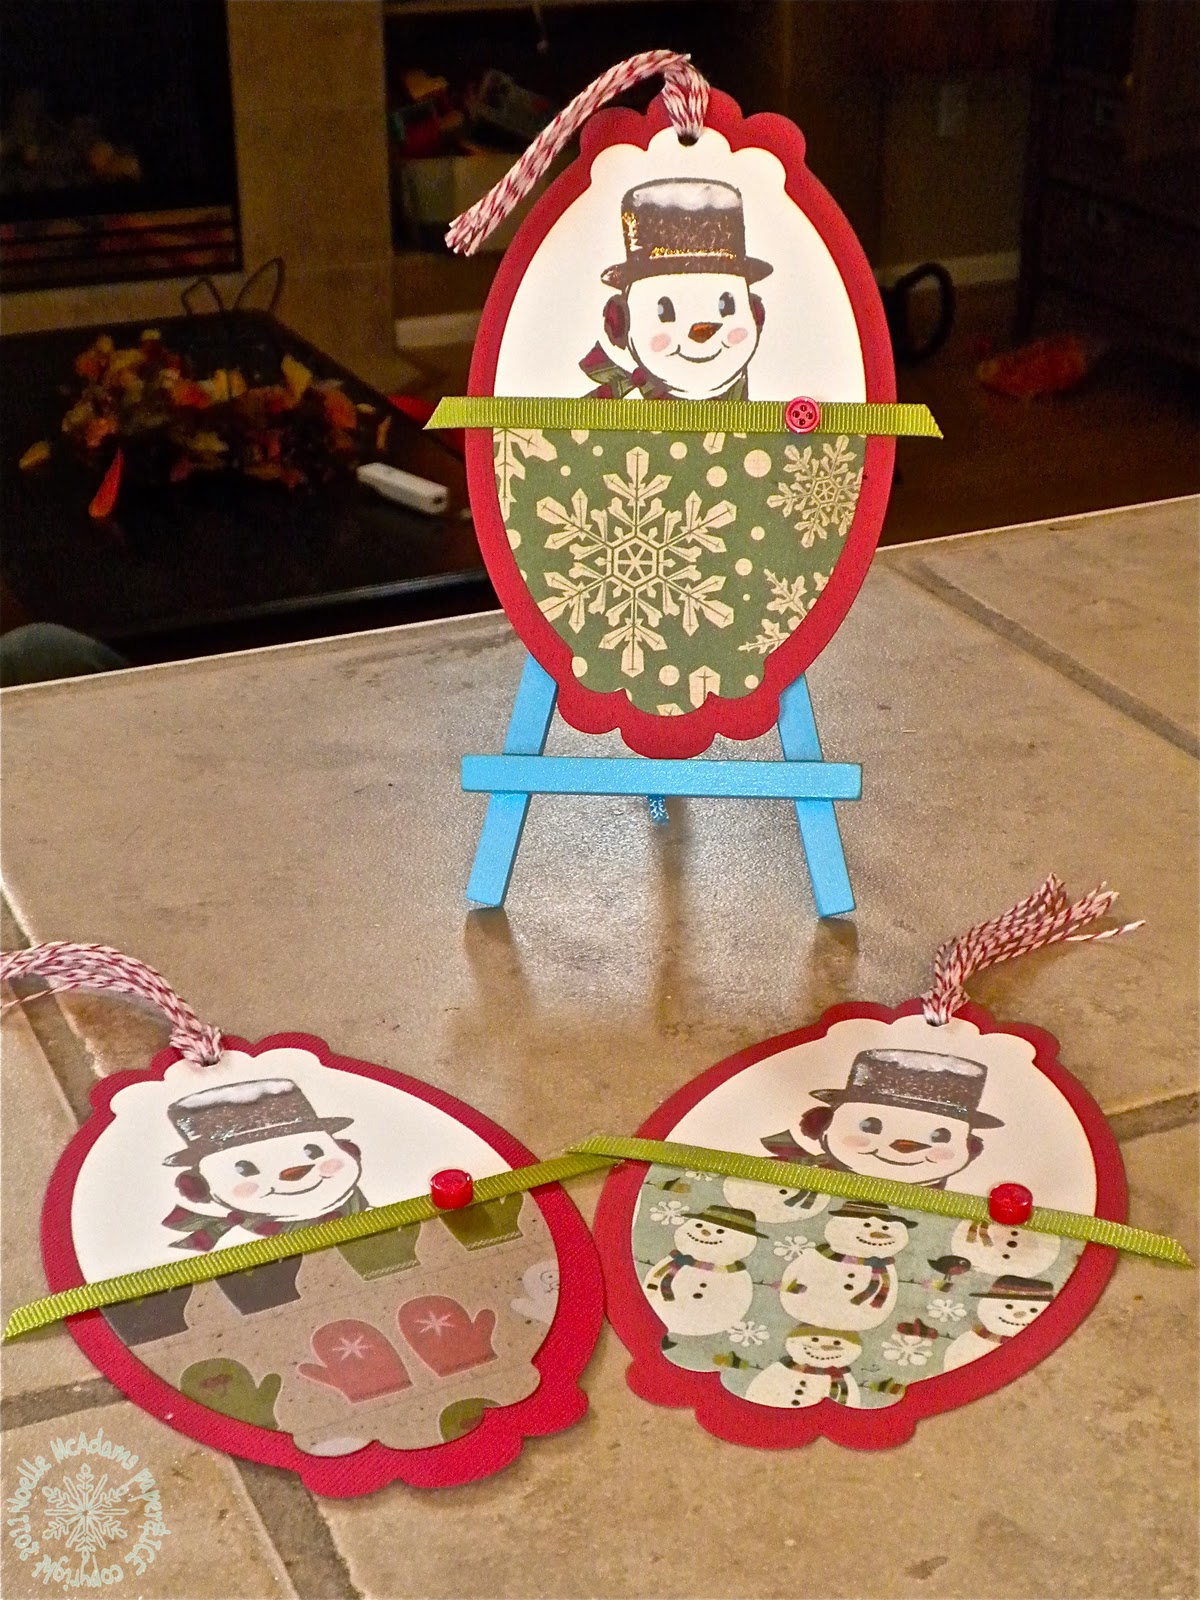
Hi there! Hope you all are well.... my kids are off school and it's been unseasonally warm here.... boo...... :( I like a cool, crisp Fall myself, but I don't think I'm going to see it this year! I thought making a cute Christmas project might make me feel more "seasonal" somehow! :) I am participating in a Christmas tag SWAP with some of the ladies in the scrapbooking group that I recently joined. You make 12 tags and get 12 tags (all different) back in return! I think it will be fun since I always have the best intentions to make my own Christmas tags & never actually do so! So here's my tags, at least a few... I've made 6 so far and have 6 to go. I used different papers on them since I was trying to use up scraps.
I think they are pretty cute! Opinions? I thought maybe I should have pleated the ribbon, but I have to mail them, so I didn't want them to get too thick. I used my new favorite Snowman stamp from Inkadinkado. You may remember him from this card that was featured on Jingle Belles in April. I loved that card & I did the same thing here with the white flocking powder and Stickles on his hat. The tag base is made from the largest die in this set of Nestabilities. Then I cut 6 ivory pieces with the next smaller die and cut them in half. I stamped my snowman in brown Memento ink and colored him with Copics. Then I added the flock and Stickles.
 I cut the patterned papers with the die as well. The ones that were an "all over" pattern, like the snowflakes, I just cut  a full piece and cut that piece in half. The ones that were an "up and down" pattern (like the mittens and the snowmen) I only die- cut the half size at a time, so they wouldn't be upside down if that makes sense. 
I ran a strip of Olive ribbon across the center to hide the seam where the 2 papers meet. I accented the ribbon with these little adhesive buttons I recently picked up at Archiver's. They were sold by the adhesive gems, if you are looking for some. For the top, I threaded some baker's twine through the hole. To do this, I wrapped the twine around my hand 7-8 times. I gathered the loop, and put one end of the loop through the hole I'd punched. I pulled it through the hole enough that I could widen the hole in the loop. Then I put the top part of my twine bundle through that hole, and pulled. The final step was to trim the ends off so I had a tassel instead of a loop. If you have large spools of baker's twine, like me, this is a great way to give a fun accent for just pennies. I bought this 2300 foot spool of red baker's twine at Crate and Barrel last Christmas for only 8$! The final touch was to stamp my "to: from:" stamp on the back of the tags.
Well, I hope the other ladies in my SWAP like these! I like them enough, that I'm making a couple extra, just for me :) Hope you have a fabulous weekend! 

xoxox, Noelle

supply list: solid cardstock in red, ivory, and green ribbon: Stampin' Up!; stamp & flocking powder: Inkadinkado; dies: Spellbinders; markers: Copic; assorted holiday paper scraps; glue pen; baker's twine: Crate and Barrel; brown dye ink: Memento

DUST IT OFF!: Use your scraps to die cut or punch and use on tags! :)


Tuesday, October 11, 2011

Too Cute To Spook!! (CQC106)

Hi all! Time for another fab color combo over at colourQ challenge!!! I think these colors are very "Halloween-y" wouldn't you agree? :) The palette is: Basic Black, Basic Gray, Tangerine Tango, Crushed Curry, and White. Here's my page!!:


Here's the palette!
I think these are definitely Halloween colors, but you could go fresh and summery, too.. Think bumblebees like the fun inspiration pic, and you could go a whole different direction! Of course, I went Halloween, LOL ;) I used a sketch I found online at Scrapbooks, etc.:

Scrapbook Page Sketch 286

I started out with a base page in the Tangerine color. I punched some black circles, and arranged them as the sketch showed. I used a strip of DP from last year's SU! Halloween pack. I punched really large circles in the gray, and that was where I decided to put my title. The title was taken from the name of a new Halloween line from Bella Blvd. I thought it would make a great title, too! I arranged some dimensional stickers between the circles in the title, but BEFORE I did that, I colored the stems on the jack-o-lantern stickers black. Remember, you want to stick as close to the palette as you can, so since there was no brown in the palette, out comes a black permanent marker! Little things like that can help a lot! ;)


I die cut the black journaling paper I used, and a Tangerine mat for it. I added a few more stickers, some bat brads, and did my journaling with a white chalk pen. And that's my page!! I hope you like it! I'm thinkin' it's going to replace the Sweet Summertime page of the boys that's currently in the shadowbox frame that I have in my house! A bit more seasonal, wouldn't you say? ;)

Have a super day! :)

xoxo, Noelle

supply list: solid cardstock & patterned paper: Stampin' Up!; punches: EK Success; stickers: K&Company and Sticko; bat brads: making memories; dies: Spellbinders; pens: Zig

Monday, October 10, 2011

Teen Wolf

Hi there! I had a bad night of sleep last night, decided to get productive around midnight, after laying in bed and trying to sleep. I'd been meditating on this new Werewolf stamp that I bought from Inkadinkado recently. When I saw this stamp, I knew I HAD to have it, because I LOVED the movie "Teen Wolf" with Michael J. Fox when I was in junior high! Besides, how many werewolf stamps have you seen out there? None, here... I mean you see vampires, witches, and jack-o-lanterns, but I've never seen a werewolf stamp. And, this guy is SO funny! So, I had been thinking since I got this stamp that I would love to use some brown flocking powder on him, to make him look "furry." BUT, my first attempt didn't exactly go as planned.... 

Uh, I'll let you see for yourself & have a good laugh! ;D
ok, pick yourself back up off the floor and dust yourself off! I know, I know.... UNBELIEVABLY bad! He looks like he's got a bad afro and lamb chop sideburns! heeheehee.... Anyway, after this **DISASTER** I realized I needed a finer tip glue pen than the 2-way glue pen I was using. Then I remembered that I had bought a VERY fine tip glue pen awhile back and never used it. It's called Quickie Glue, and it worked fabulously for this project! Think a ballpoint pen with glue in it. Here's attempt two on "fuzzing up" my werewolf...
MUCH better, wouldn't you agree? The rest of the card is pretty simple. I made the card front with a spooky tree looking paper I found in this mat stack. I punched a large circle from pale yellow cardstock & stamped the sentiment onto it. I thought I needed something in the LR hand corner to balance out the moon and werewolf in the UL hand corner. So, I used a red suede photo corner and a glittery brown brad from my stash, both VERY old, but I think it works, to create balance and tie all the colors together. 
Ok, well that is it for me today! I've got a fun page to show you tomorrow for colourQ! See you then :)

hugs, Noelle

supply list: stamps: Inkadinkado; patterned paper: Martha Stewart Crafts; brown flocking powder: Inkadinkado; punch: EK Success; solid cardstock in Cherry Cobbler, Barely Banana, and Close to Cocoa: Stampin' Up; Quickie Glue pen: Sakura; chalk pens in white and gray: Zig

DUST IT OFF!: The photo corner and brown brad are really old from my stash, no clue on the brand. 

Sunday, October 9, 2011

Matthew 11:28

Hi there! Hope you are having a great weekend so far. We are.... well, we are just having a long and difficult year any way you slice it. Had some very **good** news on Friday in that we are getting a new dishwasher for Christmas though, yea! That will solve one problem we've had as of late! :) But then last night, hubby's car door quit latching/locking/shutting at all, really. It had been sort of sporadically locking for the last few months, so now here's another big expense, oy! We will find out tomorrow, hoping the estimate isn't too ridiculous! This year has been so crazy & stressful... Not just for me, but for so many friends and family, too. It's almost like this year is cursed or something.
Anyway, I found some peace at church this morning, the sermon was all about using your talents to serve God... and I thought, you know, I don't use my talents to serve God nearly as much as I should. So I thought I would make a card with one of the AWESOME faith based stamps I own and love. And maybe seeing this will give someone else peace in their heart. I think I will send this card to my Grandma in Illinois. She has also had a TERRIBLE year, and I think she would like this card. So, I'll try and get that in the mail this week. Now see, it made ME feel better to make it, it will make her feel better to receive it, and it might even make you feel better, too? All that from a little card. :)

I layered up some pretty patterned papers. The scalloped circle is die cut from some cool patterned acetate, I love the shadowy effect that the patterned acetate gives. I had the card all made & felt it needed something a little more, so I stamped the praying hands from this Spiritual Sketches stamp set on the green patterned paper. Again, I was trying to give a subtle effect by using a tonal ink color. The main sentiment is this Bible verse stamp from Verve, which if you like it, is only $2.40 on sale right now. :)
Well, that is all for me tonight. I hope you have a great week! I have a very cute page to show you on Tuesday for colourQ! :) 

hugs, Noelle

supply list: patterned papers, acetate, & metal gem accents: K&Company; punches: EK Success; sentiments & swirl stamp: Verve; praying hands stamp: Inkadinkado; solid cardstock & inkpads in Wisteria Wonder, Ruby Red, and Old Olive: Stampin' Up!; die: Spellbinders

Saturday, October 8, 2011

Headboard from a salvage door


Hi there!! FINALLY here is the home improvement project I've been teasing you with for the last few weeks! Sorry its taken me so long to get this posted... things have just been **CRAZY** around here. I've got to face that things always seem a bit crazy here, but lately, even worse than normal! I've been relocating Ev's playroom to our unfinished basement, and reorganizing a corner of my craft room, since a friend of mine gave be a gorgeous, wood, 4 drawer vertical filing cabinet for all my 8 1/2 x 11" cardstock. Also, I'm doing a prompt for another blog, and last night I gave a stamping demo at a scrapbooking night. Super fun & I got to meet some great people! But, anyway, CRAZY, and the boys are home on Fall Break right now, too.... So, as you can imagine, that really doesn't lend itself to productivity! LOL....

Ok, so, this project has been in the making for a good long while. I saw this idea in some DIY home improvement magazine YEARS ago... Then, a couple years back, we upgraded to a king sized bed, and our queen sized headboard didn't work anymore. And, THEN I bought this old door at a Habitat for Humanity Home Improvement Outlet for 12$ about a year ago.... and... in my garage it sat.... Here's what it looked like BEFORE my little makeover.


Because my bed is a king size, and the measurements were taped on the door, I knew I didn't have to cut my door down at all, but you should always measure first! :) If you do need to cut your door down for this project, make sure you cut some off of each end so it looks "even," particularly if you have evenly spaced panels like I did.

So, a couple coats of dark taupe paint... a coat of lighter taupe paint mixed with glaze and dry brushed on... a 1" thick long board cut to fit along the top, and a piece of trim, to go around the edges of the board... and voila'!! You have a fabby new headboard, on the cheap! I estimate this project cost me around 60$, but could have been lower had I only purchased quarts of paint instead of gallons, or only used a single paint color. I bought gallon cans of the 2 colors, because I am also painting my old tag sale dresser to match! It's sort of a goldy beige shade now. That color worked well in our old house, but since we painted the walls of our master bedroom green in this house, I think the taupe will be nicer. Besides, I want it to match my headboard!! :) Well, that is it for me today, off to do laundry & get going on my colourQ page for this week! :) Have a stellar weekend!

hugs, Noelle

Wednesday, October 5, 2011

Birdie Birthday (CQC #105)

hi there! I was waiting for my new microwave to be delivered today, so I had time to get my colourQ challenge done for this week! Woot woot! I hope YOU can come over and play these fun colors this week! Isn't that a fab chair in the inspiration pic? These colors wouldn't really work in my house, but I LOVE that fabric!! SO fun & cute :)

here's the palette:
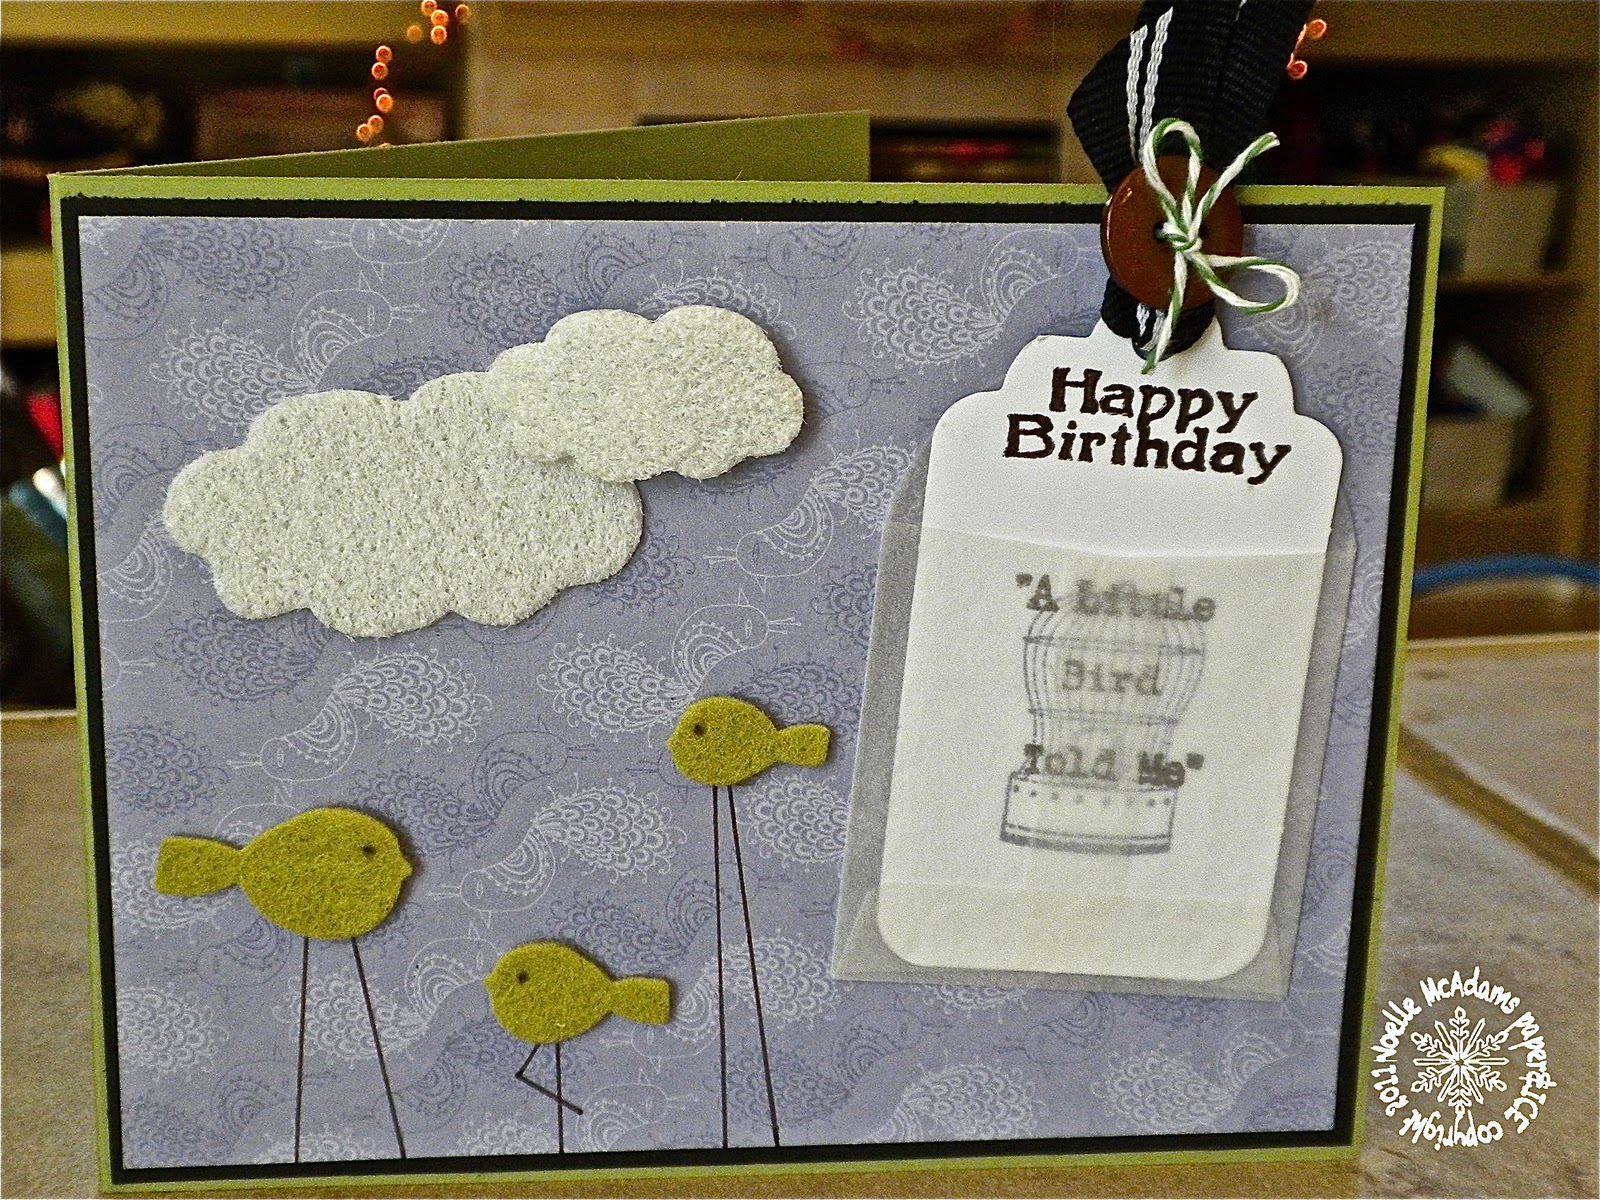
So, this card is a bit of a departure for me, I created a little scene with these little felt birdies (they were in the package from Kara, aren't they "tweet?" Ok, ok, corny, I know... ;) I made the birds some spindly little legs to stand on. I made the middle bird bending one leg like a flamingo :) 

I opened my previously unopened package of mini glassine envelopes and found an old Christmas tag that fit well in there, I flipped it over to the back side & stamped my birdcage in Wisteria ink and sentiment in brown ink onto it. I threaded some black ribbon through the hole in the top & tied it at the top with a chocolate brown button and some green baker's twine. 
The card is "built" on a Pear Pizzaz card base and a black mat. The DP is from a mat stack and has some little whimsical birds printed all over it. It was the PERFECT match to Wisteria Wonder, even though it's not SU! 

I got a new filing cabinet in my studio the other day (pics to come soon!) and when cleaning out all the old filing boxes that I used to keep my letter sized cardstock in, I found this cool "puffy" paper. I forgot I had this & hadn't used it in awhile. It's a specialty paper, almost a fabric coating of this fuzzy stuff, really fun! I die cut some clouds out of a corner of it & that was the last thing I added. Like with all specialty papers (glittered, cork, etc.) I cut it from the BACKSIDE to ensure a clean cut. 

Well that's it for today! I keep teasing you with this and not getting the pics taken... BUT I have a very fun, inexpensive home improvement project I recently completed. I'll try to share tomorrow. :) Have a great one! :) 

hugs, Noelle 

supply list: stamps: Inkadinkado; DP: K&Company; glassine envelope: making memories; felt birds cut with PTI die; cloud die: MFT; ribbon, solid cardstock, inkpads; SU!; button: BasicGrey; twine: PTI

DUST IT OFF!: Kara sent me those little felt birds from her stash. both the ribbon and that puffy paper are really old from my stash :)