Home Design Work Recognitions For Sale About Me

Friday, February 17, 2012

2 cards, 2 TCPTUES challenges


Hi there! One thing I love about TCP Tuesday Challenges is that there's a new one every week, but you have the whole month to play! :) And since I've been a little flaky as of late, that's a really GOOD thing for me! There are 2 cards for 2 different TCPTUES challenges on this post, so be sure to scroll all the way down to see both cards. :)
This first card is for TCPTUES 195, a sketch challenge from the fabulous Leigh! :) here's the sketch:
I used my new set Bunny Side Up, and my new Lacy Floral doily die behind this silly bunny. He was colored with Copics, and fussy cut out. I used my pennant dies from TCP as well, for the banner.

The second challenge/card is for TCPTUES196, and inspiration challenge, here's the inspiration pic:
very "birthday-ish" wouldn't ya say? I wanted to make a birthday card with (one of) my favorite older TCP sets: You say it's Your Birthday, and two other TCP sets: the balloons from Catch My Drift, and the sentiment from A Beary Good Year. Also I used my Big Scallop and Circus Panels CutUps on this card.

 I was commissioned to make a penguin birthday card for a friend's son, and I think this is it! :) Here it is: 

I masked the penguin with his one balloon, and stamped just the balloons from the Catch My Drift set over the top. then I just "attached" all the balloon strings together with a black pen, and outlined them all, since the lines were finer on the "Catch my drift" set. I also stamped the penguin down on my white circle, so that I wouldn't have to fussy cut out his tiny feet. So, that's why you are kind of seeing double in this pic. I added a blue corduroy button, some Peppermint Divine Twine, and a yellow star stickpin to the right hand side of the card. The circus panel Cutups framed the sentiment nicely, and some orange gems complete the fun, bright birthday look. And, those balloons just needed SOMETHING, so i added some bright buttons to a few.

And that's all for me today! I have a couple more fun posts coming up soon, so stay tuned! :) 

xoxox, Noelle

supply list: stamps: the Cat's Pajamas; dies: TCP and Spellbinders; papers: K& Company, My Mind's Eye, and BasicGrey; solid cardstock: K&Company & stampin' Up!; punches: EK Success; stickpin: Little Yellow Bicycle; markers: Copic, Zig, and Stampin' Up!; corduroy button: SU!; Divine Twine in Aqua and Peppermint; other buttons: stampin' Up! and generic

Thursday, February 16, 2012

Mod Judy Jetson card for FMS


Hello hello! Are you completely SHOCKED to see me actually playing a CURRENT challenge? Well, I have happy news, I am feeling better, and things are looking up. :) So, I actually have this challenge and TWO more new TCP cards coming up in the next few days, PLUS a Spotted Canary 3D project I am working on. So lots of fun goodies coming up for you, my oh-so-patient blog friends :)

This is for this week's Freshly Made Sketches 22. A sketch challenge:


I recently got some cute new Inkadinkado stamps, this one is Atta Girl, and I bought a few other sets, including Atta Boy which was backordered and now is on it's way! :) I LOVED the Mod-Jetsons feel of these, reminded me of ALL this October Afternoon Rocket Age stuff that I bought a YEAR ago, and have used very little of, even though I **LOVE** it! So that was the jumping off point for this card (blasting off point, perhaps?) Great CAS sketch I thought would be a fun foil for this card. 

I stamped the stamp on Bashful Blue cardstock in poppy Parade ink and punched it out. Then I stamped it again on the text-print cardstock in black and cut out only this oh-so-modern Charlie's angel with her ray gun, and pieced that onto the punched piece. Of course the 3 panels are different DPs from the OA line, and I added a few stickers and embellies from that line, too. I think this would be a fun card to give a girlfriend who's ROCKING her world, of which I am blessed to have many. :)  Here's the inside:


a different inkadinkado stamp and some more OA stickers. And, that's all folks! See you back here SOON with some more fun projects and cards! :)

xoxox, Noelle

supply list: patterned papers, embellishements, stickers: October afternoon "Rocket Age;" stamps: Inkadinkado; inkpads and solid cardstock: stampin' Up!

DUST IT OFF!: Some new, inexpensive stamps give new life to a great line that I love, but just didn't have the right use for. 


PTI Happy Birthday Banner card


Hi there! I had to make a birthday card for another crafty friend the other day. She is a girly girl, so I didn't need the card to scream "birthday" but I did feel that the background paper added to the birthday feel. This is "fine and dandy" by My Mind's Eye, a couple seasons ago.... I saw these AWESOME PTI challenge sketches on Pinterest. And, as a side note, if you are not on Pinterest, and want an invitation, leave me your email addy in the comments section, and I'd be happy to send you one. Just LOADS of great inspiration on that site. It's like heaven.... ;) 
Free-download

PTI-Sketch-1
Having a hard time resizing these for the blog, sorry they look a little "squatty." You can go to this post on Nichole Heady's blog to see them all up close and personal. I missed the cutoff to enter, but these are still fabulous sketches!


You can see I used the Mat Stack 1 die along with the larger Mat Stack 1 "Layerz" die, and the coordinating stamp set, all from Papertrey Ink. I didn't add the small embellishments at the top of the sketch, but instead a large premade flower underneath. Would have loved to have made a flower, but to be honest, I was battling the flu at the time, and was fading fast. This turned out to be a really quick card; and I'm thinking I'll make a few more similar ones for my stash, since I always need birthday cards! I hope you like it, too. :)

have a wonderful day!

xoxo, Noelle

supply list: papers: My Mind's Eye; solid cardstock: Stampin' Up!; stamps and dies: Papertrey Ink; flower: Martha Stewart Crafts

DUST IT OFF!: Those papers have been around awhile, like many others, I get a new stack and forget about the old, but these are adorable! I'm thinking I may make several of my Easter cards with the rest of these. :) 


Tuesday, February 14, 2012

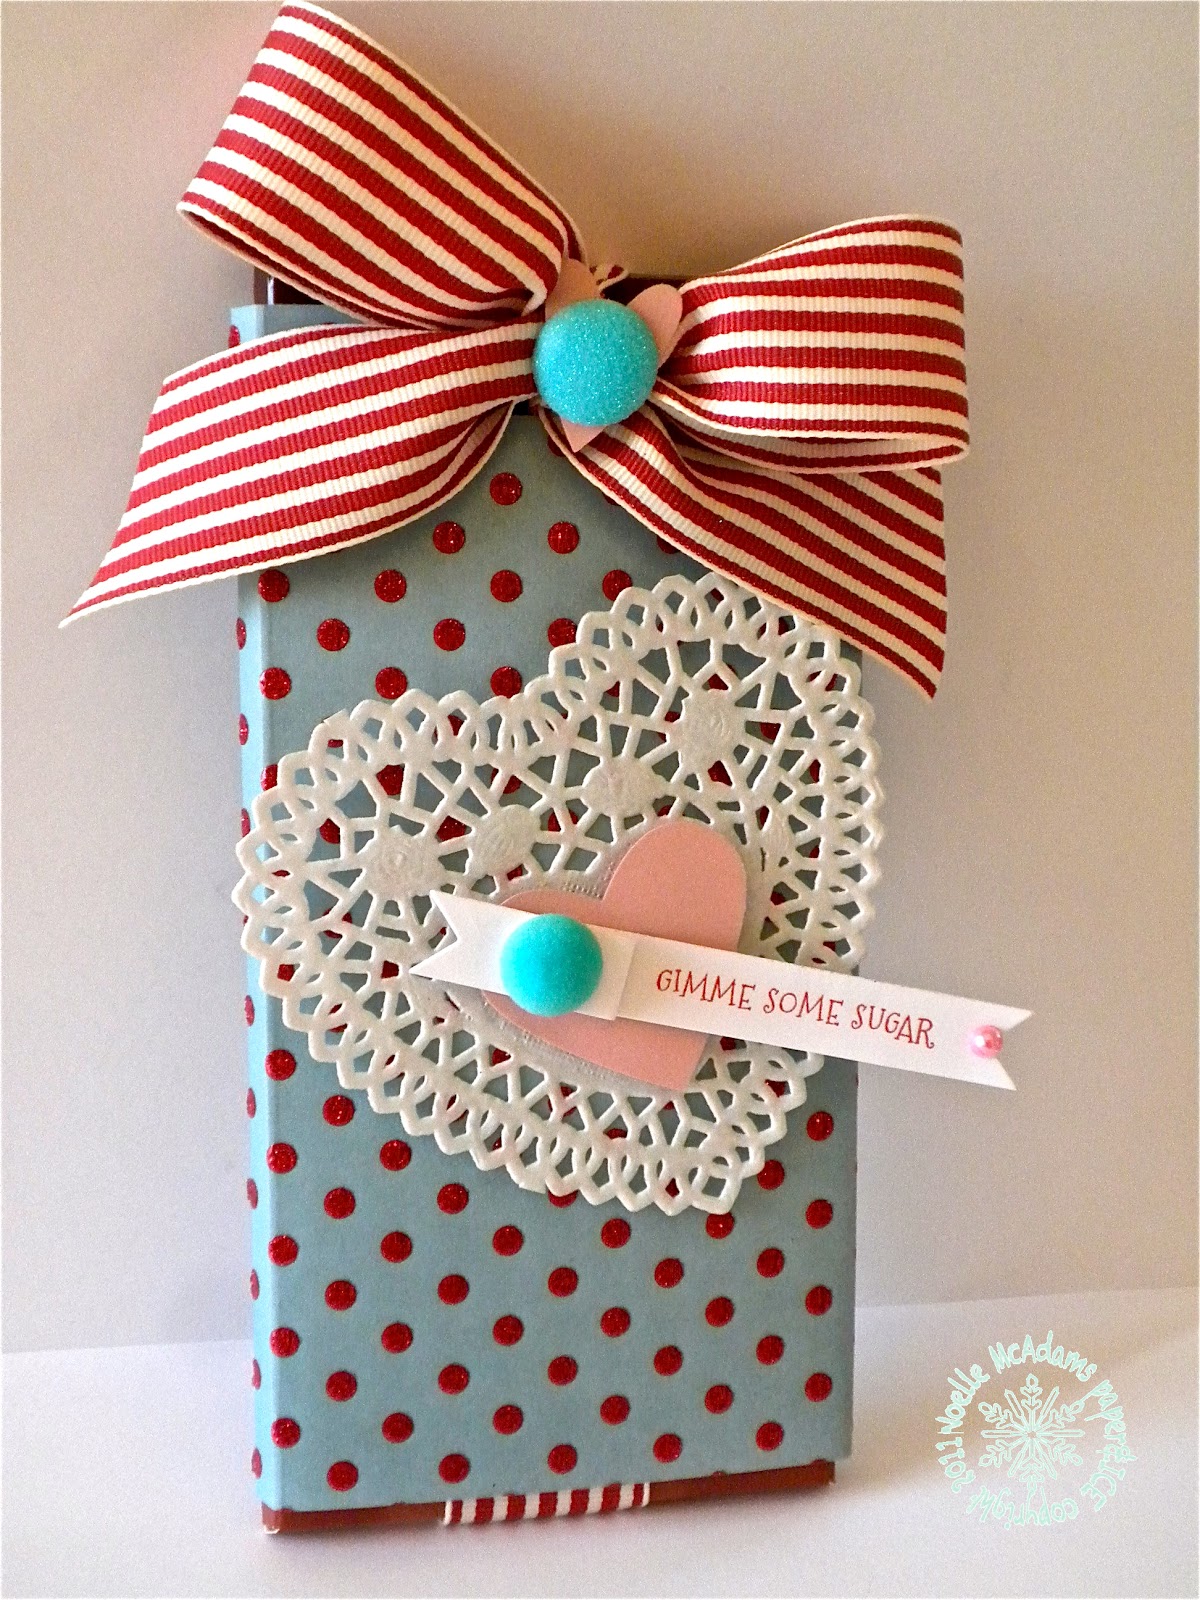
Valentine Candy Bar Slider


Hi there, I am back for the moment to show you this AWESOME Valentine's color palette from the colourQ! This is a fabulous inspiration photo as well:
cqc124
I really loved so many aspects of this.... The red and white straws, the delicate, lacy hearts, the little banners, it was all just TOO cute, so I used all of it as my inspiration. I had bought this nice chocolate bar for my hubby for Valentine's Day. I just LOVE making these chocolate bar sliders, they are so cute and easy! You just figure out the measurements of your bar. Then make the sleeve slightly shorter and score the cardstock so you have a fold on each corner of the bar. You could just wrap the cardstock around the bar and adhere it to itself in the back, but I like to have the crisp folds, sort of like a thin box without a top or a bottom. Then you punch a hole through both layers of the sleeve near the top. I used a big window punch since I had really wide ribbon. But the regular hole punch will normally do the trick. Thread enough ribbon through that you will be able to wrap the entire length of the candy bar and tie a bow at the top. While the ribbon is threaded through the holes, go ahead and put the bottom of the bar on top of the ribbon, pull the ribbon around to the top of the bar and tie your bow. Now, slowly push the bar down into the sleeve. It will look like this:
Then you can pull it out the same way! Cute, huh? Now for the embellishments, I used some punched pink hearts, some aqua gems (one velvet and one glittered), a stamped die cut banner, a pink pearl, and a doily.


The DSP I used is actually from Christmas pack, but I really loved the glittered red polka dots, ad the colors were perfect!
Well, that is all for me today. On my week off I did get some posts written and cued up, so you will have something to read. Things are still crazy, but I can see the light at the end of the tunnel! At least I've got some things here now that I can just hit "publish" on. Thank you all so much for your understanding and your well-wishes. I will get there, its just a matter of time!

big hugs, Noelle


supply list: all supplies from Stampin' Up! except: banner die: Papertrey Ink; gems: Jolee's & Recollections; stamp: The Cat's Pajamas; doily: Target Dollar Spot 2011

DUST IT OFF!: That DSP is from a Christmas pack, but there's nothing about it that screams "Christmas" to me. Pretty cute for Valentine's Day, I'd say! ;)

Tuesday, February 7, 2012

Owl Always Love You (CQC123) & blog break


Hi there, time for a fun color combo at the ColourQ! Great inspiration pic, too. Clearly, I was inspired by the pic as well. Here's the palette:

cqc123

This was a very simple card created with punches and 2 retired Stampin' Up! sets called "Owl Together Now," and "Love You Much." If you allowed yourself a bit of extra time for "owl assembly" you could probably whip up several of these cuties in a hurry! I used Rose Romance (retired) because I don't have any Regal Rose.

Also, my sweet blog friends; I wanted to let you know, I am taking a week off around the blogosphere, and things may be sporadic at best for awhile. Please don't be offended if I don't get comments back to you. I am so sorry, this is just the way it has to be right now. Some members of my extended family have been under a lot of stress and I need to help out there, hubby is working about 60-70 hours per week, the kids have been sick & I am still struggling with my new meds. In short, I am overwhelmed to the hilt, so I need to take care of my nearest and dearest right now.... but, I will MISS YOU! :) I love my blog and my blog friends! I look forward to "seeing" you on Valentine's Day, and to being back full-strength 'round these parts very soon. ;)

I have a very CUTE, EASY, and FUN colourQ project cued up for next week, just you wait! :)

Have a great week.

xoxoxox,
Noelle

supply list: all supplies from Stampin' Up! except for: Pattern stamps on vests: Martha Stewart Crafts; corner rounder punch: EK Success; die for sentiment: The Cat's Pajamas; pink gem

DUST IT OFF!: Both stamp sets and the pink colored ink and cardstock are retired.


Saturday, February 4, 2012

Valentine Test Tubes- Guest Designer at Our Creative Corner


Hi there! I am very excited to announce that this week I am the Guest Designer for Our Creative Corner!! I was very honored to be asked, it's such a thrill when people love your work! :) If you are a new visitor to my little blog, I would love to have you follow me! I've been blogging since May 2010, and I am also on the Design Team at the ColourQ blog.

Guest Designer Banner


The challenge this week is as follows: "Love is in the Air - make a Valentine's Day item (card, scrapbook page layout, 3-D item, or an altered item) using the colors: Pink, Grey, & Kraft. Now add some sparkle, (rhinestones, glittle, metal) anything that shines! And don't forget to include a heart shape."


Here's my project:

I had these darling little test tubes from PTI. You might remember the larger Halloween tubes I made for the boys in October. These are MUCH smaller, only standing 4" high, but SO cute! I thought these might be cute for the boys, but now I'm thinking that their teachers might appreciate them more! Here's a little tutorial for these, if you'd like to make some, too! :)

1. Cut strip of cardstock or heavy DP to 1 1/4" x 7 1/4"

2. Score cardstock at 2 1/4," 3 1/2," 5 3/4," and 7."

3. Punch a 1" circle in what you can see will be the top. Actually, if you have a 7/8" punch that would be even better. The 1" is slightly big, but that's all I had.

4. For the decorative front panel, cut the mat 1 1/8"x by 2 1/8" and DP is 1" x 2."

5. Embellish as desired.

You can see I used 2 shades of pink, both a pale pink and a vivid pink. I used some metal gems I got in my last Spotted Canary Prize package to embellish the punched hearts. I also decorated the top with a smaller punched heart and a tiny metal gem.

Well, that is all for me today! Hope you can come play with us at OCC! I'd love to see what you do with this challenge! :)

xoxox, Noelle


supply list: test tubes: Papertrey Ink; 3 heart punch: EK Success for Stampin' Up!; 1" circle punch: EK Success; metal gems: Bling by Jolee's; decorative papers: Stampin' Up! and Martha Stewart Crafts; solid cardstock in Kraft and Basic Gray: SU!

DUST IT OFF!: If you are new to my blog, you can see more about my dust it off segment on the sidebar. :) On this project I used up some old DP, and really old punches!

Wednesday, February 1, 2012

May Your Blessings Outnumber the Shamrocks that Grow (MOJO226)


Hey there, I'm still not feeling so hot, but have realized that sitting and "carding" as my hubby calls it, really doesn't make me feel any worse! Plus, I think it lifts my spirits. Lately I have not felt like doing much at all. I talked to my doc yesterday & she thought the side effects of the new meds I'm on should start to even out within the next 2-3 weeks. I'm functioning, but sort of just saving my energy for the "important" stuff! I did get the house cleaned up last weekend, actually I should say mostly the boys cleaned up. They have been so good about mama not feeling her best! I love my boys! :)

I got these gorgeous new Lucky You/Shamrock stamps/dies from Verve! I had not placed an order there in awhile, now they offer matching dies! I am such a sucker for stamps with dies or punches that match, LOL ;) Plus, I LOVE St. Patty's Day! My great-grandfather was an immigrant from Ireland. When I was growing up my Papa used to sing me all these little songs and limericks. 

I don't have any St. Pats Day sets. I have a few that have a shamrock in them or can be made to look "Irish," but I really liked this set. Plus I really feel like this is so versatile. You could make a birthday card, or a good luck card at any time of year with these sentiments. Anyway, enough about me raving about my new stamps, onto the card! I decided to use the latest Mojo Monday 226 sketch.

I did flip the sketch vertically. I just felt it added a certain dynamic that I wanted, particularly since the sentiment was rectangular instead of square. I used 3 different shades of green on this card. That's a trick I recommend if you are using only one real color on your project. I used Stampin' Up! Garden Green, Wild Wasabi, and Pear Pizzaz. I really felt this card NEEDED stitching, like it was sort of non-negotiable! LOL. 

The Verve dies come with these little clear positioning tools, so you can get a perfect cut around your stamp every time! They really were easy to use. :) All this Wild Wasabi DSP is really old SU! from a 6" prints pack. I used solid cardstock in Neenah Solar White, Garden Green, Black, and Kraft. 

Well, that is it for me today! I am hoping to get some more projects done today. "See" you soon! :)

xoxox, Noelle


supply list: stamps and dies: Verve; inkpads, solid cardstock, and DSP: Stampin' Up!; green adhesive button: Pebbles; sewing machine with black thread.  

DUST IT OFF!: My gosh that DSP is so old. OOOOOOOLD! ;) Use it up!