Tuesday, March 29, 2011

Tire Tracks (TCPTUES)

Hey there all! Here's my card for this week's TCP TUESDAY 152. The challenge this week is to make a shaped card. Which is a pretty fun and different challenge. They are also doing a blog hop at TCP this week, so go check out the hop! They had a new release last night and OH BOY, there is some GREAT new stuff in their line:) 

Sooooo, my card, I decided to use this adorable stamp set called "Joyride" LOOOOOVE this one! I made a circular card because I was **trying** to make a tire. As I was photographing it, I realized it looks more like a record album, whoops! If you are not as old as me, maybe YOU will think it looks like a tire since records were not your form of music growing up, right? lol, I was commiserating with my friends on facebook today, because I took the boys to a movie and one of those trivia things popped up on the screen, and it said "Justin Bieber was born in 1994."And all I could think was "Justin Bieber was born AFTER I graduated from high school!" LOL, so anyway, I had that as my status on facebook today, and we all had a good laugh about how old we are:) So, I was trying to make a tire, I cut a large black cardstock circle and used my scoring board to create the tire "tread." You can see that aspect far better in the lower pic, here.  Then I created my hubcap, well, let's go with "custom rim" right? I cut a smaller silver metallic cardstock circle and added some very old white metal hardware to it and put gold and pink rhinestones in the center of the hardware. I popped it up with dimensionals in the center of my "tire." I added my punched sentiment to the center of the hubcab and some rhinestone flourishes to the tire. For my bunny I stamped her twice, once on the green patterned paper and once on white where I colored her with Copics. I paper pieced the scooter with the patterned paper and added some pink gems for the lights. 
Tire "tread" is more obvious in this pic....

I hope you like my card! My husband just told me it looks like a sombrero, so we'll just see how many folks **get** that it's SUPPOSED to be a tire, lol! Have a great day! -Noelle

supply list: stamps:TCP; patterned papers;MME, American Crafts; colored rhinestones:MME; rhinestone flourishes:Recollections; scoring board:MSC; punches:EK Success and MSC; markers:Copic; black inkpad:Memento

DUST IT OFF!: Those white hardware pieces are so very old, I don't even know who made them, nice to use them up on this card!


Dyeing Easter Eggs scrapbook page (CQC#78)

 
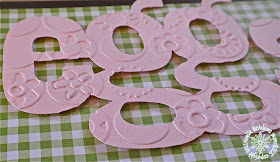
Hi there! Time for another GREAT color challenge at colourQ! I got a wee bit nervous when I saw these colors. I can pretty much make any colors work for a card, but since I scrapbook for CQC, I have to find photos that will work with the colors as well. Aaaaaaand, since I have 3 sons, pink is NOT a color I use often when scrapping! I really need to get some pics of my nieces for these pink opportunities! Anyway, I figured pink is a springy/Easter color and I did have these Easter egg dyeing pics from last year, so I decided to use those. I found some green gingham print paper in my stash which looked to be about the right shade of green and went with the fresh look I was going for. I cut out the word "eggs" on the Cricut in the Pink Pirouette and dry embossed it in the Cuttlebug. For the word "Easter" I stamped the letters down and punched them out with and oval punch. I also cut my eggs picture out in an oval and matted it in the pink as well. the oval reminded me of an egg, so that's why I focused on that shape. When I scrapbook, I usually figure that square or rectangular shaped photos are the norm, or that they're "neutral." One way to draw attention to a certain photo is by cutting it out in a different shape. So I will usually only try to draw the eye to one or 2 pics per layout. 


I used a technique on this layout that can REALLY help you save paper if you like a layered page look like I do. See the Espresso brown cardstock, that are bordering the gingham pieces?? I actually cut the centers out of those Espresso pieces, thereby saving about a 10" square piece from each Espresso piece. One of them I was then able to use to mat my photos on the right hand page, see? It's SUCH a great technique, since I often like to mat my photos in cardstock. 

Cut center out of 12" cardstock with 12" trimmer

Set center piece aside for later use.


adhere to back of 11 1/2" square paper for a
(back of paper shown) layered look

I found these SUPER old tab stickers in my stash, that's where I stamped the word "Dyeing." I accented with a variety of buttons, brads and little accents, most of which were pretty old. Check out my "dust it off" section at the bottom of the page for further details! 

 I hope you are having a great week! We are on our SECOND week of Spring Break and I'm trying to keep the boys busy! Thinking of trying Evan out at his first movie in a real live movie theater, wish me luck! Have a STELLAR day! -Noelle

Supply list: solid cardstock, letter stamps, Espresso brown ink and pink upholstered brad: SU!; chipboard eggs: Recollections; buttons: Dress It Up and The Paper Studio; metal lowers: Making Memories; oval punch: EK Success/SU!; flower & scallop border sticker: We R Memory Keepers; large Easter brads and gingham paper: The Paper Studio; tab sticker: K and Company; From My Kitchen Cricut cartridge; embossing folder: Cuttlebug

DUST IT OFF!: Where to begin? SO many old goodies on this page! The large Easter brads, the buttons, the tab sticker, and those flower and border stickers as well. I don't own much in the way of Easter products, so I had fun scrounging around nooks and crannies of my studio for all these goodies;) What's better is that I LOVE the way this page turned out! 


PS, I found out only last night that THIS CARD was featured as the Pick of the Litter over at TCP on Friday, Woot, woot! I'm so excited, and also feeling a little dingy that it took me so many days to notice, things can get a little crazy with the boys home, lol. Thanks a MILLION, TCP! :)


Saturday, March 26, 2011

Sea You! (TCPTUES 151)


Hi there! I wanted to get a post in this week for TCP Tuesday! Here is the inspiration pic below. When I first saw this I thought, SUMMER!!! All the pink was a jumping off point and then I was even able to incorporate the cherry. You may be TOTALLY shocked by this, but I did a lot of fussy cutting on this card (I know, I know, I really HATE fussy cutting, so you never see it here, right?) But, my friend Sylvia had given a few tips on fussy cutting on her blog a few weeks ago here. So, I gathered my courage and stamped down my wave stamp several times on different blue papers. I dug out a new pair of MSC tiny scissors from my last Spotted Canary prize package, gathered my courage and took Sylvia's advice to go VERY slowly, and I think it turned out ok, don't you? I still can't say I'm a fan, because I really struggle with PATIENCE. I like to work pretty fast and fussy cutting is NOT fast. But, at least I know now that I CAN do it, if I want to. :) I hope you like my whale, isn't she cute? Have a great day!
-Noelle


supply list: stamps: TCP; cloud stamps: Unity; all patterned papers except polka-dot: MME/Stella and Rose; pink polka dot paper:OA; tab sticker: K & Company; water stickers: EK Success; inkpads in Baja Breeze and Melon Mambo: SU!; solid cardstock: SU!; mini buttons: unknown; die: Spellbinders

DUST IT OFF!: That tab sticker is ancient as are those mini buttons

Disney layouts

Combining a premade page (left) with a solid page that
I pulled together with the comic book paper.

This is some of the paper I bought at WDW.


Hi there! Since the boys are at Grandmas for a few days, I've been scrapping like a mad woman! My friend Kim asked me to meet her over at Archiver's the other day to get some pages done, and since I didn't want to take a lot of stuff with me, I decided to focus on my Disney pages since I have SO MANY PICTURES! These are definitely going to need their own album. I'm only about 1/3 of the way through them after these 18 pages, lol. I made them all pretty simple pages accented with stickers. While I LOOOOOVE fancy handmade accents, there just isn't always time for that, though I did make my own version of Epcot Center's "Spaceship Earth."
I'm not going to  write a supply list on these, but most of the Disney themed stuff is EK Success, except for the Disney stuff with the actual park names on them, I bought a HUGE scrapbook kit when I was there that's actually made by Disney. If you have a question about a product or a technique, leave a comment on this post, and I will get back to you ASAP.

Hope you are having a stellar weekend! -Noelle


Again, combining a patterned page with a solid.
I made the accents with a CM Mickey Mouse punch.

Fancy borders behind the title. The only Halloween Disney products I
could find were these teeny stickers from Walgreens,
so I used them in strips, I think they look like filmstrips.

Same event as the last 2 pg. spread. The banner stamps read "Not So Scary"

Epcot pages. these papers were from WDW too. 

The Epcot landmark "Spaceship Earth" that
I made from a dry-embossed silver circle.

The papers, stickers and journal block are from the WDW kit.
The letter stamps are Inkadinkadoo.

Safari page, not much Disney on here,
but I did add a couple Mickey Mouse buttons.

A tiger print background paper and some fun Jolee's stickers.

Wednesday, March 23, 2011

Bluebird of Happiness (CQC #77)


Hi everyone! I'm baaaack with my card for this week's colourQ! If you saw my last post this morning you already know a little about this card. I designed the layout and these stamps are a 2$ stamp set from Inkadinkadoo. Can't beat that, right? Click that link there and you can check it out! I love the way that the images are made up from words. Check out that last post, it's a COMPLETELY different card, with a stamp from the same series and the same layout. 

So, how in LOVE are you with these colors this week? I am CRAZY about these! Concord Crush, Bermuda Bay, Kiwi Kiss, Bashful Blue and white, oooooooo! I'm a cool color junkie, so I had a LOT of fun with these. I started out with a Concord Crush card base. I created the decorative strip along the right side of the card with a punched strip of Kiwi DSP, a distressed strip of Bermuda Bay and a patterned piece that (though I originally saw the background in it as navy?) looks SO perfect with the Concord Crush card. For my main panel, I stamped the birdie down in Bashful Blue, and the sentiment over that in the Bermuda Bay. I die-cut that piece and sponged the edges and then die cut a mat for it out of the same Kiwi DSP I'd used on the strip. I pulled out some buttons, and old punch and some dark purple wire for my embellishments. The Bermuda flower center was made with the flower stamp that came with the stamp set. I stamped the flower in Concord on white, then punched out the center and layered the circle with a clear button and a punched flower. 


I hope you like my card! Go check out the AWESOME samples my DT buds have for you today! See you soon! -Noelle


supply list: solid cardstock, inkpads, Kiwi DSP, buttons: SU!; stamps: Inkadinkadoo; dies: Spellbinders; punches: EK Success; patterned paper: K and Company; dark purple wire

DUST IT OFF!: That purple wire was bought in a set of colored wires around 10 years ago. I had NEVER used the purple until today! Also, that 3 flower punch is really old. 


Smile! You're on Candid Camera!


Hi there! Sorry you haven't seen very much of me as of late. Kids are home on Spring Break and things have been CRAZY! I just had to get some crafty time in this morning though. I've got my nephew and two nieces here today and though you might think that 6 kids vs. 3 would make things even crazier, in fact, it's keeping my 3 kids occupied, so I can get things DONE! Yippee! :) 

So, my card. I recently purchased this stamp from Inkadinkadoo, and if you click on that link, you'll see these stamps are only 2$! Seriously, 2$. Not only are they affordable, but, so ON trend for right now. I fell in love with this stamp when I first saw it, it's so cool and graphic. I don't have a camera stamp anyway, so it's nice to use something different. I was trying to make a card for a man, and I think I succeeded.  I used the technique I described back here to stitch the buttons down. All the buttons except the red one are from my random jar, and in case you are new to paper & ICE, one thing I NEVER throw out are those little buttons in baggies that come on the clothes you buy? Yeah, I save them all and I rarely buy buttons because of it. I designed the layout of this card myself, no sketch, sometimes I like to just play & was having fun doing that this morning. I made another card with a different stamp from the same series and the same layout for this week's colourQ, which is my very next post so come check back this afternoon. I LOVE the colors this week, I'm such a cool color lover.  


I'll be back very soon with that next post. "See" you then! 
-Noelle 

supply list: red and black patterned papers, solid cardstock, red button, library clip, Cherry Cobbler inkpad: SU!; stamps: Inkadinkadoo; punch: EK Success; notebook print paper: MME; black inkpad: Memento; bakers twine: Crate and Barrel

DUST IT OFF!: reuse those buttons that you might have thrown away, that black patterned paper is several years old, too.

Saturday, March 19, 2011

Chick-fil-Angel


Hey all! I've got my little card done and I wanted to share my story with you, because all my friends on facebook were so excited about it:) It's one of those "the world is actually a good place and there are caring people out there" kind of story. 

So, Tuesday night I mentioned we ended up at the ER. Evan choked on (and ultimately swallowed) a toy. He is ok, thank GOODNESS, but it was a stressful evening to say the least. There was a time where they thought they might have to do emergency surgery & the entire thing was scary, oy. It can be really tough having a little one at home when there are two BIG brothers as well. It was a piece of my oldest son's Erector set that he got hold of. When my other 2 were little, they were both little, so we didn't own things like Erector sets in those days. Anyway, we'd been at the ER a little over 3 hours when we finally got the "all clear" to go home, instructions in hand on what signs to look for in case the toy perforated his bowel, SCARY! My hubby had taken the other boys home 2 hours before, so it was just me and Ev heading home a little after 7pm. We were both starving and I decided to pick up Chick-fil-A so we could eat and then I'd put him right to bed when we got home. CFA is always crowded, so there were several cars in line. I ordered our food and waited my turn. When I was second in line, I went into my purse to pull out my wallet. It was not in there. I started pulling everything out frantically looking for it, no wallet. I asked Ev, "did you take Mommy's wallet?" He said, "yeah, it on the floor." My heart sank as I remembered he'd been messing in my purse at the hospital. He must have taken the wallet out and it had left it on the floor. Now, I don't mind admitting to you that I almost burst into tears right then. We were both SO tired and hungry and the thought of driving all the way back to the hospital with a hungry, cranky, tired 3 year old who'd just spent 3 hours being poked and prodded was not at all appealing. I pulled up to the window, I started to explain to the teenager working the drive-thru window that I had left my wallet, I could come back and get the food, etc, I was so sorry. She smiled, she very kindly and respectfully said something like "No problem, we can take care of your dinner." I mean there was not a hint of disrespect or irritation in her voice. I started stammering "What, are you sure, I can come back..." and she smiled again and said "don't worry about it." and handed over our food.  I felt I'd met a real-life angel. As I drove back to the hospital with tears in my eyes, and a quiet, happy son who was eating his food, it was such a reminder of God's love for us. It gave me a feeling of complete peace. Maybe this story can give you that feeling as well. 

So, I just kept thinking I had to DO SOMETHING to say thank you to Chick-fil-A, so I made this simple card and told my story to the manager of CFA in it. I'm going to include some money so perhaps they can "pay it forward" in some other way. The card is a chicken with angel wings and a halo;) pretty simple, but I think it will work beautifully:) 

Peace to you today, wherever and whoever you are. Set your frustrations down for a few minutes and just feel held, taken care of, and loved by God. We all have our problems, our fears and our anger, but God is there, always, holding us:) 

xoxox, Noelle

supply list: patterned papers: OA, MME, Jillibean; angel wings brad: Oriental Trading; buttons, twine, and solid cardstock: SU!; oval cutter: CM; font for sentiment: Word for Mac

DUST IT OFF!: I've been giving a lot of lip service to my circle, oval and wavy cutters from Creative Memories, I just LOVE them! I've tried other circle cutters, but just don't like the way they work. I've had those blades and most of the guides for 10 years+ :) also I've had those angel wing brads a LOOOONG time and never used a single one! So glad to finally get to use one;) 


Friday, March 18, 2011

In Your Easter Bonnet.....


Hey gals! I hope you all are doing well, I've had a FABULOUS day:) My friend Cara and I have had this day on the calendar for months, and our plan was to go check out this HUGE cool scrapbooking store in Fort Collins (probably about a 90 minute drive for us). We discovered on Wednesday that the store is only online now, so that was a little sad, but INSTEAD we had a great day shopping and a nice lunch:) Thanks, Cara! We discovered a great new home store today where I bought the CUTEST Easter decoration, a big egg made out of pussy willows, too cute! Also I bought an outfit to wear for Easter, so I guess I have Easter on the brain, even though it's not for another month and a half. So, I thought I'd make yet another Easter card (hope you're not too sick of them yet!) for this week's TCP Tuesday challenge. Here is the SUPER amazing sketch for this week... (didn't realize until after I posted that I got the triangles backwards! Whoops!;)

You have (admittedly) seen a lot of cards with this set, I know;) I've just looked for an Easter set for years that I was truly in LOVE with, and this is it! I usually resorted to making more "generic" Easter cards, like flowers or cutting out ovals for eggs, etc.... because the sets were usually just too formal for my liking. This set is just TOO much fun! :) So, I guess what I'm tellin' ya, is you might just have to see some more of it for awhile;) 


So, they suggested using the Pennant die for this card, I do not have that Pennant die or any other pennant die, however **audible sigh** because I love banners;) It may need to show up in MY Easter basket, right? I love how the TCP die has both tiny (for cards) and large (for decor) pennants in the set. 

Ok, blah, blah, I'll shut up now and get to the card..... since I do NOT have the die, I figured out how wide and how long I wanted my triangular pieces to be and I made a cardstock pattern from a scrap. I traced it onto the back of my patterned paper (more MME Stella and Rose, I'm so smitten!) cut 'em out and die cut some scalloped border pieces which I also dry embossed. I stamped my lil' chicks onto some Ivory cardstock and colored with Copics. That embellishment looks fancy, but was actually super simple, and made mostly from scraps of ribbon! I taped down one lovely rose from some rose ribbon, then wrapped a strip of green ribbon over that and around the card front. then I laid scraps of pink and green ribbon down on top of that and took a thin blue ribbon and tied it around both scraps and the green ribbon, make sense? Finally I accented the whole thing with some heart stick pins from my old stash. Punched out and layered my sentiment, and voila! One wild chick and her colleagues are all hooked up for Easter:) 

Well, I hope you have a stellar weekend, I do have one more project that's not finished yet, but in the works, it has something to do with the ER trip I mentioned a few posts ago and a real-life angel. Can't wait for you to see. 

-Noelle

supply list: stamps: TCP; patterned paper: My Mind's Eye/Stella and Rose; scalloped border die and herringbone ribbon scraps: MFT; green ribbon, blue ribbon, solid cardstock:SU!; embossing folder: Cuttlebug; circle punch: EK Success; shaped circle punch: Martha Stewart Crafts; rose ribbon: American Crafts; markers: Copic

DUST IT OFF!:Use those ribbon scraps! Plus, those heart stick pins have been in my stash FOREVER, I know I had them when we bought this house 5 years ago, so they're ooooold. No clue on the brand even! That green ribbon is also from SU's Sale-a-bration several years back.

Happy Bird-day to my niece and nephew


Hey there! Just a super quick post I wanted to show you. These cards are for my niece and nephew. Their birthdays are a little over a month apart, and I'm already late getting my niece's present out, whoops! I've had it sitting here for a couple weeks, some cute outfits from Build-a-bear for the panda we bought her for her birthday last year;) I know she will love them, and since her little brother's first birthday is coming up soon, I thought I'll pick up his gift this weekend and just send it all off together next week, fun for all! 


I made Irene's card first, and then just copied it in bright colors for Mike. My own design, layout, etc. Just fun and cute (and easy! These only took about 30 minutes for both;) I hope you like them! This is one of my favorite SU! stamp sets "Pun Fun" I've gotten A LOT of use out of that set, I have to say!! 


I've got another card to show you tonight! "See" you soon! :)

-Noelle

supply list: cardstock, multi colored ribbon, stamps and patterned paper: SU!; punches: EK Success; cupcake brads & gems: K and Company; glitter buttons: Recollections; pink and white ribbon: American Crafts

DUST IT OFF!: My trusty punches, that pink and yellow DSP is retired, and that pink and white ribbon is really old! 

Wednesday, March 16, 2011

Happy St. Patty's Day!


Top o' the Mornin' and Happy St. Patrick's day to you all! We have had a TOTALLY crazy week including one trip to the ER on Tuesday night. Fortunately everyone is ok now, and I will write more about the whole ordeal in my next post...

If it had NOT been St. Patty's Day tomorrow, I'm sure I wouldn't have made the time to craft, but while I was at Target this morning, I found some cute little SPD goodies for the boys, and I couldn't just give them away in boring old gift bags, right? So, the dishes had to wait a little bit longer, though I'm glad to say the kitchen is clean and my studio picked up a I type. HERE'S how it looked this afternoon..... WHAT A MESS!!!


So, I took an armful of supplies and headed out to the dining room. The light is actually better in there anyway. I decided to try and use some old and cheaper quality supplies, the green cardstock I used is all from one of those 300 sheets Costco packs, and not super sturdy, I regretted that a little later on once I realized the boxes were pretty flimsy :( Oh well, cest la vie, right? I had cut the box sides out on the Cricut. I actually found a rectangular shape that actually had the holes in the 4 corners to tie the box together, so that worked well. Then I just cut square box bottoms and punched holes in the four corners. Heres a pic of the box after embellishing and before I tied the top corners together.... If you want to see a similar box construction with a pretty detailed tutorial, check out this older post here.


I made all my box sides, embellished with some printed papers (these are WAY old, I have no clue the brand, sorry!) and I made shamrocks out of three green punched hearts and ribbon "stems." I accented the boxes with some cute stickers I bought for my "lucky" banner here. Here's my box on the inside once I tied it all together....


Here's the cards and boxes all filled up, and yes, that's MY little leprechaun lurking in the background;) lol, I didn't even know he was in the shot until I went to edit the photos!


Here's a pic of one of the card/box sets....


I had spent so much time on the boxes (and the kitchen and studio were still a mess!) So I kept the cards super simple......


The goodies! Bag of "gold" (rolos) and some green mint M&Ms, a shamrock tumbler and green bubbles! I mean, who can resist green bubbles, right? 


Here is an Irish blessing for you all today (and one I know I can personally use!;)

I hope you all have a very lucky day and don't get pinched! -Noelle


If God sends you down a stony path,
may he give you strong shoes.

-Irish Blessing


Supply list: green cardstock: generic/Costco; heart punch: SU!/EK; Pacific Point cardstock: SU!; patterned paper: unsure of manufacturer, but maybe AC Cardstock?;green glitter buttons on cards: Recollections; pot of gold and shamrock stickers: Jolee's; ribbon: Offray; Graphically Speaking Cricut cartridge

DUST IT OFF!!!: That patterned paper and all the ribbons are OOOOOLLLLLLDDDDDD ;) 


Tuesday, March 15, 2011

CQC #76 You are my sunshine


Hi everyone! Here is my page for this week's colourQ! The colors are: Daffodil Delight, Old Olive, Kiwi Kiss, Early Espresso, and White. 

On this page are photos of one of my babies when he actually WAS a baby;) This is Ev when he was four months old! I can't believe how little he looks! This page was sort of a rescue mission for these photos. I used to have them in a frame, and then when I stashed all my "regular, year-round" deco at the holidays, the frame was broken and there was broken glass ALL over! It was one of those frames that had the pics sandwiched between 2 pieces of glass, and it was the piece on the back that broke, so I had to actually TEAR these pics off the cardstock they were mounted on (which was taped to the broken glass), so the backs of these photos are a complete mess, some of them a paper thin in areas. Anyway, I had saved them & once I got them mounted onto new cardstock they looked MUCH better and the colors seemed to work well with this weeks challenge. 

back of sun

front of sun

So, I pieced together this 12" paper from 2 separate sheets/scraps by Crate Paper, I put a yellow SU! border sticker down to hide the seam. I cut my title on the Cricut from some Bazzill textured cardstock in the Olive color & bordered the letters in Espresso. I mounted one pic in Olive, one in Kiwi and one in Espresso. The sun is made from a cut circle and punched hearts for the "rays." I printed my journaling on some patterned paper and after matting it, I accented the left side with an OA sticker that I put Ev's name on with some yellow sticker letters and I added a couple of those green glitter buttons I've been so fond of lately! My final touch were some pinwheels I made:) I hope you like my page!

Journaling

title cut on cricut with textured cardstock

pinwheels for fun!
Be SURE and head over to colourQ and check out the other samples, they are AWESOME! I hope you can play with us this week! Have a stellar (or should I say, sunny?) day! xoxo -Noelle


Supply List: patterned papers: Crate Paper, American Crafts, Stampin' Up!; textured cardstock: Bazzill; solid cardstock in challenge colors, heart punch, border sticker and decorative brads: SU!; white sticker letters: The Paper studio; yellow sticker letters: Crafts, etc.; Cricut cartridge: Don Juan; glitter buttons: Recollections; shaped sticker: October Afternoon


DUST IT OFF!: Most of that DSP is 2-3 years old (in fact, the CP ones are the backs of Christmas papers!); 3 heart punch; circle cutter; sticker letters in both colors