Tuesday, January 31, 2012

Valentine Pocket Pages (CQC122)

Hello there, time for another fun, Valentine-y color combo at the colourQ!! Here's the palette for you, loving the kraft and the black, personally.
cqc122
I decided these would be fab colors for making some pocket pages for the boys old Valentines. I made one page for each, and when I was done, could NOT find Collin's Valentines from last year anywhere? But had a bag from the previous year, so that's why his is a little different. If I come upon the other ones, I guess I'll just make a new page!
Now, if you've never made these pocket pages before, I tell you, you really SHOULD give it a go. It's a wonderful way to save those birthday, baby, and holiday cards that we never really know what to do with. It's also a great alternative to leaving the INSIDES of your scrapbook covers blank.. You can adhere these to the inside of the covers with that super sticky tape, and then people can easily pull out the cards and take a look... I did that with the boys baby albums. :)

Here's a pic of the pocket on the back:
Now, you could use foam squares, too. I particularly like the foam tape, though.... You really should use something to give the pocket some depth away from the page, so it won't fall apart when you put the cards/memorabilia in. You can get HUGE rolls of this foam tape (made by Scotch) at the office supply store for around 25-30$. I know that's a lot, but I've had mine for years, and just finished the roll! If you have boxes of cards and things around, you could even do a whole album of these. they are really fast pages, since you don't need to figure out layout or embellish a lot. Really it's just the pocket, and you can add a little decoration at the top of the pages like I did here, but the rest of the page likely won't show, once you fill the pockets.


I used a set of Patterned Love stamps I got from my last Spotted Canary prize package. Using an extra-large acrylic block, I was able to position all 4 stamps at once, and just stamp each page one time. easy peasy... Also used my TCP Heart Trio CutUps die set and my fave punch for the edge of the pocket. 

I used my labelmaker to add the boys names to each page, I hand cut a fishtail at the end of each label for decoration and I added some cute little monkey stickers I had leftover from last year's Valentines. 

Well, that is all for me today! Hope you will come join us at the colourQ. I'd love to see what you'll come up with!

xoxo, Noelle

supply list: stamps: Inkadinakdo; die: TCP; labelmaker: Dymo; stickers: K&Company; punch: EK Success; foam tape: Scotch; glass baubles: K&Company

DUST IT OFF!: Sometimes buying in bulk can really pay off! On this project, I finally used up the massive roll of foam tape I've had for years. Plus, scrap that memorabilia! No one will ever look at it in a shoebox anyway :)
  

Sunday, January 29, 2012

Sprinkle Hearts Valentine (TCPTUES194 & PP80)


Hi there, I'm still not feeling so hot. :( I'm not sick anymore, but my health problems (which are normally not present THANK GOODNESS!) really have me feeling crummy. Between a low thyroid and a painful cyst, I have just not been feeling very "me" the last 4-5 days. I know that everything will get ironed out in the next few weeks, and I am SO blessed that it's nothing more serious, but I just feel "bleh." So, I'm sorry if I'm slow publishing and/or returning comments. I'm just moving slow right now, if my hubby and kids can accept that, I guess you can too, right? ;) 
Valentine Blog Hop

This card is for TCPTUESDAY, I really wanted to play with my new TCP Valentines stamps again before Valentines Day! They are also having a Valentine's Blog Hop over there, just use any TCP CutUps or TCP stamps for your Valentines projects, and you can link up, it's on the sidebar on the TCP blog. For this card I used "Gimme Some Sugar" and "Build A Bingo" on the tab. This is also using Anne Marie's FAB sketch at The Paper Players! Here is the sketch:

I had seen this gorgeous CAS card on Julie Masse's fabulous blog in December, and I asked her via the Die Cutting Hints thread on SCS how she dry embossed with her die. As it turned out, I already HAD the tan embossing mats needed, I bought them thinking they were for something else, and then, when I couldn't figure out how to use them correctly, they got relegated to the bottom of the box where I keep my dies and pads. Well, thanks to her, now I know how to use them! I thought the Heart CutUp would be such a cool dry embossed background, so that was my jumping off point for this card. Still pushing myself to be a bit more CAS, and on this card, I think it paid off. 

Have you noticed how mirrored dressers and consoles are making a comeback? Well, I thought Sprinkle is just known for being SOOOOO fabulous and chic, that she would probably have a mirrored piece of furniture to give her lollipops away from, so I colored it silver. I actually intended to add some Crystal Effects to the lollies, but I guess that will happen after publishing this, LOL! 

I really liked the way it turned out to use all the different reds and pinks on this card, lots of fun! Well, I will see you on Tuesday for another ColourQ challenge! I've got a fun project all ready to show you for that. See you then! :)

xoxo, Noelle

supply list: stamps and heart die: The Cat's Pajamas; punches: EK Success; felt flower: K&Company; decorative paper: Martha Stewart Crafts; markers: Zig, Stampin' Up!, and Inkadinkado; flocked tag: Heidi Grace Designs; solid cardstock: Stampin' Up!

DUST IT OFF!: That tag is really old as are the punches used on this card. 


Friday, January 27, 2012

Wait, wasn't Christmas just a few weeks ago? (Jingle Belles and Merry Monday challenges)


Well, yes it was just a few weeks ago! ;) but I'm trying to get a jump-start on next year's cards. I haven't played along at Jingle Belles since last year, and I missed those gals! Also, Lesley is doing a new Christmas card challenge at her blog, too! This week, Jingle Belles challenge is to make a card inspired by their AWESOME new banner! Check it:
jingle belles


And Lesley's Merry Monday challenge this week is to use the following sketch:


Yesterday, I saw this GORGEOUS card over at Christina's blog. I LOVE the way she used the negative space & anything with rainbow stripes makes me happy! I thought this might be a cool sketch to try the negative space idea with. Here's another shot of my card:


I used the elements of the line of bells, the red glitter and the idea to use a vintage looking font from the banner. I didn't take too many liberties with the sketch, except for the fact that I didn't put my sentiment in the corner. You can see I'm still challenging myself to go more CAS. I cut my DP to size, punched a partial circle and added a strip of red glitter paper to the side where the circle had been punched & trimmed. I punched the bells from some foil paper and added a baker's twine bow and red gem to each bell. 


Well that is all for me today! Hope you are having a good week! Hugs, Noelle

supply list: stamp: Inkadinkado; circle & corner punches: EK Success; bell punch: Martha Stewart Crafts; red glitter paper & red gems: Recollections; silver paper: Martha Stewart Crafts; decorative paper:  Memory Box

Tuesday, January 24, 2012

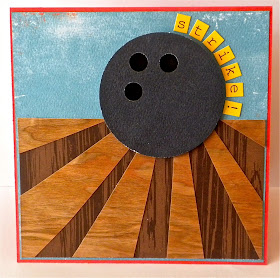
STRIKE! Bowling card


Hello there! Let me start off by apologizing if I have not returned your comments. I'm not ignoring you, I promise. I have been SO busy, and now I have a virus, and I've also had a few other health problems as well. Nothing serious, but I don't feel so hot! So very tired... and my house is starting to look like an episode of "Hoarders!" Ok, admittedly not QUITE that bad! But definitely more cluttered than I'd like. Are you secretly fascinated with that show or totally creeped out by it? I am.... (now, not so SECRETLY) fascinated. But I like to see how people's minds work. Plus, it makes me feel **so much better** about my housekeeping skills! LOL! ;) 

This card was my other PC reject from the last round. No worries about that, I'd love to share it with you guys right now. :) I only told you about that because I used a sketch from the call, it looked kind of like a sunset. I thought the bowling idea was clever, we will have to see if there are any bowling cards from the sketch in the issue. It's quite possible that several folks had the same idea!

A former project Bowling for Birthday Party Invitations has been popular, so I thought you might like this one, too. LOADS of kids have bowling parties, and there really aren't that many papercrafting products out there made specifically for bowling. Trust me, I looked everywhere when I was making those invitations! 

To make the "alley" I started with a rectangle of woodgrain patterned paper. I then cut another rectangle of the same size from veneer paper. I randomly cut the veneer paper into diagonal strips with scissors, so they would meet up where the circle shape was. Then I adhered every other strip onto the patterned paper. The "ball" is just a punched black circle, with three smaller holes punched in a triangle shape. Then, using foam dots I adhered a smaller, darker circle behind the holes. The sentiment is sticker letters. Pretty simple really. You could use the extra veneer paper strips to make a second "alley" for a second card if you wanted to make several for invitations. The other great thing about this card is, it doesn't require a lot of fancy tools. Back to Basics, I like that! 

Well, I hope YOU are not sick, and that instead you are having some fun, crafty time today. Big hugs! :)

Noelle

supply list: DP: American crafts and Authentique; sticker letters: Authentique; punches: EK Success; solid cardstock: SU!; wood veneer sheet. 


Birthday gift card holder (CQC121)


Well, hello hello! This is my card for this week's colourQ challenge 121! Check it out, very rich and earthy toned this week! 
cqc121

Initially, I thought these colors would make a great teacher card, but I am ALWAYS, and I mean ALWAYS out of birthday cards when I need 'em! And, since I make so many cards in a year, I've decided that is RIDICULOUS! I should always have a birthday card (or 10!) on hand. I'd been toying with the idea of a card/gift card holder. So, this is what I came up with...

I made my card, and then made that lower panel with the mustard color punched edge, with no adhesive on the top, to create a pocket to slide the giftcard into. This way, it can be a card and a gift all in one!! I couldn't find a coffee cup stamp when I looked around my stash. I think I **DO** have one somewhere, but it's really small. I used lots of different stamps, and brands of things on this card, it was sort of all over the board! 

This is such a cute latte girl stamp from MFT. Also I had never inked up this awesome mini clear Friends Words stamp I got from my last Spotted Canary prize package for the background, which is heat embossed in white EP on Kraft cardstock. I used and old SU! set called "Wow Flowers" for the birthday sentiment on the right. Though this isn't a very "birthday-ish" birthday card, I think it's really cute and fun for anyone who likes coffee! (like me, or pretty much all of my friends...) ;) 

Well, that's all for me today! Hope you can come play with us at colourQ this week! Would love to see what YOU come up with!! :)

hugs, Noelle

supply list: Stamps: Inkadinkado, MFT, SU!; punches: EK Success & Martha Stewart Crafts; pillow stickers: K&Company; ribbon and solid cardstock: SU!: adhesive button: Pebbles; DP: K&Company

Sunday, January 22, 2012

Happy Birthday, Brady!!!

Hi there! Sorry about the quality of these pics, I am doing a quick post from my iPhone. I just wanted to show you this birthday card I made for my nephew who is just turning one!! Admittedly, this card is a bit busier, and more my typical style than the CAS cards I've been trying lately. This card is all old product, except for that little label. Just a mishmash of things that have been lying around for AGES!! I did use my new build a bingo set from TCP to highlight the "1" on the card.

And that's all folks!! Hope you're having a great weekend! :)

xo, Noelle

Saturday, January 21, 2012

Valentines Banner ("I Love U")


Hi there! Linking this back to the Blog Hop for Valentine's projects at TCP! You can check out the deets here.

Valentine Blog Hop
Not a long post today, but this was a little Valentine's project I'd been wanting to get to for awhile now :). I made a little banner to enhance my Valentine's Decorations yesterday. You might remember the Liberty Banner, and the Lucky Banner that I made last year to hang in this same spot. I did not have a banner die for those 2 projects, so if you don't have a banner die, and would like to make a banner, those are both great posts for that. ;) But you might remember that I recently splurged on the Pennant die, over at TCP, I also used their Heart Trio die on this project. Nothing real "technique-y" about this project, just cut and embellish. LOVE that kinda stuff, don't you? :) Here's some more pics.... 


I used stickers for the letters, but you could always stamp, use die-cuts, or chipboard letters if you're in the market for something similar! I think on all my banners, I've used punched pieces behind the letters to "frame" them. 


I chose the colors: Kraft, Pink, and Red. I thought this would coordinate well with the other decorations I had, and the beige walls/mantel in my home. An interior decorator tip for you: Group like items together that work well in color/style and scale. By creating "vignettes" or displays like this one; you can make your seasonal home decor feel seamless, even if (as in this case) there's not really any other pink or red in the room, since I'm a blues and greens kinda gal! Further questions? Comment here, and I'll get back to ya! Have a stellar day :)

xoxo, Noelle

supply list: dies and Peppermint Divine Twine: The Cat's pajamas; decorative papers: Martha Stewart Crafts; punches: EK Success; border stickers and glass baubles: K&Company; letter stickers: October Afternoon


DUST IT OFF!: If you would like a banner, but don't want to invest in a banner die, please check those previous posts for tips on making fun banners with punches and squares of DP. :) 

Friday, January 20, 2012

Thank you! (PP78)


Hi all! I am SQUEEZING this in under the wire for the gorgeous color combo at Paper Players this week! I really wanted to play this pretty, feminine color combo that LeAnne came up with! Aren't you proud? TWO pink cards in one week?!? I must be feverish or something! ;) 

Here's the pretty palette:

So, I don't think that I ever told you, but I WON the fabulous blog candy at Lynn's blog! I was so tickled! TWO fabulous PaperTrey Ink sets (both not available for sale) and some pretty Maya Road gems that look like crystals, I was even MORE tickled when I get the package yesterday, because I LOVE stamps like this, but for some reason I never buy these floral kinds of sets. I really lean far more towards cutesy/funny and sometimes graphic and text stamps. But then I see all these GORGEOUS cards in the blogosphere with these kinds of stamps & wish I had some! So, I thought I'd make Lynn a little note, to say thanks (Lynn, if you're reading this, sorry the cat's out of the bag, but this will be heading your way, SOON!;) 

I felt the color combo at PP really was the perfect fit for this card. And, since I am challenging myself to go more CAS these days, do you see that 2/3 of this card is only a SINGLE layer?? so pink, **and** CAS? Wow, I know, you're probably thinking you clicked on someone else's blog! ;)


So, I cut my card from Neenah cardstock, I can't remember what the color is called, but ivory-colored is a good description. I scored the card front into thirds. I stamped the bottom panel with the challenge colors and the sentiment in black in the center panel. Then I had to leave for Pilates & mid legwork (gotta love reformer, I'm pretty sure I'll be in a fair amount of agony tomorrow! Thinking of cards takes my mind off the pain! LOL) I was thinking that a dry embossed matted panel on the top, might be really pretty... So when I got home, I did that, and the final touch was a pretty Prima flower. Pretty simple card, really. Would make a good jumping off point for a mass-production cardfest in the future :)

Have a great weekend! 

xoxo, Noelle

supply list: stamps: PTI; cardstock: Neenah & SU!; embossing folder: Cuttlebug; flower: Prima; inkpads: Memento and SU!

DUST IT OFF!: Both that flower and embossing folder have been gathering dust for AWHILE! :) 

Thursday, January 19, 2012

Gimme Some SUGAH! (TCPTUES193)


Hello there! I am linking this back to the Blog Hop for Valentines at TCP!!

I am having a busy week, but had to make a little time to play with this week's TCP Tuesday. I was initially a bit nervous about these colors! You know how pink is not really my thing! ;) But, I figured these colors would work well with my new stamp set from there Gimme Some Sugar. I thought I'd give Sprinkle a little kissing booth, so she could get all the kisses she wants! ;) 

I went a bit more CAS on this card than I tend to. I still am thinking I might need to bling it up a bit! But, I've been trying to rein myself in a little, since I really admire all the GORGEOUS Clean and Simple cards I see out there! Besides, these stamps are SO stinkin' CUTE, you don't really need all the extra!! 

I paper-pieced the bottom part of the stand and the banners. I colored Sprinkle's hat, eyes, and collar with regular markers. I added some Peppermint Divine Twine and a couple buttons to embellish. And, that's all folks! Have a great Friday! BIG hugs :)

Noelle

supply list: stamps and twine: TCP; patterned papers: Stampin Up! and American Crafts; solid cardstock: Neenah and SU!; markers: Zig and SU! 


Tuesday, January 17, 2012

Love me, love my GRAMMA (CQC120)

Hi there! Hope you all are doing well :) It's time for another super-YUMMY color combination at ColourQ!! I am SO in love with these colors! Here is the palette:

cqc120
Do you LOVE this, too? Soooooo pretty! I knew it was not going to be a color combo for the boys pics. But I had been wanting to do a page or two about my sweet Gramma for awhile. My Gramma was such an amazing role model for me. She and my Papa lived down the street when I was growing up, and she watched us when my Mom worked. Now that I am a Mom, I feel so very humbled when I think of all the things they did for me, all the energy they invested in my upbringing. I was/am so very blessed! Here's the 2 page spread:


I found several pics from through the years. The one in the middle on the left page is my Gramma holding me when I was a newborn. :) 
I used a lot of my new goodies from The Cat's Pajamas! LOVE this new die, the Lacy Floral Die. I used it both as a mask for some spray ink, and adding the die-cut peeking out from behind the photo strips. I used the Circus Border CutUp for the trim pieces that I cut from some Rich Razzleberry colored DSP. I thought the Build-A-Bingo set would make cute accents for the pages, since I remember my grandparents playing board games with me for hours as a kid! Yahtzee, checkers, Bingo, Monopoly, Trivial Pursuit, you name it, we played it! :) Here's some more pics:

And here's a couple more shots of each page:


And, since I had everything out already, AND Gramma's birthday is in less than a month:
Well, that is all for me, today! I hope YOU can come join us for these lovely colors this week at the ColourQ! Would love to see what YOU'LL come up with!! Big hugs!!

Noelle

supply list: solid cardstock, ribbon, and inkpads: Stampin' Up!; decorative papers: Creative Memories, Stampin' Up!; stamps and dies: the Cat's Pajamas; spray ink: Tattered Angels/color: Jack Frost; punches: EK Success/Stampin' Up!; felt roses: K&Company; die cut cardstock piece on card: K&Company; faux button on card: Studio 112; scalloped circle die: Spellbinders; lined cardstock: Creative Memories; large decorative aqua gem on first page: Jolee's Parcel; resin flower on card: prima; letter stickers: The Paper Studio; clear gems

DUST IT OFF!: The DPs are really old, as is the ribbon.